FAQ Overview
Introduction
What is osConcert?
Welcome to osConcert
osConcert was originally devised as an Online Visual Reservation Management tool to help ticket sellers manage their seat bookings.
After more than 10 years of gradual development with the help of many passionate users osConcert has become a powerful and affordable online feature packed ticketing software.
Our newest technology combines multiple venues for your Visual Reserved Seating, Box Office P.O.S and also allows you to create unlimited 'General Admission' events. Since September 2021 we now have a 'Design Your Own Seat Plan' feature we call DESIGN MODE...where the Administrator can create objects and allow the Box Office Staff to re-arrange the seats at the Front End.
Creating and integrating your Seatplan Layouts for osConcert is the service we provide. We also undertake more complex and unique set ups for General Admission and Session Time booking systems for osConcert.
We guarantee a perfectly LOADED system. Tampering with the Seat Plan integration is NOT recommended. Our support is fast, free and with over ten years of experience.
OsConcert is an adapted php open source shopping cart software that can be customized by you or your developers.
Be very careful when digging deeper in the settings, take notes of any changes you make that are outside of this guide. If you break the functionality you may need to revert back to the default set up.
This F.A.Q is focusing on getting started with osConcert and explains the sections that your project may require. For more refer to our separate on-line PDF guides. Alternatively Email me gordon@osconcert.com as I AM the User manual.
Contact us for more Technical Developers Support
Especially first time users, PLEASE take your time to read the FAQ carefully. Check the HELP Documents or Email us any questions you may have.
Try to understand and enjoy the simple features that this FAQ explores and we are sure that your business will be a success!
Author: Gordon
Last update: 2021-09-26 11:14
What's New in osConcert Version 9?
This entry is in revision and can not be displayed.Author: Gordon
Last update: 2021-08-31 08:07
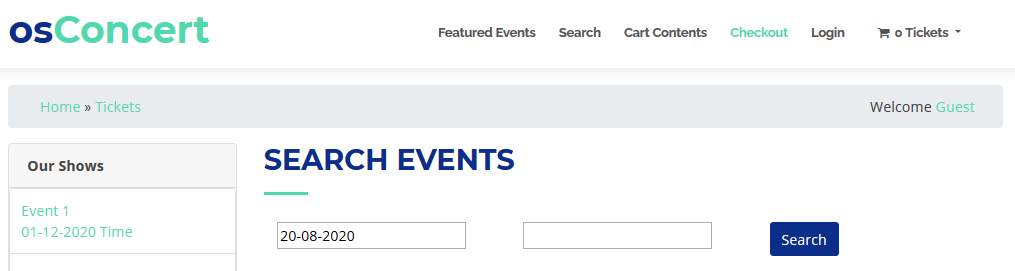
Can you explain the Featured Events?
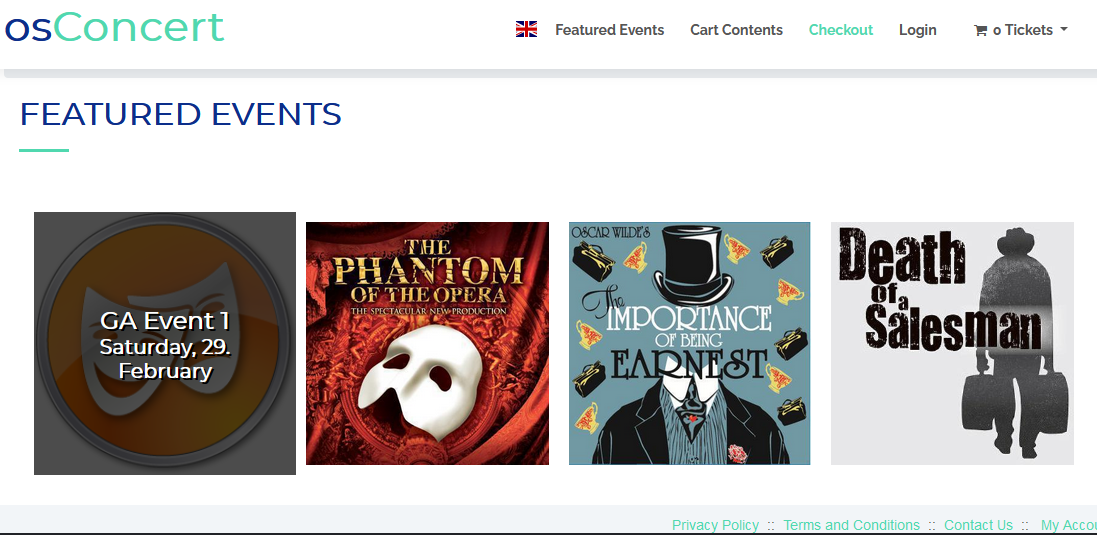
From the perspective of the visitor we have a list of 'Featured' EVENTS (Featured meaning available/active events).
In the default osConcert they will usually be a responsive image grid (with overlay text).
These are direct links to the categories of products that make up the Event Listings.
This is the recommended NAVIGATION for your customers.
For the Administrator these Events are LOADED into the system (as Seat Plans) or created in Admin>Products (as General Admission)
Events are listed in the Admin>Concert Details (JQGrid Plugin)
Here, the Headings, Description, Venue Name, Date and Time can be easily edited.
For each listing there is also a menu for editing prices by colorband.
AFTER each listing is edited it should have a Unique Date ID ...usually in the format of a complete date and time (UK/EU)
E.g 25-11-2021 20:00 (25th November 2021 8pm) (Recommended also for the QR scanning app to recognize the universal datetime)
This Unique Date ID is seen only by the Administrator for reporting purposes)
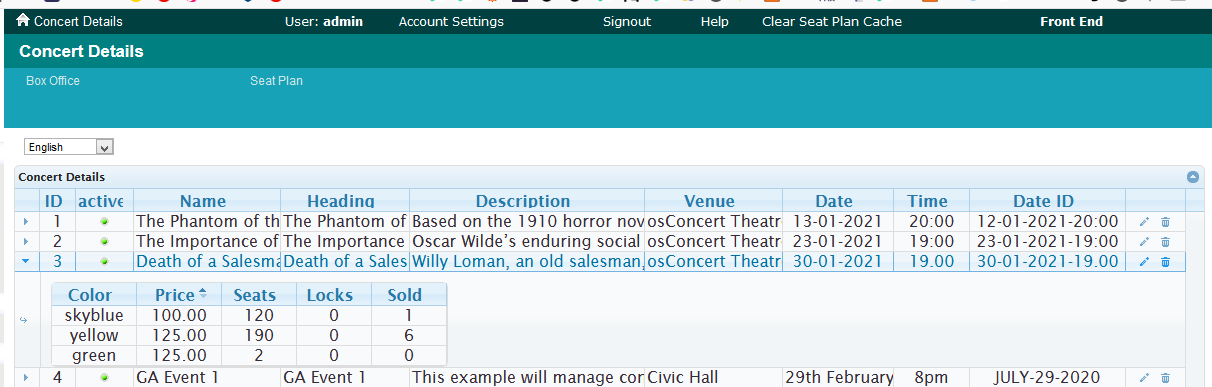
Finally each listing is either Active or De-activated (green or red buttons) Active means that the Event is available at the Front End.
Author: Gordon
Last update: 2020-11-28 06:00
What is NEW in Version 9 for 2021/2022?
This entry is in revision and can not be displayed.Author: Gordon
Last update: 2022-12-16 06:22
How can I block many seats for Social Distancing rules?
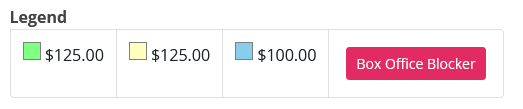
Box Office Blocker
Since 2020 osConcert has a simple way to Block or UnBlock seats in a Reserved Seating application.
Enable Box Office Blocking in Admin>Concert Details>Allow Box Office Blocker='yes'
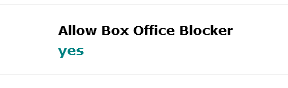
Blocked seats will appear as grey and cannot be selected.
login with a Box Office account and navigate to a Seat Plan
Click the Box Office Blocker button and you will be presented with instruction - Step 1
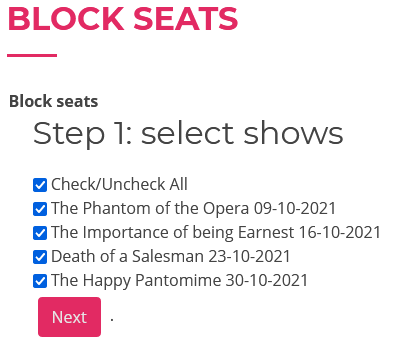
Select Seat Plans of the same kind and click NEXT
You will see your seat plan
start to click seat cells and they will be greyed out (Blocked)
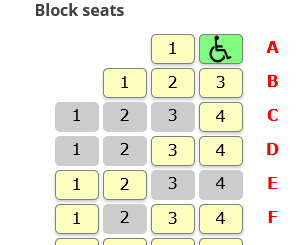
Click them again to Unblock
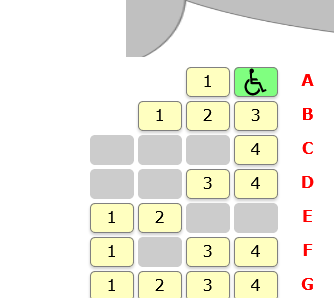
That's it! Exit Box Office and you will see the blocked seats very clearly.
This is an easy way to arrange Social Distancing Seating Requirements.
Author: Gordon
Last update: 2021-07-26 13:47
Can you answer popular questions from prospects?
Ticketers from all over the world have certain requirements. Here is a selection Questions and Answers.
Does osConcert support Multiple Theater User Integration?
We want many Theaters to manage their Events...can osConcert allow multiple users to create and manage their own events?
Absolutely NOT. osConcert was designed only for simple management of events for one organisation only.
Does osConcert support Events without a Reserved Seating requirement?
osConcert supports Reserved Seating Events by arrangement. (Seatplan Integration by osConcert) but also supports Unlimited General Admission Events that can be easily created by the user.
Does osConcert support a fast booking process so that eTickets can be issued immediately?
osConcert uses a Box Office Method, whereby Agents are assigned a special Box Office Account...so as to quickly book tickets through the FRONT END of the software at Point Of Sale. (Bypass existing Credit Card payment)
How does osConcert handle Ticket Cancellation and Ticket Changes?
osConcert is an ORDER based system. Customers order tickets and the system registers the order. Therefore an Administrator has the abilty to DELETE and RESTOCK whole orders. REFUND partially or completely while also RESTOCKING tickets. Changes can be made to orders by ADDING or DELETING to the order in the Administration. Customers have NO abilty to Cancell other than to contact the Store Owner.
Do you give source code to help enhance features for the future?
osConcert is mostly open source PHP and the user can make changes to the code where ever they want. However this may affect the integration of future upgrades and increase the cost of upgrades when osConcert releases a new version update.
osConcert does not work with many API's unless undertaking specific custom projects.
Does osConcert provide Template Guidelines or Specifications to help web developers and designers?
osConcert only issues General Guidlines only but our support is available to answer questions anytime. Basically the osConcert Template is based on the latest Bootstrap 5 Styling as seen at https://www.bootstrapmade.com
Author: Gordon
Last update: 2021-07-28 06:24
We are a Church, how do we get started?
How to set up osConcert with FREE Reservations? (Zero Prices)
You have just received your osConcert with your Church Seat Plan integrated.
So you will have a number of LOADED seat plans ready to activate.
Let's first go to Admin>Concert Details

We want to activate any one of the listings so we open the listing with the right hand pencil icon.
We want a short Name for the Event (Name)...and a long name for the Event (Heading)
We want to set the Event to be ACTIVE = check the active box (active)
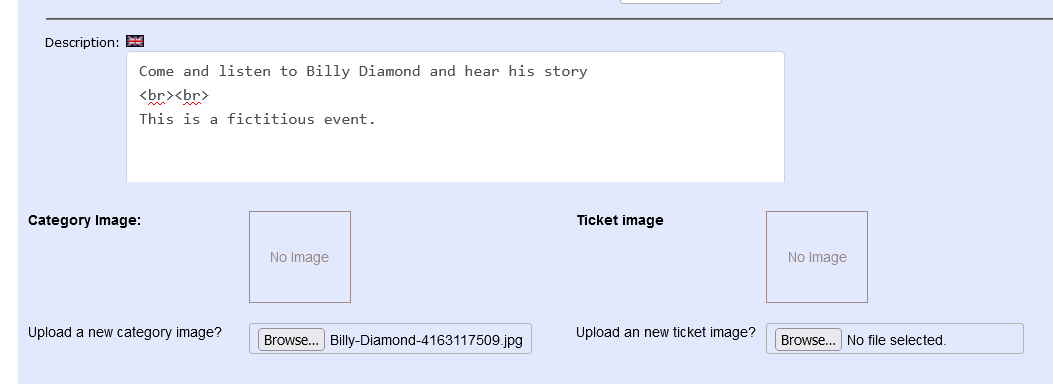
It's optional to have a Description of your event (Description)
You can enter the Name of your Venue e.g St Mary's (Venue)
Next we must choose a DATE from the DatePicker (Date)
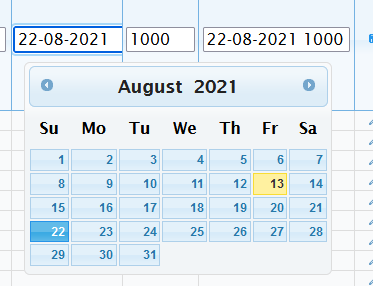
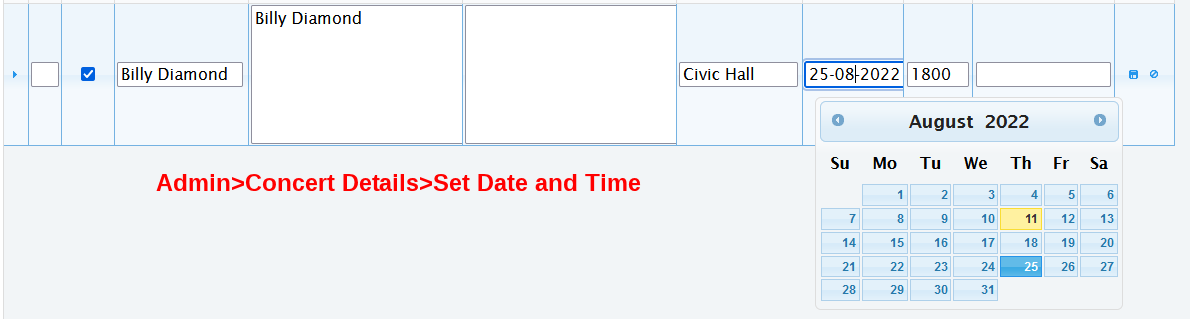
Also write the TIME as 24 hour e.g 1100 (Time) (it will be interpreted a 11am throught the FRONT END)
IMPORTANT: The last field DateID will be automatically set (if the Date ID Auto Fill enabled is enabled as default)
The Date ID gives the Event a unique identification for reporting purposes

With all the fields completed SAVE the listing by closing the inline editor (pencil icon)
If we open again and click the Left Arrow we will see a list of Colors and Prices....since seats are Free Reservations this should be left at 0 (zero) and usually there is only one color band.
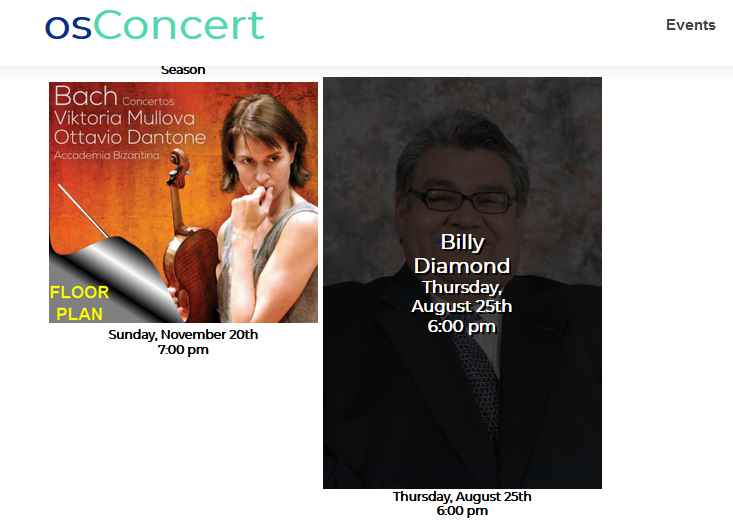
Now if we go to the FRONT END in our browser we should see the Event listed as a Featured Event with the Name, Venue, Date and Time overlaying an image. We can change that background image by going to Admin>Products> edit the category of your created Event and we will see the option to upload a background image.
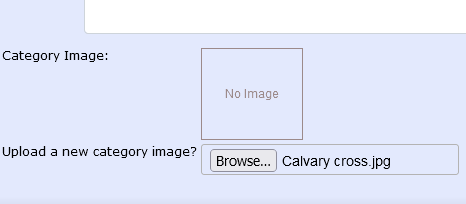
Upload any image and it will be resized to the restriction set in Admin>Shop Settings>Images>Image Upload Width (in pixels)

RESULT:
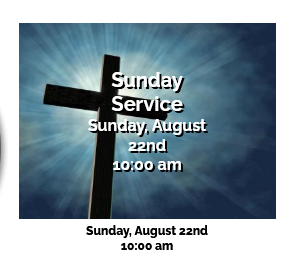
Now with the Event ACTIVE you can announce the Event to your patrons and they can come to the page to select and RESERVE seats at no cost. As osConcert has a REGISTRATION page by default you the Administrator may want to change the conditions of the Sign Up Fields. You can do that in the Admin>Shop Settings>Advanced>Customers to configure and activate your own sign up fields for the FRONT END Create Account Form.
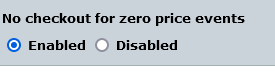
Finally ...we don't really want your customers to see a Payment Page (even if the event is FREE!) so there is a hidden setting at Admin>Products>Advanced>Free Checkout that we should enable so that your customers will go starigh to the CONFIRMATION page when checking out their selected seat RESERVATIONS.
So now we have it so your vistors register/login and RESERVE seats from your Seat Plan. What will you do when the Event has finished and you want to RESET the Seat Plan so that we can use it again?...we will need to RESET all the seats that are unavailable to be available again. We do that by clicking the TRASH ICON in the Admin>Concert Details.
So that we have the abilty to RESET the Reserved Seats to be Available again
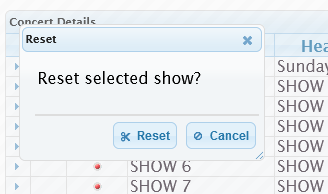
Please NOTE: The RESET option described here will only RESET the seats and NOT the existing Concert Details. They can be overwritten by inline editing anytime.
That's the basics of Set Up and Reset.
There are many other configurations but I hope this tutorial explains how to set up a Free Event.
Author: Gordon
Last update: 2021-08-13 10:52
How easy is it to set up and get started with osConcert?
Very Easy!
osConcert is an open source php software application. (Adapted e-Commerce Shopping Cart Style)
Therefore, it needs to be uploaded to a suitable web-server that is pointing to your own domain name.
Fortunately, it’s pretty easy these days to acquire basic web hosting and manage everything yourself.
Here is a quick overview of what you have to do.
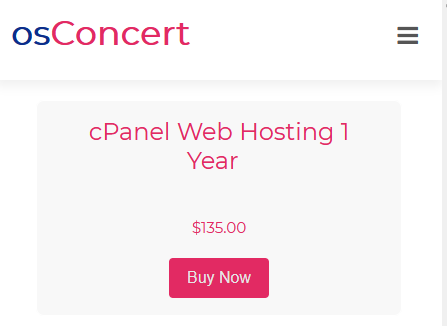
1. Purchase a Domain Name and standard Web Hosting. (for this example is the best idea) You can easily purchase  cPanel Web Hosting from top reliable hosting companies like www.hostgator.com or www.bluehost.com but if you want my support I am a reseller of Hostgator for over 20 years and I can set you up a Web Hosting account for only £100 GBP ($135 USD) per year. (This includes my full support at all times)
You can purchase a suitable domain name from any good Domain Name Company like e.g www.godaddy.com
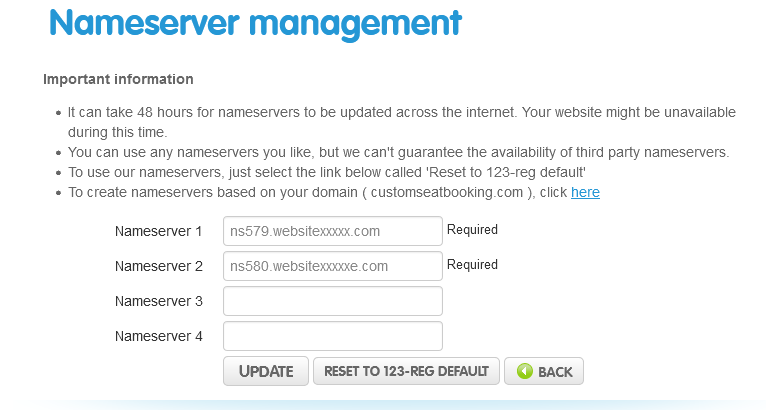
2. Your Domain Name needs to point(connect) to your Web Hosting so you’ll be provided with Name server details when you have purchased your new web hosting account. You simply login to your Domain Registration and look for something like “ Change Name Servers “
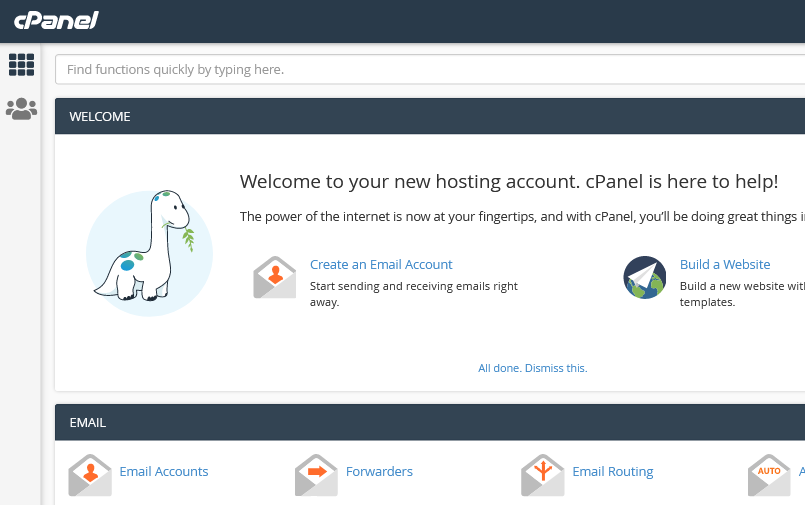
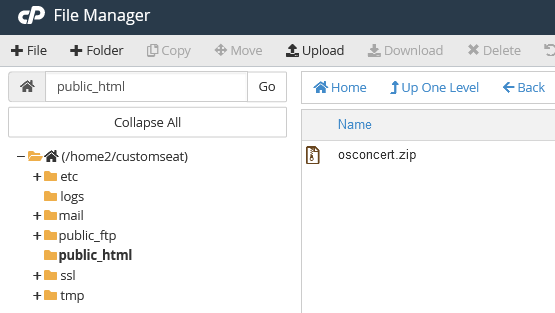
3. Now if you have access to your cPanel and Login to the interface…we can go straight to the File Manager>public_html and upload the zipped version of your osConcert software:
THAT’S IT!..I will give you full instructions for easy for installation or I can install for you.
PURCHASE NOW! Contact me by my personal email: Gordon@osConcert.com or my Skype ID:Gordon.adams4
Author: Gordon
Last update: 2021-08-31 08:09
What is NEW in Version 9_7 for 2022?
This entry is in revision and can not be displayed.Author: Gordon
Last update: 2023-11-11 07:33
How do I correctly set Date and Time in version 9.5?
osConcert Version 9 is simple to set up correctly. Just follow this procedure and you will get it.
Let's first update a setting to make it easier to set a correct DATE ID
A DATE ID is a unique ID required for reporting and scanning features throughout osConcert.
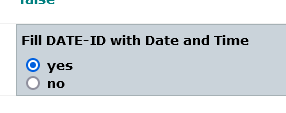
Goto your seat plan settings and set Fill DATE-ID this will create a DATE-ID automatically when you set the Date and Time and Save the listing.
Now we must goto Admin>Concert Details
It's important to set the DATE with the Date Picker and write the 24 hour TIME e.g 2000 (=8:00pm)
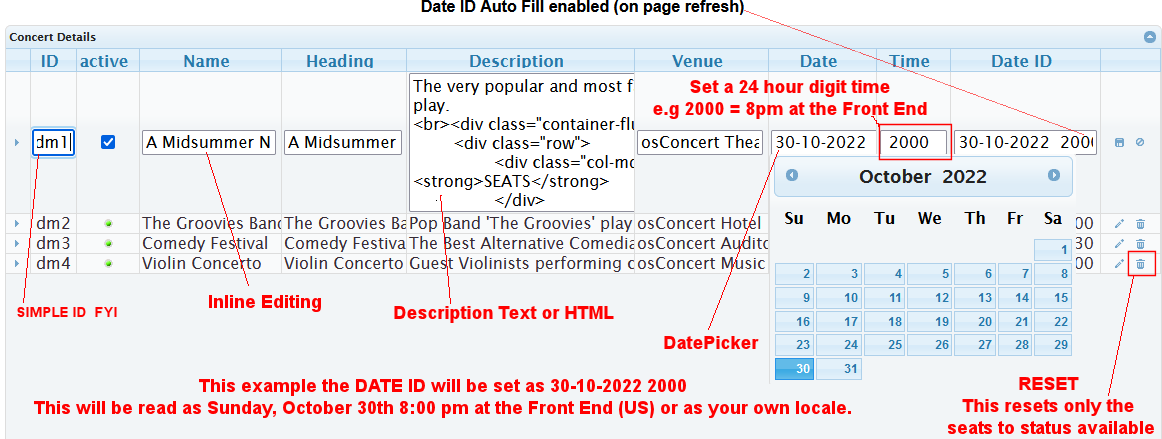
In conclusion setting a date from the datepicker 30-10-2022 and write a time 2000 we will get a DATE ID set automatically as 30-10-2022 2000 and at the Front End the Date and Time will read Sunday, October 30th 8:00pm or whatever way your server locale is set for your country/region.
Author: Gordon
Last update: 2021-12-21 06:35
How to set up the Season Tickets feature?
This entry is in revision and can not be displayed.Author: Gordon
Last update: 2022-08-04 06:35
How to create a General Admission Event in version 9.5?
There have been some slight changes in the latest versions but setting up a General Admission event is much the same as before. You create a category and create products with a quantity. For Concessions you must create your concession products and set a Master Quantity for the residing category.
Admin>Products>New Category
New Product> write the Name ...e.g. Adult Ticket
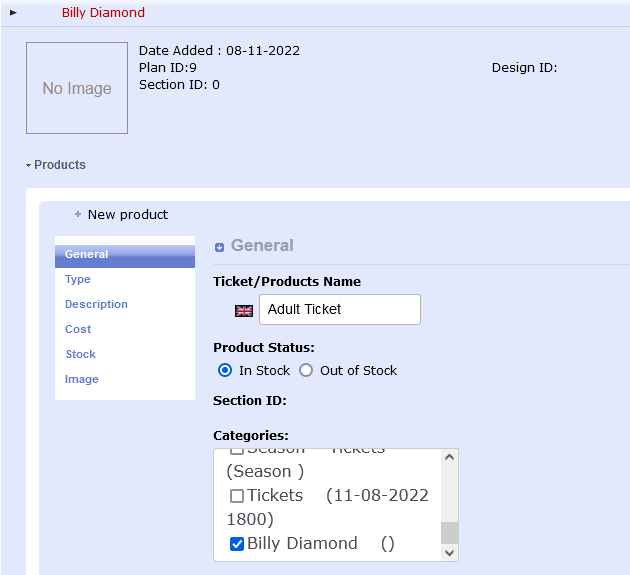
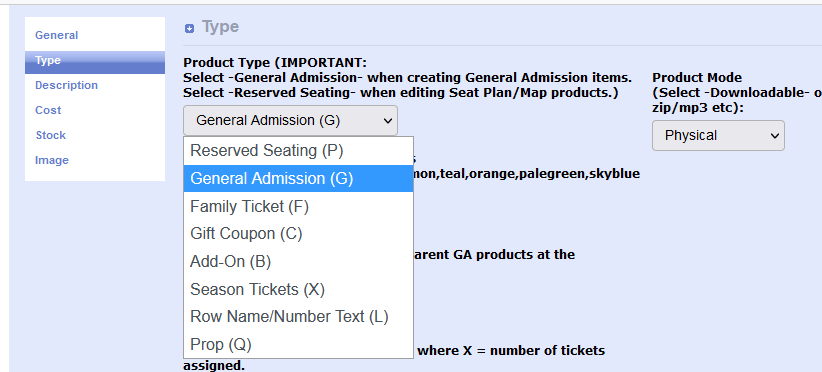
TYPE tab IMPORTANT: choose General Admission from the drop down menu
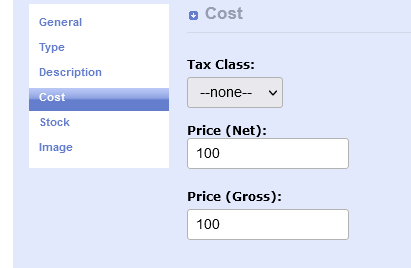
COST tab Insert the price of the ticket
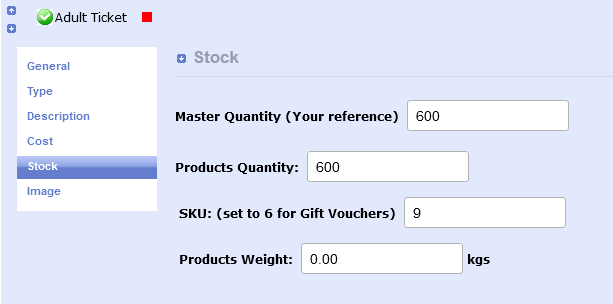
STOCK tab inert the Quantity of tickets
SKU should always be 9 for General Admission
SAVE and Exit by clicking the GREEN SAVE button 
Now go to Admin>Concert Details to set Date and Time
For a complete FAQ guide about setting Concert Details
How do I correctly set Date and Time in version 9.5?
go here
That just about sets the basics for a General Admission Event
Now go back and upload an appropriate image for you event Admin>Products>Edit
Go to the Front End and check everything is as you like it.
NOTES:
Author: Gordon
Last update: 2022-08-11 05:53
How to add a seatplan event?
This entry is in revision and can not be displayed.Author: Gordon
Last update: 2022-09-21 04:05
How to enable Gift Vouchers for purchase and redemption?
It's now possible to allow your customers to purchase Gift Voucher/Coupons at a price they determine above $1.
They will recieve an eTicket as a GIFT VOUCHER with a generated coupon code that can be transferred but used only once for purchases at your store.
Here's how to set up a GIFT VOUCHER within your Administration
In Admin>Products create a General Admission category for your Gift Coupon product
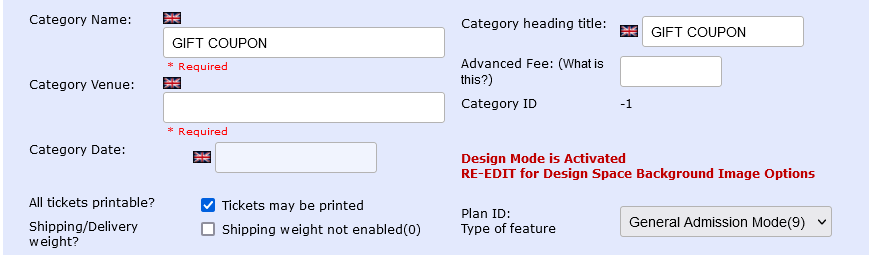
Save it and create a product

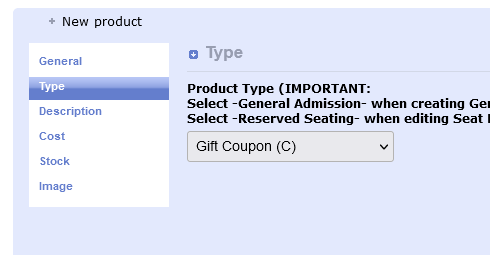
If yours is version 9.7 in the TYPE tab set C: Gift Coupon (for older versions select General)
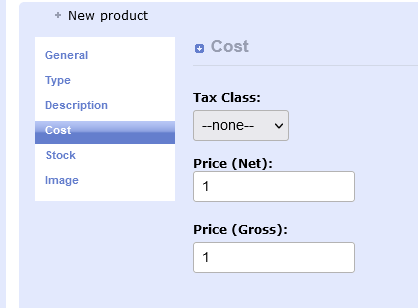
In tab COST set price=1
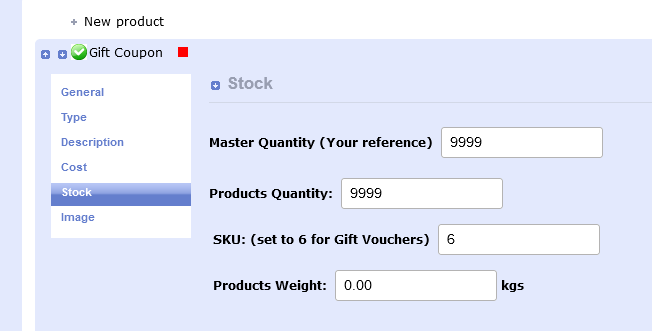
Create an unlimited stock or if you have a limite set it here as quantity.
IMPORTANT: Now set SKU = 6. This is a specific setting for Gift Vouchers
Save the product and go to the front end. You should see the product like this.
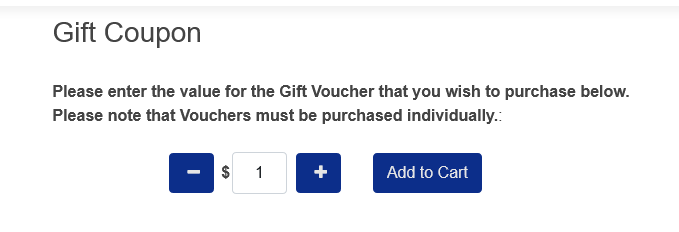
Don't forget to give the product an image and the category an image in the usual way.
Follow the instructions for setting up coupons for order totals in this FAQ
Now when a customer wants to purchase a GIFT VOUCHER they can set thier own price and purchase through your payment system just like buying a normal event ticket.
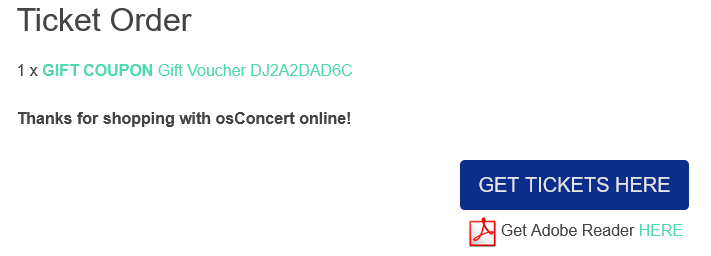
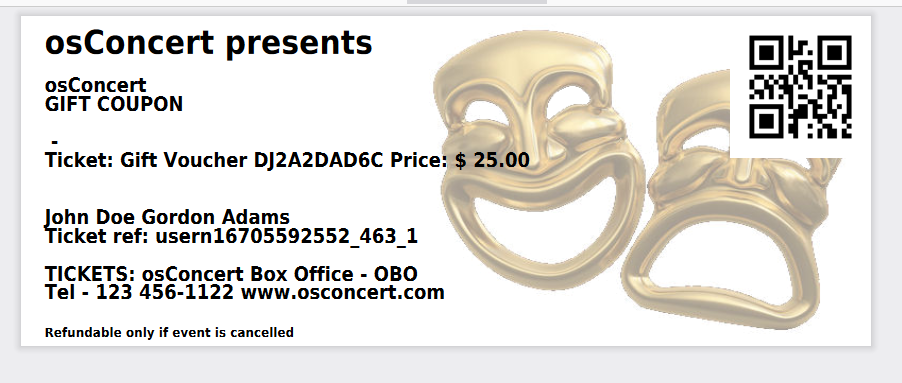
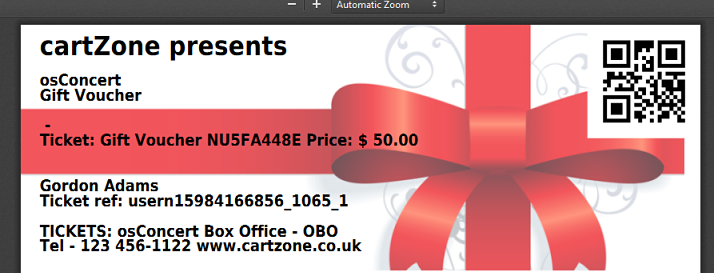
The customer will see the eTicket PDF and the Gift Code will be presented on the printable ticket/coupon. Now the recipient of the coupon code will be able to use it at your store just like any other coupons that are provided by you for discounts. They simple redeem the code at the checkout payment.
Author: Gordon
Last update: 2022-12-09 05:22
test
This entry is in revision and can not be displayed.Author: Gordon
Last update: 2022-12-16 07:03
What is NEW in osConcert Version 9 for 2023
Version 9 is compatible for servers up to PHP 7.4.30 (non-strict)
2021/22
Updated Templates and Editing
A complete overhaul of the Front End Template Design. Now it's much easier to import a Professional Bootstrap 5 Template Design.
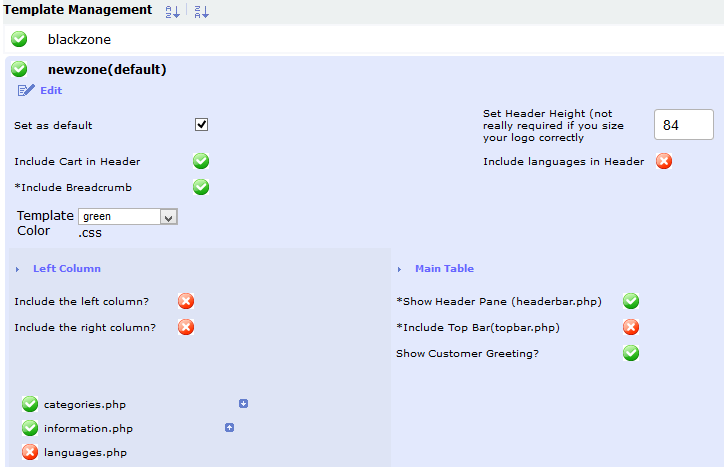
In the Admin>Shop Settings>Templates there are 3 templates ..each with color themes.
Open up the Template Edit and there are more options. e.g now we can REMOVE the Left Column entirely or we can enable a HeaderBar (with Carousel) or enable a Right Column (Blog Style)
DatePicker for easier Date set up in Concert Details including optional Expiry by Date (and Time).
Now users can simply select a DATE for the Event.
The DATE will be recorded as a UNIX timestamp in the TABLE 'categories'
This will be useful for Event/Session Expiry (if enabled) = Admin>Products>Advanced>Category Products>Allow Category DATE Expiry
The DATE field does not have to be from the DatePicker it can be in TEXT format like before.
Furthermore ...the Date ID can be set to create automatically as Date+Time (if enabled) Admin>Concert Details>Seat Plan>Fill DATE-ID with Date and Time

Featured Events and Search By Date options in the Front End
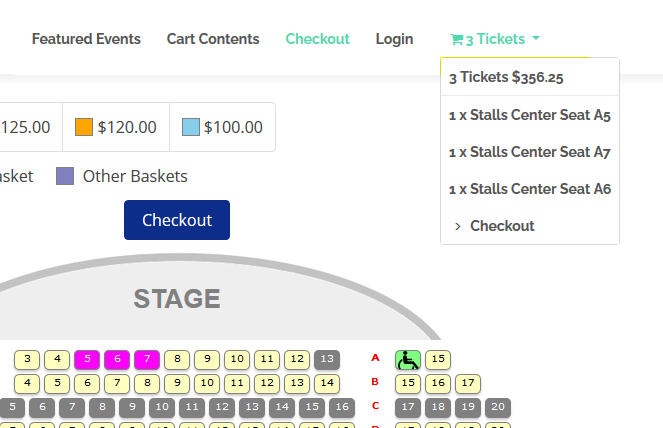
New Shopping Basket in Header Menu
Away with the old scrolling cart in the left column, ..we now have a simple version to allow for Full One Page Design
Box Office Blocker
A NEW Feature to help the Box Office Staff to simply BLOCK seats with just one lick of the mouse
READ MY PDF Instruction: https://www.osconcert.com/BoxOfficeMultiBlocker.pdf

Updated Administration with optional Help Messages
More attaractive and organized Admin.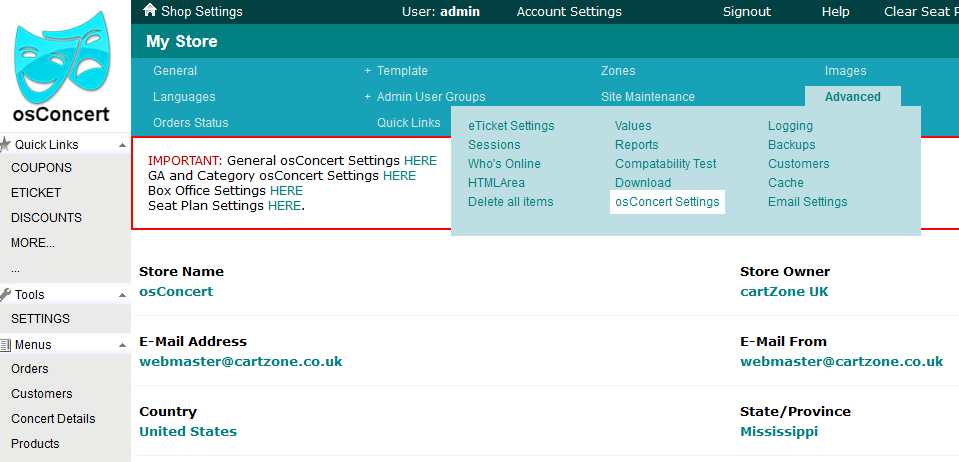
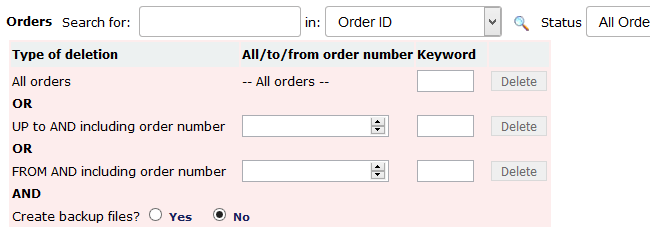
New Delete Multiple Orders
We have updated the 'Delete All Orders' feature. Now we can partially delete old orders between selected order numbers.
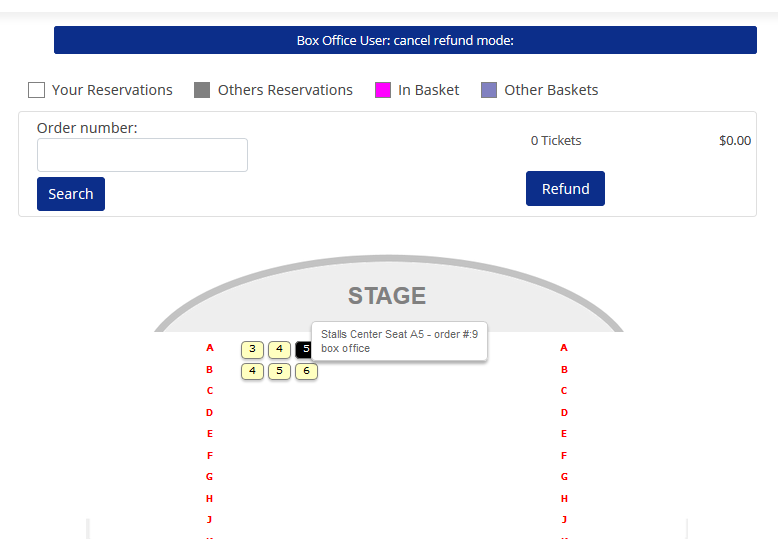
Box Office Refund
Improved Box Office Refund, search the order and the seat visually for a simple refund process.(Reserved Seating Only)
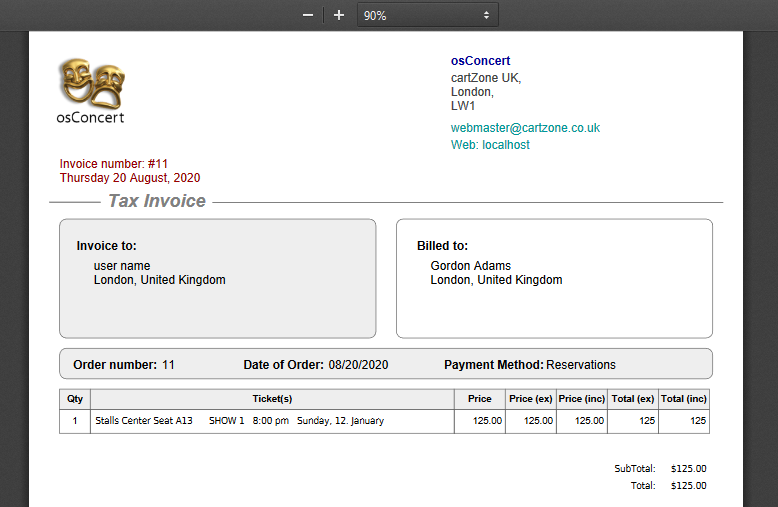
PDF Invoices in Admin and Front End
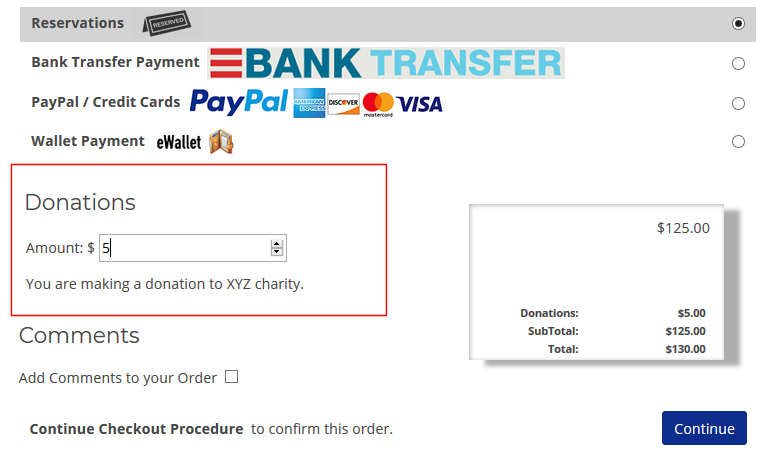
Donation Module option checkout.
Season Tickets
Allow your customers to buy a bunch of tickets so that they can redeem them from their account throughout the season whenever they wish
 .
.
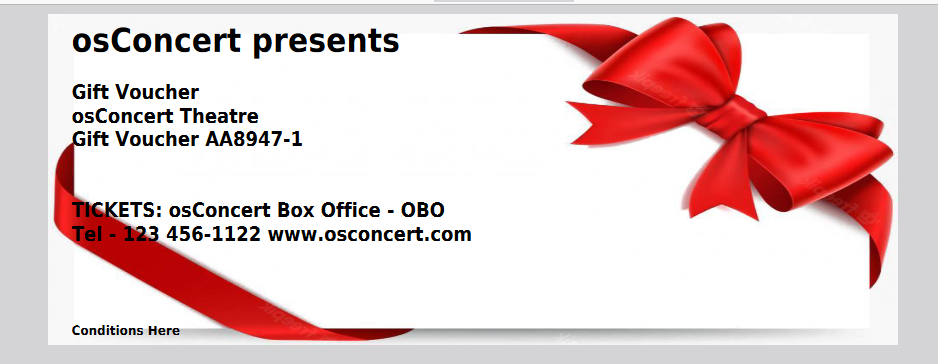
Gift Voucher
Customers can purchase a GIFT VOUCHER for your ticket shop at any price they choose and send it to friends.
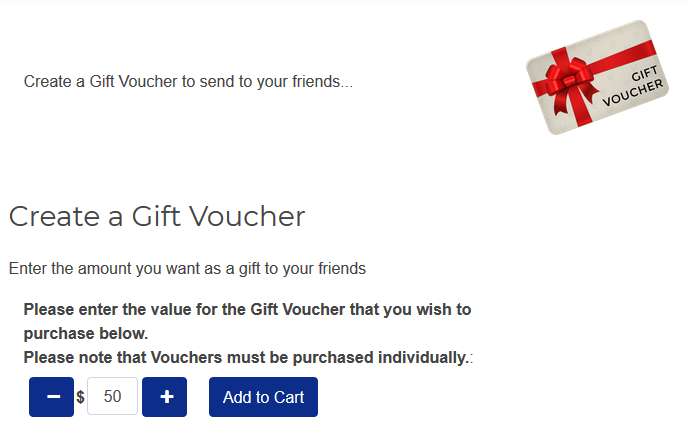
Gift Vouchers can be designed and sent to friends as PDF or just send the CODE
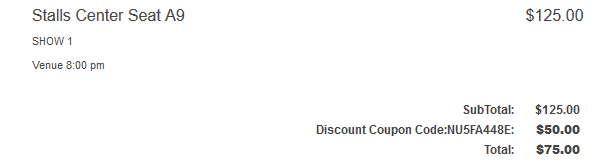
Gift Voucher Codes can be redeemed at the checkout just like any other COUPON code if the Coupon Discount is enabled.
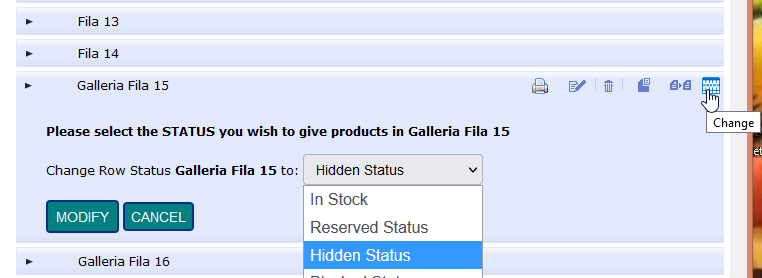
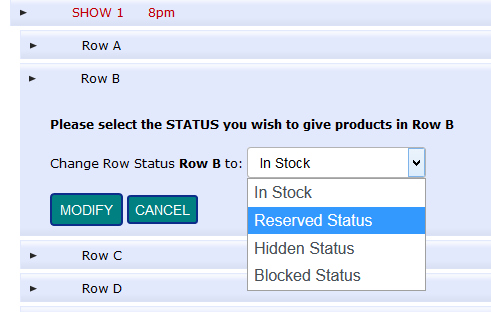
Row Status Settings
EASILY Set whole ROWS (categories) out of stock, hidden, in-stock or more options
(NEW!...now added Blocked Status.)
RESULT: out of stock.

Optional Navigation Tabs
Especially for Calendar Projects and Cinema. Enable Date Tabs

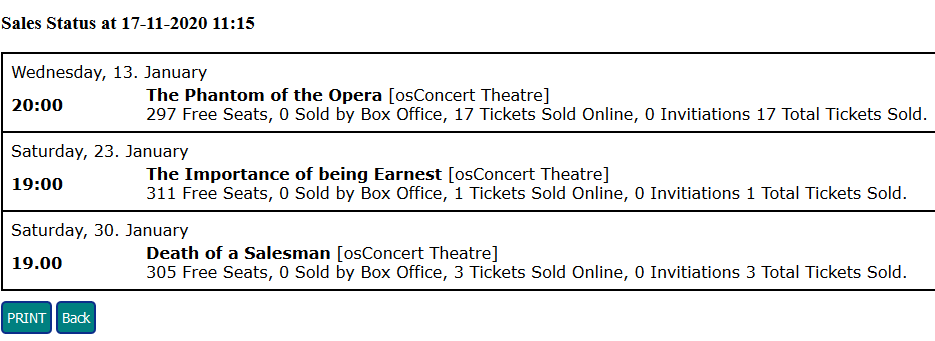
New Active Event Report
Print a quick overview of sales of only ACTIVE events (must be from the datepicker)
ONLY works when Event Dates are set by the DatePicker
Paypal Update
Paypal has been updated to the API version
This means you get your KEYS from the Development Site https://developer.paypal.com/developer

Customer Export

Updated Data Suite
What I call the data suite is a built in CRUD albeit restricted to prevent deletion and editing in most places.
It's the data direct from the Database Tables.
Example. Orders Data Only ...ideal to export and print recent Customer Order Data for Marketing.
This default setting will present Orders Data: (all data for this example is purely fictiicious)
The Administrator can Select, Search and Export Order Data
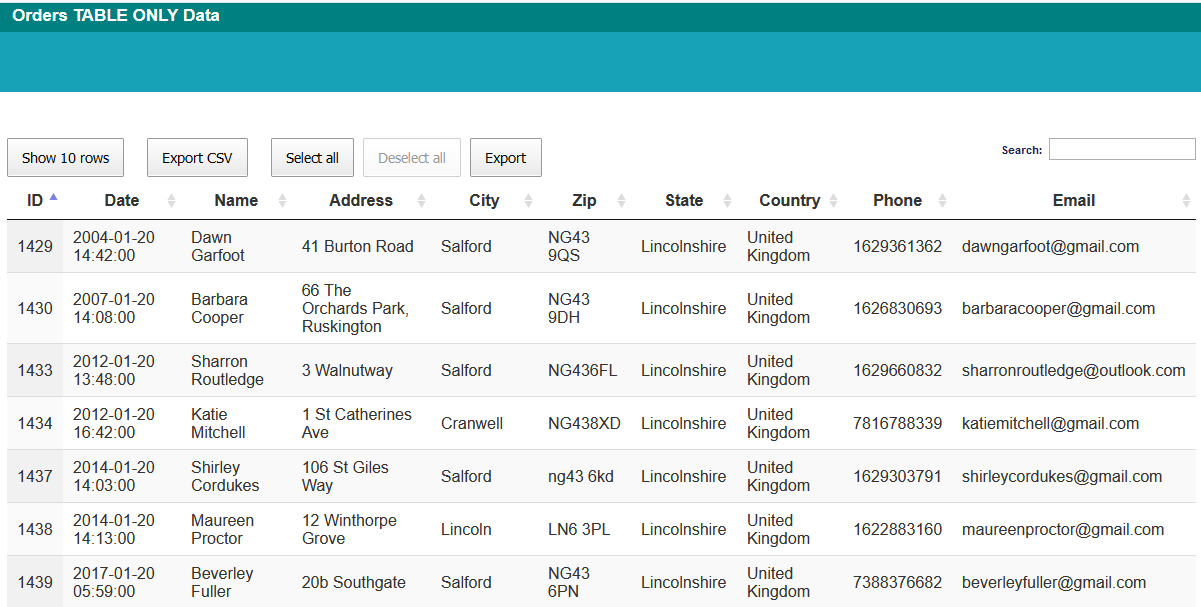
Other Table Data available: Products, Products Data Only, Orders Barcode
Custom Data Tables are available if requested for a small task fee.
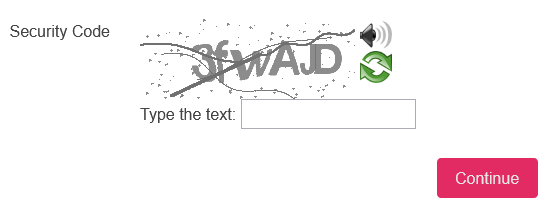
Updated CAPTCHA (Security Code) at Sign Up Form
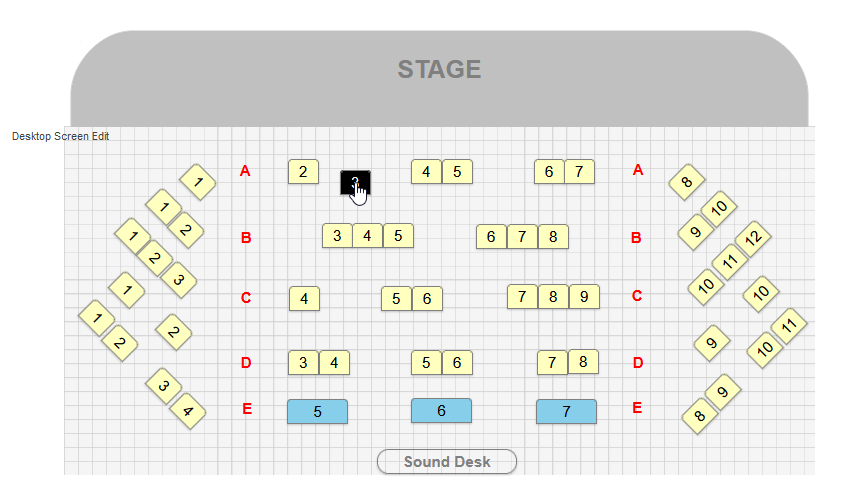
Box Office Designer (Design Mode)
New Feature as of August 2021 ,,,now integrated into osConcert v9.5
Administrator can create category>select Design Mode and create objects
Seats, Text/Numbers and Props
When the Administrator sets permission for the Box Office Agents they can edit from the Front End
Box Office can drag the objects around the Design Space ...where they stop is where they saty and the design is commited to the database immediately.
That's it! Prices can be set as usual by the Administrator. Box Office only can move the objects.
TRY THE DEMONSTRATION HERE
READ THE FULL FAQ HERE
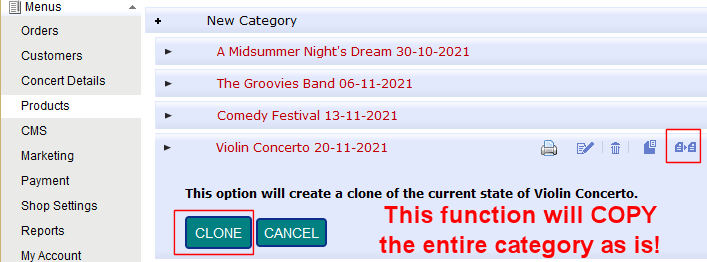
Clone Category Function
Admin>Products
Mostly for the benefit of the users Creating and Designing Reserved Seating for small events, we now have a CLONE button to copy categories. The button will clone an existing category as is! so make sure it is reset before you do. (Later we will update our Delete Category button)
Lots more Configurations.....
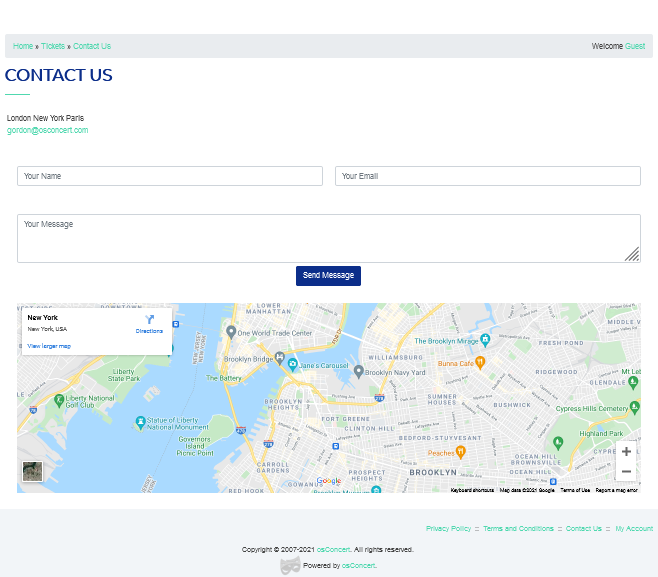
Improved Contact Us page with Map URL (google)
including the option to enable Homepage Contact Form at the foot of the page
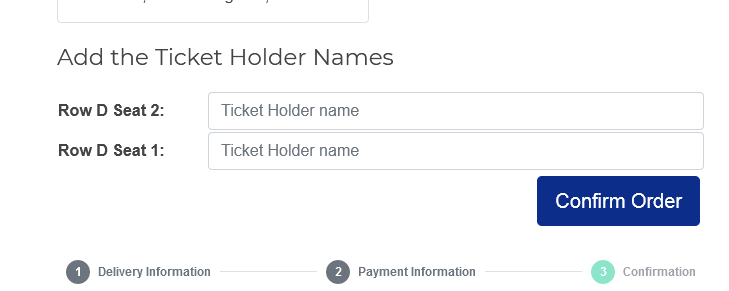
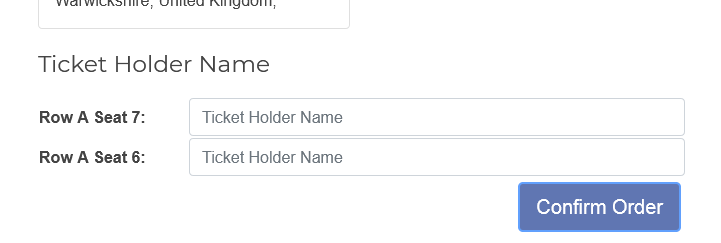
Abilty for customers or box office to add ticket holder names at checkout (optional)
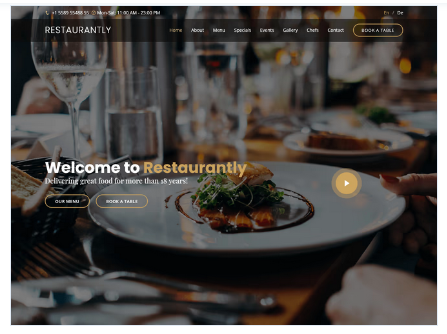
Now we can integrate amazing responsive Bootstrap 5 templates like this one: (ask for demonstration)
https://bootstrapmade.com/restaurantly-restaurant-template/

Google ReCaptcha for the osConcert Contact Form
reCAPTCHA v3 helps you detect abusive traffic on your website without user interaction. Instead of showing a CAPTCHA challenge, reCAPTCHA v3 returns a score so you can choose the most appropriate action for your website.
https://www.google.com/recaptcha/about/
Simply get your keys from your google account
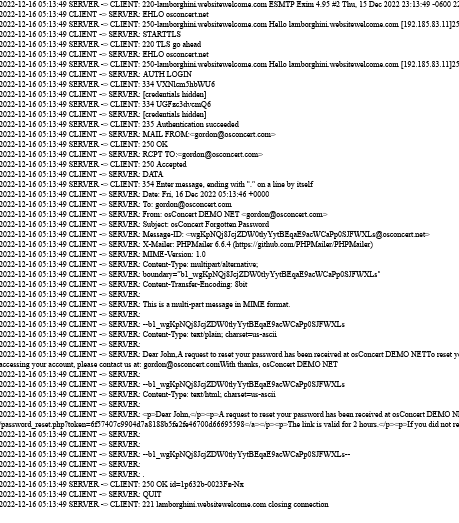
Added SMTP Debug
For when you have enabled SMTP settings in the Email Settings. This helps debug the sending of emails via the PHPMailer class plugin. DEBUG set at 2 will tell you if your SMTP is sending or not.
Updated and Improved Security and Payment Options
Update Paypal IPN to API version.
Update StripePay to StripePay SCA (Strong Authentication)
Database Suite for direct editing of the Categories and Products
MailerLite Newsletter
Updated SMPT phpMailer Plugin
More Configuration for eTickets
PURCHASE and DOWNLOAD now!
Author: Gordon
Last update: 2022-12-16 07:12
What do we need to know about TAX?
This entry is in revision and can not be displayed.Author: Gordon
Last update: 2023-02-09 15:06
Whats new in osConcert 9.8 for PHP8.1.12?
osConcert is a PHP software application and recently the server side language has been updated for all servers from PHP7 to PHP8. PHP8 is a stricter, more secure and faster version for 2023 and beyond.
PHP is a server side scripting language that is embedded in HTML
In order for my users to successfully continue enjoying the benefits of a self hosted seat booking software, I have spent may weeks preparing a new version of osConcert hopefully void of any PHP8 bugs.
There are hundreds of file changes and very little database changes...so you are advised to order the new version as a zip file download or buy my Annual Support Fee if you want me to re-integrate your seat plan files and any custom coding you may have. eTicket templates will be affected as ticket template placeholders have been changed from %%Concert Date%% to [[Concert date]]
New Feature: Ticket Refund Coupon Replacement for the Administrator
What this means is the Administrator can easily replace existing ticket orders with a GIFT VOUCHER code and in the same page SEND the customer an updated order with GIFT VOUCHER(s) attached.
This is very handy if there has been a SHOW cancellation and you would like to offer your customers a replacement ticket instead of issuing a money refund.
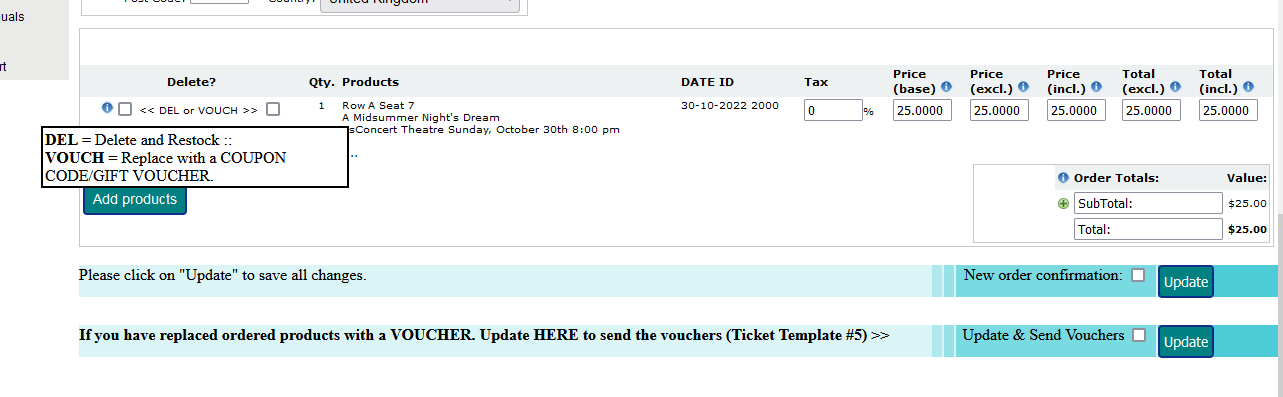
In Admin>Orders>Edit Selecting the VOUCH checkbox and updaing the order will destroy the original eTicket and create a unique coupon code that is valid for one year ONLY for the use of the customer of the original order.
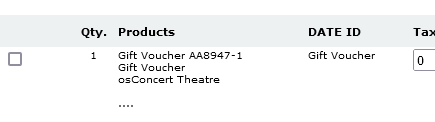
There will be a default Gift Voucher Template
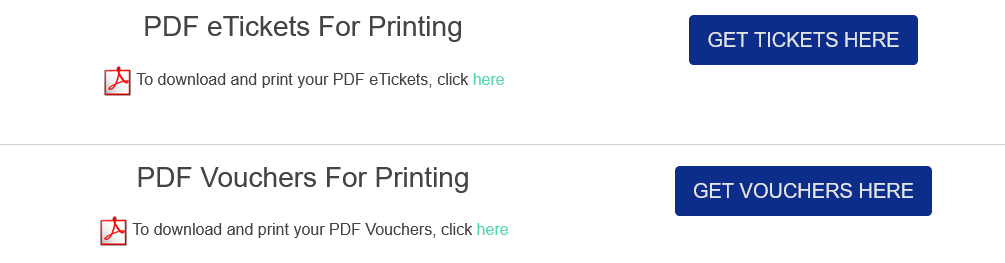
The Administrator has the ability to print the Vouchers within the Admin>Orders>Edit page and the customer also can access the tickets from their front end account:
Setting are in Admin>Payment>Voucher Default
If you have an existing Gift Vucher product, enter the Product ID here

New Feature: Product Reminder
For version 9.8 we have a simple feature that will allow the user to add a REMINDER product (or products) at the shopping cart page, the payment method page and the checkout confirmation page.
The administrator can choose which pages they would like to show the reminder and there will be a place to input Product ID's. There is also a place to edit the REMINDER text for the customer to read.
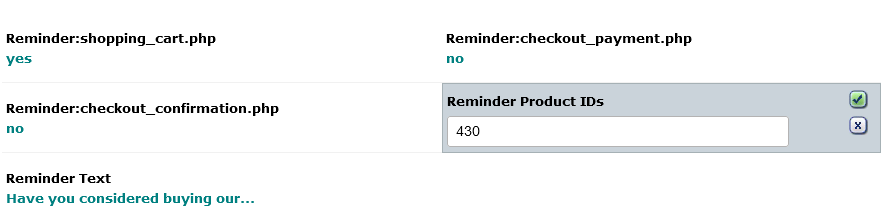
For example....perhaps you have an Event Programme you want to sell or some refreshments for the interval?
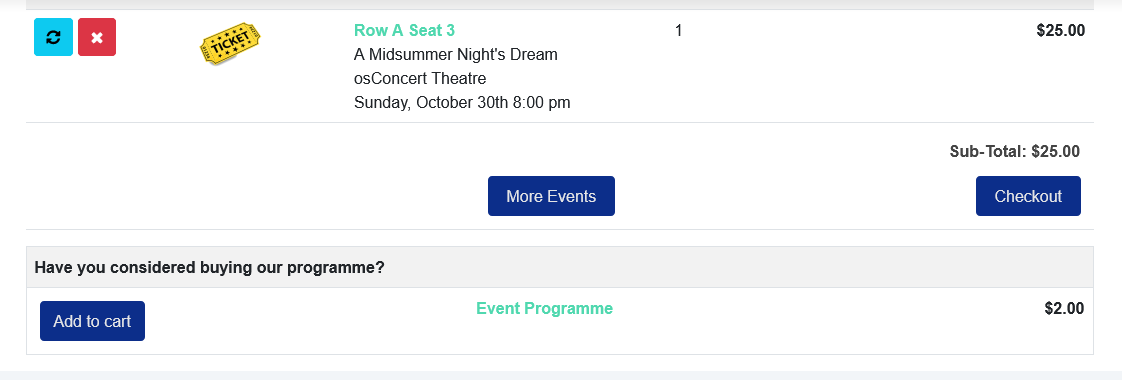
It's a simple nudge for the customers at checkout.
Author: Gordon
Last update: 2023-03-12 10:48
How to create discounts for the seat plan tickets?
If you want to offer a reduced price for your seat plan tickets rather than the full ticket price.
We have a feature called SaleMaker
Salemaker allows the user to create a special discount and when enabled the visitorcan choose the discount that suits them. For instance if we set a discount for Students for example...we can set a 20% reduction and insist that the Student Must Provide Proof of ID when the customer arrives at the door of the event.
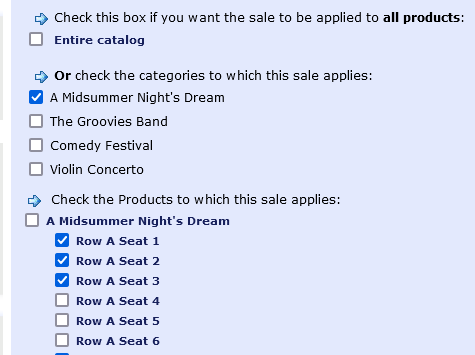
We can apply this discount to All Categories or Specific Categories and we can create multiple types of Discounts.
To set up a Seat Plan Discount goto Admin>Products>Discount
Click > New Sale and follow the guide below to set up your first discount for the entire catalog
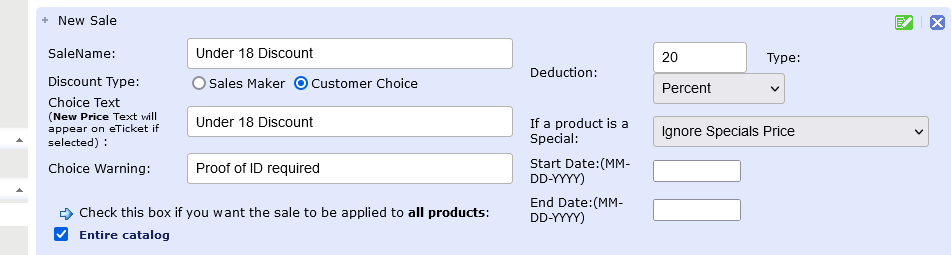
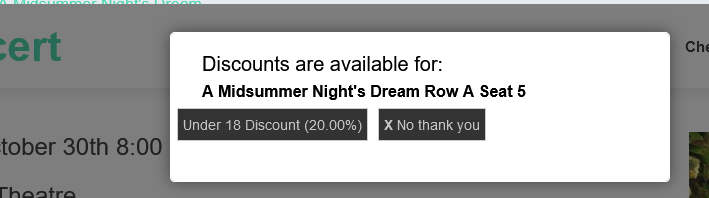
When you save this set up and goto the your seat plan at the front end ....the visitor will see a Pop Up like this screesnhot below and the discount will be applied to the shopping cart unless the custome clicks the No Thank You button.
Thats the very basic and recommended set up.
If you want to apply discounts to specific categories then you must UNCHECK the Entire catalog and check the categories to which this sale applies and then proceed to uncheck the categories that you DO NOT want the discount to be applied to.
Author: Gordon
Last update: 2023-09-11 04:58
What's new in osConcert Version 9.9?
If you didn't already know osConcert was upgraded for PHP8.1+ servers in Version 9.8
Click here to read about that
Version 9.9 is reserved for user upgrades, seat plan integrations and PRO Package users.
Now for 2024 I have my new version 9.9 I will be listing the improvements here in this FAQ
Updated Expiry feature....Now Global Event Expiry
Some users want to have an automated expiry of shows...in the older version there was a way to expire shows but it was too complicated to use....so I have simplified it for version 9.9
Many users wanted their events to expire a few hours or a maybe 30 minutes BEFORE the show start because they could then sell tickets at the door. Some users want shows to expire a few hours AFTER the show start. The show start is of course the Date & Time that is set in the Admin Concert Details as DATE ID.
I decided to make it easier and allow the Administrator to select one expiry setting for all events.
Now the expiry setting is a Global Expiry Difference in Admin>Marketing
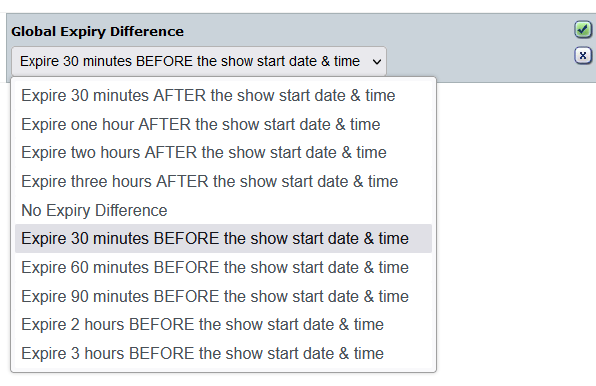
Simply put ....if you choose Global Event Expiry as 30 Minutes BEFORE the show start & time ALL YOUR EVENTS will be disabled 30 minutes BEFORE your Event DATE ID's that you set in Admin>Concert Details
New improved Bootstrap 5.3 Templates with multiple color themes.
Yes..I have worked hard and learned a lot from my work developing my Dynamic Bootstrap Showcase Website database template system. Now I have an almost perfect responsive adjustable front end template system for osConcert.
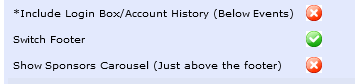
Now apart from a professional default template in Light or Dark.....there are options for Static Hero, Fullscreen Hero and Fullscreen Video Background Hero and a Carousel Hero (Bootstrap Hero is the first Front Page Feature that a visitor will see when visting your default website)
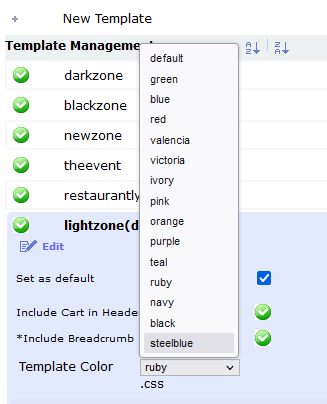
Also there is an image slider for your Sponsor Logos at the footer...that will be very useful for users.
For a demonstration of my new updated template system visit my main Reserved Seating DEMO at my website...there you can try the Color Switcher
Now there is also a footer switch basic or more interesting for the 2 new templates Lightzone and Darkzone
Furthermore an improvment for the Newsletter Subscription Button now with a link to your Email Service Landing Page
Other improvements
Email debug: There is a setting in Admin>Emil Settings where you can DEBUG your SMTP service...a setting = 2 will show you a page of trace information about the email authentication and send details.
New Payment Sales CSV Report: Download a CSV report with an emphasis on sales made by different Payment Methods including Booking Fees and Tax
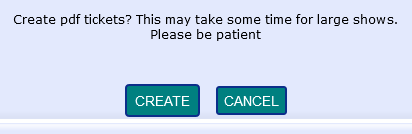
Fixed Create PDF tickets: One click and create basic PDF eTickets for any category...useful if you want to print the tickets that you didn't sell online.
New INFORMATION about seats blocked manually
BEFORE:
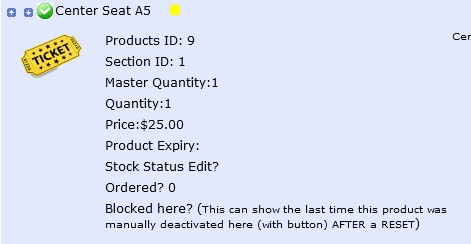
AFTER:
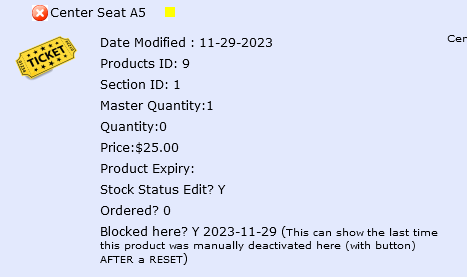
Now there are clues if there is ever any confusion about seats blocked or restocked
Here you can check details about specific seats and if they were blocked manually by staff or not.
UPDATED Design Mode
Now your Seat Plans can work with Left Column or Right Column enabled.
Add to cart is correctly disabled when in Box Office Design Mode.
UPDATED Seat Plan Cloning.
Now integrated Seat Plans large and small can be cloned correctly only for versions 9.9 and usually after an upgrade as your old seat plans will need to be updated. (Section ID must be perfect in all 5 category and product database tables)
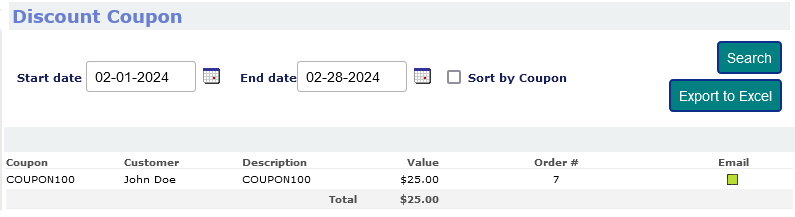
Improved Coupon Discount Usage Report
UPDATED templates
Your seat plans made with Design Mode can now handle Left Column setting.
Now users can enable the Left/Right Columns for blog style and seat plans will collapse as expected on all devices.
Before Design Mode was only functional in full page mode.
NOTE: It is still recommended you build your seat plan in full page mode. After completion then try with Left Column enabled. (Some seat plans won't look that good with Left Column enabled)
If there are further features and imrovements I will add them here through 2024.
UPGRADE HERE
Author: Gordon
Last update: 2024-03-26 02:02
How to build your own seat plan?
UPDATED February 2024
In all versions there is osConcert Design Mode
This means you are able to utilize the osConcert Seat Plan Technology for your very own seat plan creations.
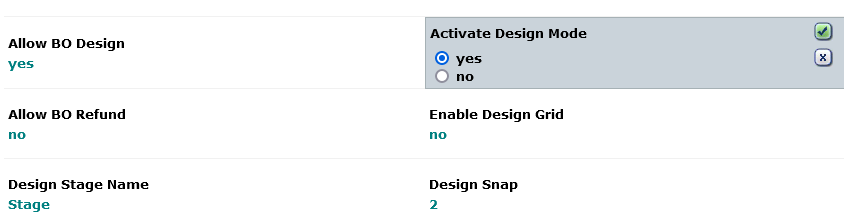
To start creating seat plans in Design Mode we must first access the Administration as Top Administrator. Then we should activate the Design Mode in Admin>Concert Details>Box Office
PLEASE ALSO DISABLE 'Seat Plan Cache'
Admin>Concert Details>Seat Plan>Seat Plan Cache
and Clear Seat Plan Cache Admin>Clear Seat Plan Cache
or we will have problems with the pages we are trying to build.
Set Activate Design Mode = yes AND Allow BO Design = yes
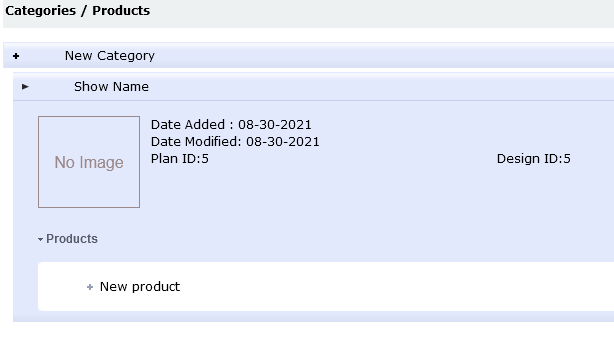
The first action you will want to do is create a New Show Category for your seat plan.
The Top Administrator must create the products, the text and the props so that a Front End Box Office account can eventually move the objects in the Design Space...effectively designing the seat plan.
IMPORTANT NOTE: All products created for the Design Space will be relative to each other. This means if you delete any this will most probable affect the position of some or all of the objects. Therefore take this into consideration when designing the seat plan.
Products that you don't want to be seen should be hidden (Admin>Alternative Categories Edit>HIDE)
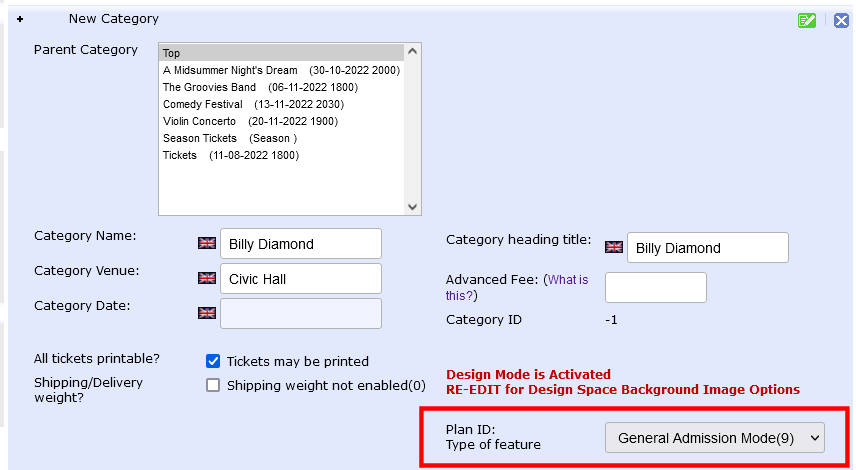
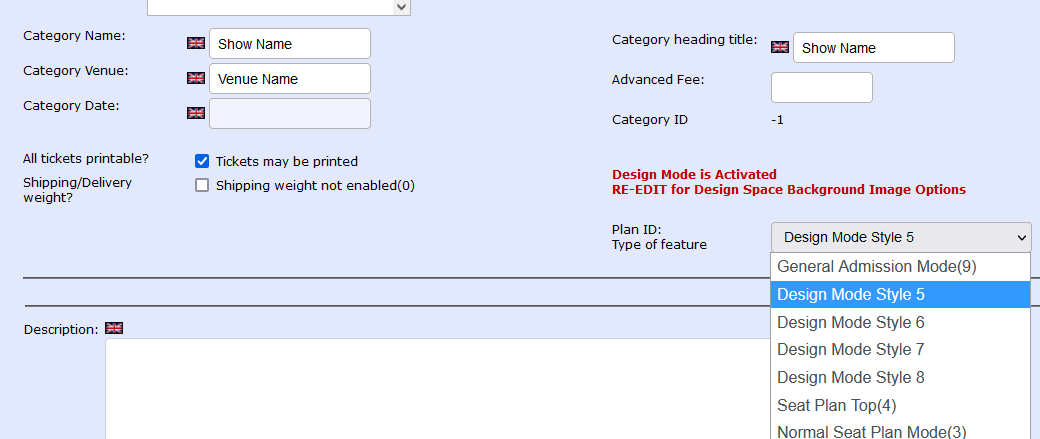
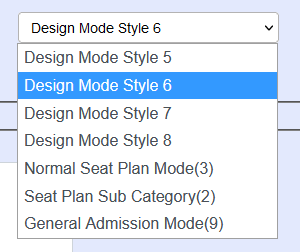
Goto Admin>Products and create the Show Category just like if it were a General Admission Event. For the Type of feature select a Design Style e.g Design Mode Style 5...this represents a standard stylesheet that will dictate the shape and styles of our objects on the Front End. There will be 4 styles to choose from and they can be easily adjusted by accessing the file with a html text editor.
EACH OF MY 4 DEFAULT DEMONTRATIONS USES A DIFFERENT STYLESHEET
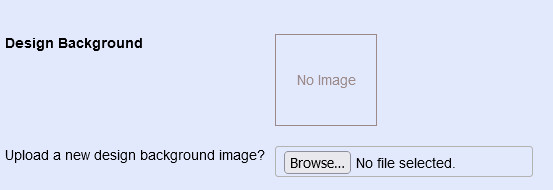
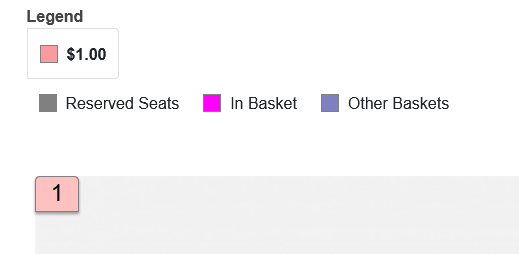
Now before we create Seat Products we can upload a backgound image for the design space. This could be a guide image like your own complete seat plan as an jpg image. This would make it easier for the designer at the front end to easily arrange the seats in the correct place.
Furthermore .....we should adjust the Design Space relative to the full width default=1100px
EXAMPLE
So I guess if your image width is 960w / 576h pixels the ratio required will need an image height of 660 pixels
You can enter the height of your image in the new field :
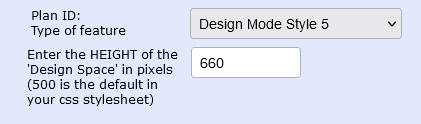
Now your image will keep a good ratio (1100w / 660h) when collapsing for devices in responsive mode.
Let's start adding Seat Products
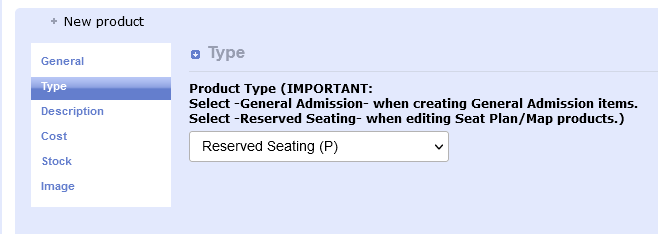
Create your first product. Let's make a Seat product and call it Seat 1
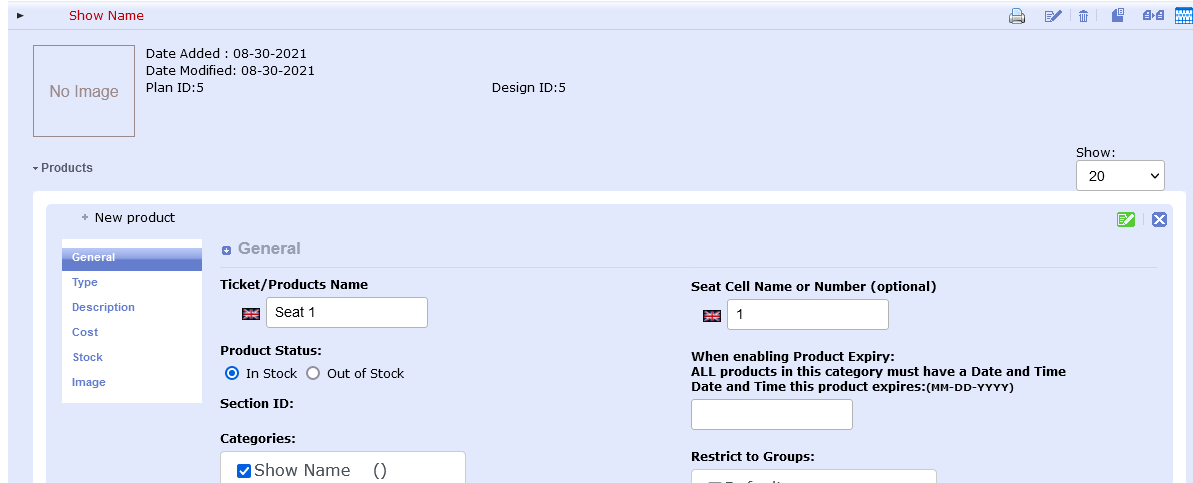
In the TYPE TAB.....let's make sure we select Product Type= Reserved Seating (P). That means the product is a seat product which has a price, color band, stock=1 ....we can adjust these things later, ...for now IGNORE COST AND STOCK let's just create lot's of seats with their names and numbers.
(it's possible to also upload a Ticket Image for your checkout process in the IMAGE tab)
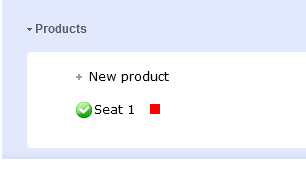
Make sure you click the SAVE button and we have our first product.
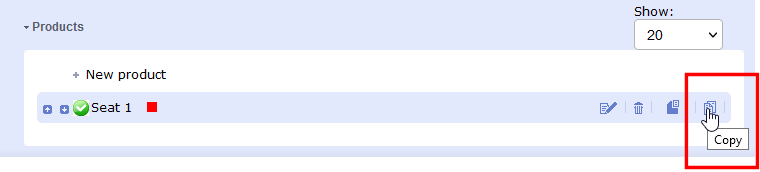
If we want more products the easiest way is to use the COPY function and copy as many as we need. For this tutorial we will copy our first product and then edit and rename it as Seat 2. We will then explore the results at the Front End.
There are ways to create numerous products if you use database imports....but for novices, the COPY function takes only a few seconds per seat......you can have a hundred seats in no time if you set your mind to it. I know some feel this is hard work.....but every seat needs a name and number and only YOU know what you want. I don't have an AI version yet.
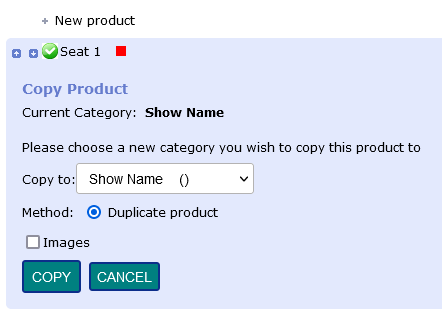
Choose duplicate product and click COPY. (also check images if you plan to have a Ticket Image)

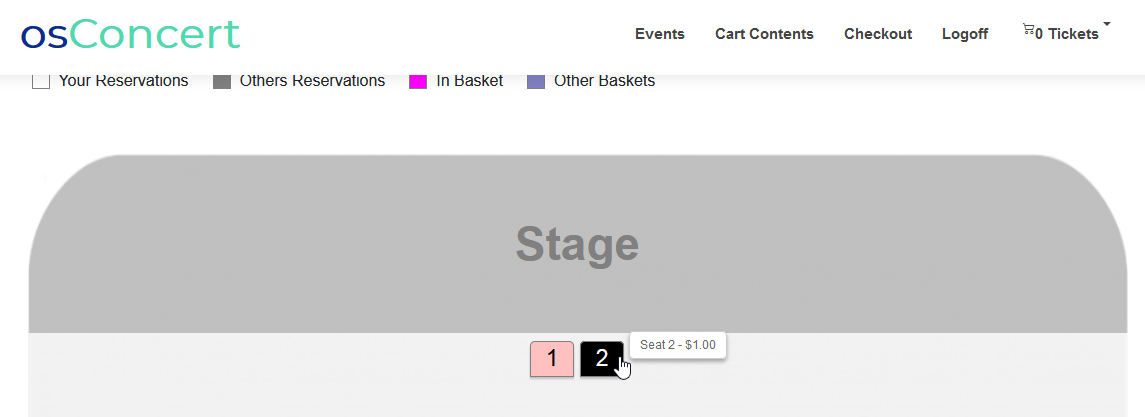
Now we have 2 products ready for this tutorial. Let's go to the Front End and take a look at what we have got.
We see the default Design Background and the products loaded at the Top Left of the design space.
When we login as Box Office we can drag the seats from the stack and place them wherever we like in the Design Space.
But first let's go back to the Administration because for this tutorial I want ot have a Stage Label and because I didn't upload a stage image it remains default = none.
Open the Show Category for edit and scroll down and we will see options to upload images for the category. We want to upload an image for the Stage ...so will upload the image below:

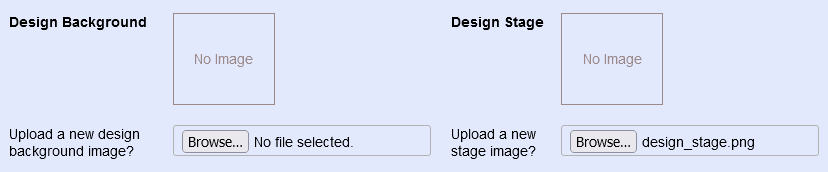
I have a default stage image from the outset but for now you are able to upload your own image or the default image provided in the osconcert/images folder.
 Upload and Click the SAVE button as usual.
Now let's go back to the Front End and view the stage image.

Now we should login with our Box Office account because only Box Office Staff have the right to move objects in the Design Space
Goto the osConcert Login:
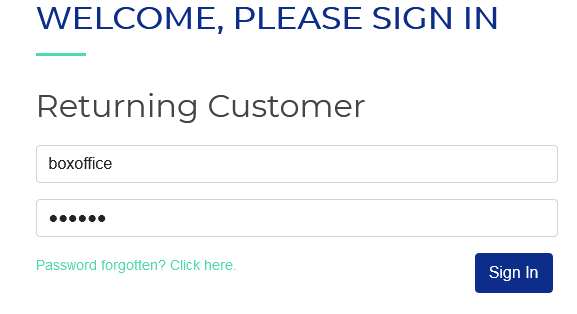
Now go back to the Show category on the Front End and click the blue "click to Redesign Seating" button
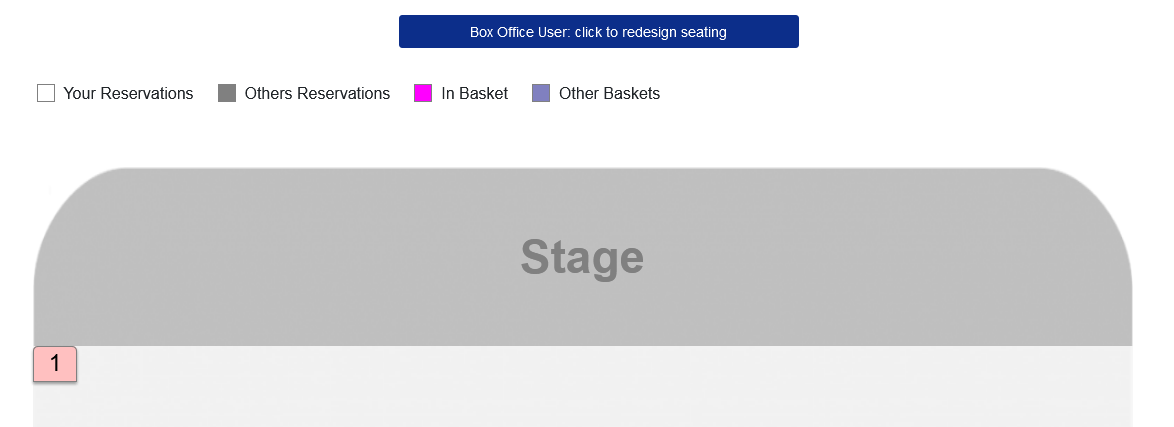
Now you should see a Design GRID (default is 50 pixels but it could be 10px or 100px )
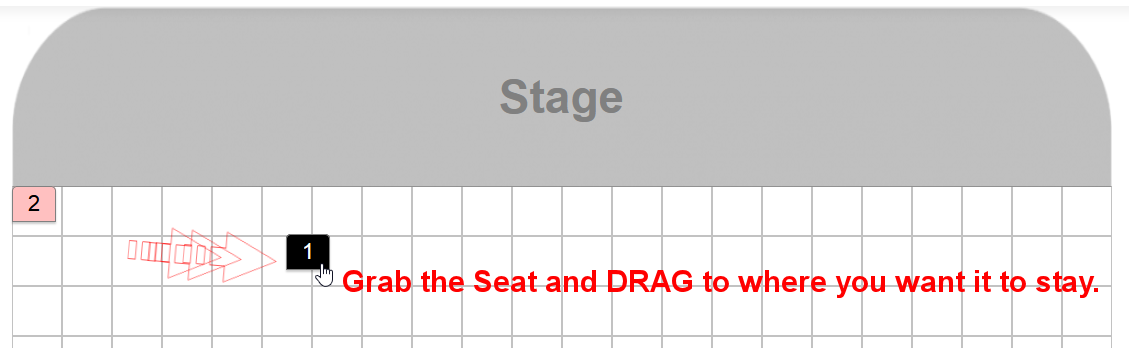
Grab the products with your Left Click>Mouse and DRAG them around the Design Space ...where they stop will be recorded in the database until you decide to mode them again. Only Box Office has this access.
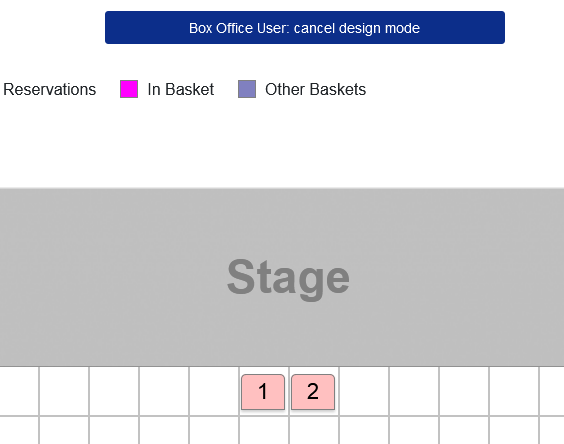
Now you can Cancel the Design Mode and Logout from your Box Office Account and the products will be ready for the Booking Process. make sure as Administrator the Concert Details are set as usual for your event and the Prices are set per Color Band of course.
To this point ...that is the very basics of creating products and designing the seat plan arrangement of the chairs. Next we will create Text e.g Row Letters and Props e.g Sound Desk
Creating Text and Props
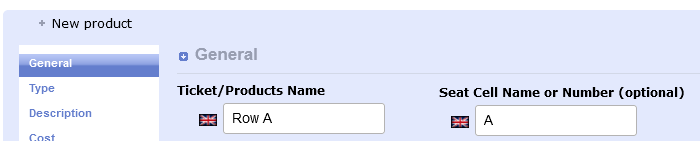
When we have Rows of Reserved Seating ...it would be a helpful to show the Row name e.g Row A for seats in row A :)
Simply create a New Product.... Name it 'Row A' and number it as 'A'...then we should choose the Row Name/Number Text in the Type Tab and SAVE
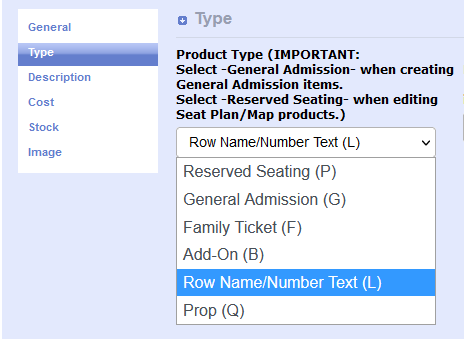
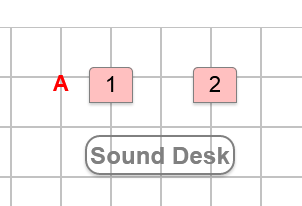
That's it! Go to the Front End Design Mode and you should be able to 'drag' it into place.

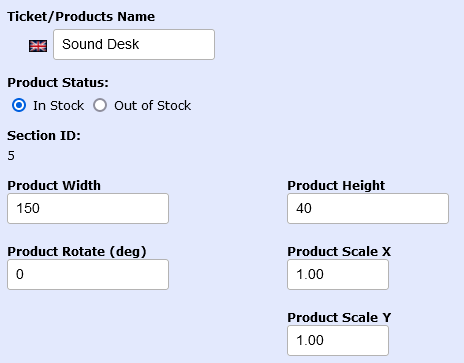
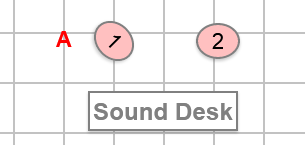
For something like a Sound Desk prop ...follow the same procedure but choose Prop from the TYpe Tab drop down menu.
Now we will need to give the object a width in pixels and maybe enlarge it a little
For this example I write Sound Desk ....width=150 pixels height 40 pixels and Scale +1 and SAVE the product!
Rotating objects
What if we want to rotate an object e,g 45 degrees
Just edit the product and add 45 to the Rotate Input. (or PASTE -45 into the input field for the opposite angle)

Styles and stylesheets
NOTE: Basic styling is saved in specific css stylesheets in templates/newzone/assets/css/
seatplan5.css
seatplan6.css
seatplan7.css
seatplan8.css
When you edit your category you can choose another of the 4 stylesheets
If you are familar with css styles you can edit the master stylesheets and create something really special.
Seatplan 6 has a basic circle as seats.
That's the very basics of the Design Mode....obviously for more complex creations it will become an art.
Perhaps some users will surprise me :)
Author: Gordon
Last update: 2024-02-24 09:02
What do we need to know about our outgoing emails to Customers and Box Office?
The osConcert Email Settings will be found in Admin>Shop Settings>Advanced>Email Settings
There will be a choice......you use your basic server Sendmail (nothing to do)
or you can create a SMTP account in your server email section and complete the SMTP settings according to the guidance from your server support
You will need:
SMTP: Server URL
SMTP: Username
SMTP: Password
SMTP: Access port (usually 587)
Enable DEBUG=2 if you need to see a complete readout of the email output in your browser
I typical way will be to set DEBUG and use the Password Forgotten page to send yourself an email.
If you have problems ...you can contact me for advice (gordon@osconcert.com)
We use the world famous phpMailer and it works well...but osConcert has no control after emails are sent from the system. Please advise your customers about ways they can retrieve their eTickets if they say they did not receive emails. Usually they are to be found in Junk Mail Boxes or some emails are just unreliable like yahoo/hotmail and even gmail. I use a fastmail.com account which is far superior to gmail.
osConcert recommends using the customer account system so that customers have the ability to login to their account to view and retrieve order conformations including the eTicket download.
There are some configurations you'll need to know...and I will try to address them in this guide.
Let me just highlight the DEFAULT settings.
- NOTE: All emails send will have the reply address you set in the Admin>Shop Settings>Email from:

- All emails will send to the customers preferred account address they entered at sign up
- Adminstrator has the option of receiving all copies of all successful customer purchase confirmations:

- Box Office agents can be sent email confirmations if the Box Office Setting below is in favour.

A setting = yes will stop Box Office Users receiving confirmations to their box office email address
- Box Office agents can initiate email confrmations on behalf of their customers using the Change Address Box Office Billing Address page

So the setting above means we are NOT HIDING the Customer Billing Address and so ....if the customers email address for the Billing form is set=true (it is true by default)

Admin>Quick Configuration Links>Customer Details
The above conditions will send an email confirmation on behalf of the Box Office agent to the customers email they have entered in thier Billing Address Form
IMPORTANT: All email confirmations will receive email attachements if the payment status = Delivered (successful payment) AND......where the eTicket settings are set like below

Author: Gordon
Last update: 2024-05-05 09:41
Installation
How do we install osConcert?
We recommend a full https installation and that will require your domain has a SSL certificate installed. Don't worry osConcert installs perfectly fine without SSL.
[SEPT 2-23] osConcert is tested on php8.1.16 and MySQL 5.7 usually on Linux (LAMP) or Windows machines.
osConcert is installable in most popular servers and is delivered by 62mb zip file.
Just like WordPress or Joomla or any other php application we must extract the zip file, rename the 'osconcert' folder and run in the browser address bar to start the installation routine.
- A common example of installation is through the popular cPanel hosting.
- Simply Upload the Zip file through the File Manager to the Directory or Sub Domain you prefer or in the 'root'.
- Extract the zip files and Rename the folder e.g tickets/
- Go to your browser e.g www.yourdomain.com/tickets (yourdomain.tickets.com) and start the installation routine.
You will need to Create a database with User/Name/Password before you begin as the osConcert installation requires this information.
IMPORTANT! Please name your own Administration directory (default = admin)...to something more unique and difficult to find by others.
During the process the installation data will be uploaded to your new database and you will have the option to install the osconcert_data (Seat Plan Imports).
For full https installation make sure you have this version at the outset.
Finally the process will ask for an Email and Password for the Administration Login ...make sure the password is strong and you take a note of this information. osConcert will not email you this information.
Later when you login to the Administration you will have the ability to change the login data.
DOWNLOAD PDF: https://www.osconcert.com/installation.pdf
The latest PDF Installation Instructions are downloadable here: New osConcert Installation Guide 2020/21
Author: Gordon
Last update: 2023-09-03 15:06
Getting Started
Is there a Quick Start Guide?
Yes! ..after installation here is the a list of the important steps you'll need to attend to immediately.
1. Shop Settings - Admin>Shop Settings
Add the name of your store, email, address and especially select the correct Timezone from the drop down menu.
2. Admin Account - Admin>My Account
Make sure to set a strong alpha/numeric password for your Administor access. Other Administrators can be processed at Admin>Shop Settings>Admin User groups
3. Template Settings - Admin>Shop Settings>Template
At the time of writing there are only 3 available templates, Dark , Light and TheEvent based on Bootstrap 5 styling.
Choose one template and open to edit.
There are options to enable Left Column with InfoBoxes, however osConcert recommends staying with a full page design with NO columns.
There are also options to choose a theme color from a drop down menu.
The default template has a Header Carousel enabled ...you may disable that by clicking buttons Headerbar from green to red. Other options are self explanatory.
4. Create your 'Sign Up' form - Admin>Shop Settings>Advanced>Customers
Enable and edit the Form Fields you require. Click the red button to green. Do not disable the Country/State fields.
5. Email Templates - Admin>Marketing
Each Template listed can be edited and you own personal email response can be entered. IMPORTANT each template has a Subject Line and Reply Email Address. You may want to add your own Subject and Email or they will remain my defaults.
You will find the Email receipt in Marketing>Email template>Product Sale and Product Sent the latter is the template fired when a New Order Confimation is sent from Admin>orders.
6. Set a Payment Method - Admin>Payments
If you have a PayPal business account, you can accept payment immediately. Other preferred payment modules are ready to install. Go to your https://developer.paypal.com/developer with your Business Email and password and get your LIVE Credentials. (Client KEY and secret KEY) You can also get your Sandbox Credentials too.
7. Order Totals - Booking Fees, Tax, Donations, and Discounts. Admin>Payment>Advanced>Order Totals
When you want to add a feature in the customer checkout process e.g. a Booking Fee (per ticket)
Uninstall ALL existing modules and re-install one by one in the order that makes the best sense. Sub Total>Booking Fee>Total.
8. Design your e-Ticket. Admin>TICKET>Events Customer Ticket>Edit.
You will find a simple DEFAULT template you can edit at You will want to change the default settings immediately. A lot more configurations will be availabe at Admin>Shop Settings>Advanced>E-Ticket Settings
9. Set up your Concert - Admin>Concert Details
Input your Concert Name, Venue, Date and Time.
IMPORTANT! osConcert Event Dates are now set with DatePicker (Date input) and the Time should be set like this 2000 is going to reflect as 8pm at the Front End. (Specific Date Formats can be set in the system if you don't like the default) (tutorial coming soon)
Set your prices according to color banding. Left arrow, set prices and press ENTER on your keyboard. Activate the listing for Front End viewing. Activate Admin>Concert Details>Seat Plan> Fill DATE-ID with Date and Time=YES if you want DATE ID to be filled automatically.
10. CMS (Content Management) Pages Admin>CMS
Create your Homepage CMS>Homepage ...using the built in TinyMCE WYSIWYG Editor. Create and Edit existing Terms & Conditions or Privacy Policy DEFAULT osConcert Information.
Finally go to the Front End and make a TEST order as if you are the Customer or Box Office Agent.
Now customers can select seats, checkout and register for an account and finally make their reservations for your advertised Concert.
Be sure to email me with any questions without hesitation: gordon@osconcert.com
Author: Gordon
Last update: 2021-07-21 18:43
How do I configure osConcert?
Configuration
Throughout the osConcert Back End there is plethora of settings, most of which should be kept default unless you are sure you know what you are doing.
Here are the important settings you will need to know to get started quickly:
- Shop Settings
Admin>Shop Settings
Try to complete all the fields on this page for your benefit.
Timezone is important so be sure to select the correct zone.
- NEW Additional Settings are now displayed at Admin>Products>Advanced>Category Products
- My Account
Admin>My Account
Change or update the Top Administrator username and password here.
Admin>Shop settings>Templates
- Template
Choose a default template.
In version 9, SEPT 2020 we have 3 new default Bootstrap 4+ templates.
The basic 'newzone' with a list of theme colors (blue/) as seen at my website
The same basic 'blackzone' with dark background and light text
https://www.osconcert.com
and 'theevent' as seen in this DEMONSTRATION:
https://www.osconcert.com/event/
I have more Bootstrap 4+ templates available...just ask me.
The css styling system is built around Twitter "Bootstrap 4" and the theme stylesheet will control the basic colors.
In fact you can choose any online Bootstrap 4 template and it will integrate easily especially the templates at:
https://bootstrapmade.com/bootstrap-4-templates/
Restaurantly, Avilon and Reveal are also available with osConcert.
- Tax Zones
You don't really need to adjust anything here...but the default Tax Zones are very important.
There are 4 Zones that are configured and must be considered throughout the configuration of osConcert.
Australia
USA
World Zones
Box Office
Decide which is your Zone and select this Zone wherever it is required through osConcert.
Homepage
Admin>CMS>Homepage
Write text and information here for your Customers if you choose to have a Homepage.
The page has a built in WYSIWYG editor by TinyMCE.
osConcert Settings
Here are some important settings relative to ticket selling features. Each setting has a short explanation, later in our FAQ we will elaborate more about each setting.
NEW Additional Settings are now displayed at Admin>Products>Advanced>Category Products
eTicket Settings
Admin>Shop Settings>Advanced>eTicket Settings
Here are some important settings relative to eTicket set up.
Each setting has a short explanation, later in our FAQ we will elaborate more about each setting.
If you do not require PDF eTickets functionality set the Enable eTickets = false.
If you want to have the PDF eTickets sent as an attachment with the customers email response enable it here.
- eTicket Edit
Admin>Payment>Ticket
To quickly enable eTickets for your performance. Here we can edit the default template with your own text and placeholders. Full instructions are given at the page below the content pane. Please test your PDF eTickets from the Admin>Orders.
Concert Details
Admin>Concert Details
This page is the hub of the Seat Plan settings and is the main page for activating your Shows for the Seat Plans you have integrated.
The page utilizes a popular jquery plugin called JQGrid.
Each listing represents a LOADED Seat Plan or your General Admission Event
You may need to read the Help File:
How-to-best-label-your-show-for-menu-and-headings.pdf for a better understanding.
- Enable your event
Click into the input fields of your listing and enter the name of your SHOW, your short description, Venue name, Date and Time.
Later in our FAQ we will elaborate more because more specific details are required when using QR Barcode Scanning Smartphone A
UPDATED for July 2020 the Date is now a 'datepicker' (optionally this can be ignored if you want to write the Date a different way.)
- Date ID
Very IMPORTANT to give a unique ID for each SHOW listing as the osConcert Report requires a Date ID to correctly produce your osConcert SALES /TICKET Report
- Set Prices
Click the Left Arrow and a sub menu will produce the Color Bands of the Seat Plan. Click into the input field>set your price and press ENTER on your keyboard. Your prices will be saved
- Activate
You will see a Green button and a Red button. Green=Active, Red=Inactive.
It goes without saying the inactive settings will NOT show your event at the Front End.
- Featured categories
Each Active listing will be part of the Featured Categories/Events on your osConcert Homepage (Main Page). If you prefer not to show featured categories/events goto Admin>Marketing>Options>and disable Show Featured Categories=false
(UPDATE Sept 2020 now in Admin>Products>Advanced>Category Products)
Payment Methods
- Payment System
Admin>Payments
Here is where all the Payment System Modules reside as well as other important settings regarding payment management.
- Currencies
IMPORTANT: set your local currency carefully, just remember to go back and make your setting default (if you just see '0' at your Front End!)
- Payment Modules
Each available Payment module has important settings. Install what you need and Please read all instruction carefully.
It's IMPORTANT you enable your correct ZONE and disable the ZONES you do not need per module.
- PayPal API
Paypal is our complimentary module. You must have a Paypal Business Email ID to use it.
UPDATED June 2020 ...you must login at https://developer.paypal.com/developer to get your KEYS
In your actual Paypal Account Preferences ..it is advisable to set AUTO-REDIRECT with any URL.
- Stripepay US/ Stripepay SCA (Strong Card Authentication)(UK/EU)
Using StripePay requires your domain to have a SSL certificate. Enter your Test Publishing Key and your Test Secret Publishing Key here and use the Test Mode before you enable Production Mode. Default settings will work fine but study the documentation at StripePay for your specific requirements.
- We have a number of available Payment Mods that can be updated and enabled. Please send for a list of modules 2020/21.
Customers
Admin>Customers
About customers
There is the option for Administrators to create and edit each Customer Account.
- Box Office
Customer accounts highlighted in red are Box Office Users. A Box Office user has a Country=Box Office.
- Customer Sign Up Form
Admin>Shop Settings>Advanced>Customers
Users can create their own customer registration/sign up forms.
The basic rule is to keep the Country/State fields ENABLED as this is what denotes a customers ZONE.
A customer zone is required to present a Payment Module for example.
Disabling the Country/State field here creates a problem! when they find their customers cannot see any Payment modules at the checkout process.
If you seriously prefer NO Country State field in your Sign Up there is a way but we will address this issue later in our FAQ.
Each Country has an ID, make sure you add a default ID in the Country/State Field setting for a your default country.
Here are some examples:
USA=223
UK=222
Australia=93
(You can find the ID number in Admin>Shop Settings>Zones)
- PWA
Purchase Without Account options.
In the osConcert settings there is the Option to enable PWA.
The rule here is the default form a customer will see will be REQUIRED fields only.
A shorter smaller form = less required fields.
Marketing Templates
Admin>Marketing
This page will list all the Email Response Templates, Contact Us Form and more.
- Email response
Admin>Marketing>Email Template
It's enough to keep the default template and edit some text. There are placeholders listed to the right.
- Customer Invoice
UPDATED June 2020 The final Invoice is now a PDF template. Settings can be found in Admin>Marketing>PDF Invoice
The old default HTML is now obsolete.
- User Creation
A simple response to customers who sign up.
Please DO NOT allow password placeholders. Passwords should be kept secret.
Orders
Admin>Orders
Orders are received here with an Order Status, the purchaser here is the Billing Address Holder. The customer is the main account holder.
- Order Status
An order takes the Order Status set with the associated Payment Module.
We are looking for a status of Delivered for when an order is completely paid for. An Order Status of Pending requires an Update by the Top Administrator if and when the payment is completed and the order is deemed 'Delivered'.
For eTickets, a Delivered status will release PDF eTickets at a customer account.
- Edit Orders
Admin>Orders>Order Edit
A fully comprehensive page for editing and updating incoming orders is available.
- Test Orders
Test the system with Reservations Module enabled and you will quickly get familiar with the ticket selling process.
- Delete All Orders
It's possible to DELETE all Orders after testing or after a lengthy season of shows.
(A back up is created at the database and a reversal will be available)
Order Totals
Admin>Payment>Advanced>Order Totals
You'll see the Order Total at the checkout confirmation page, therefore it is necessary to set the way the Order Totals are presented throughout the checkout process.
IMPORTANT for each new module added to the Order Totals. ALL existing modules should be Un-Installed and then Re-Installed in the order that is most logical.
- Booking Fees
There are a few ways to enable Booking Fees. The most popular way is to the 'Booking Fee Per Ticket'. Enable that here. Full instruction is within the module editor.
Some users require a fee per order this is easily enabled with the 'Booking Fee' module listed.
- Tax
If a tax system e.g VAT is going to be introduced enable the Tax/Service Charge here ...but there is a lot more require to do.
We may need to enable Tax per product from elsewhere in the application. We will be expanding on the Tax System Set Up in a later FAQ.
- Global Quantity Discount can be set here if the user requires a discount per quantity of tickets. Instructions are within the module editor.
- Shipping
If shipping and delivery charges are to be applied. here we need to enable the 'Shipping' module if any shipping modules are installed and activated at Admin>Products>Shipping. Again we will be expanding more about the Shipping options and set up later in the FAQ.
- Donations
New mod for JULY 2020. Administrator can allow donations to be made at the checkout and also their is an option to FORCE a donation. Associated Language File may require editing.
FTP > includes/languages/modules/order_total/
- Box Office Reduction
Box office mod. Onlet the Box Office Agent will see this nodule and process a discount.
- Coupon Discount
This module must be anabled if you want to accept Coupon/Gift Vouchers at the checkout confirmation
- Season ticket purchase
This module must be enabled if you are using the Season Ticket Feature
Discounts
There are many ways to set up discount options for your tickets, here are just some options you may need right away.
- Salemaker Discounts
Admin>Orders>Discounts>Products
SaleMaker is available for the Reserved Seating (Seat Plans). Set up for the Entire Catalog (All Tickets All Shows) or select the categories and products you require.
- Coupon Discount
Admin>Orders>Vouchers and Coupons
Coupon Discount can be set here to be redeemed by the customer at the checkout payment page.
Don't forget to enable the Order Total for Coupons at Admin>Payment>Advanced>Order Totals
osConcert Report
Admin>Orders>osConcert SALES
Here by selecting the DATE ID of your SHOW+Orders Status e.g 'Delivered'. You can quickly Download a Excel/CSV/PDF to study and print a list of tickets within your chosen date range. This can be used as a doorlist.
Languages
osConcert can be served in all langauges. We have Language Packs for German, Italian Spanish, French, Polish, Turkish, Romanian, Czech, Russian, Thai, Dutch, Greek, Japanese and Chinese.
- Language Files
Every Front End page or module has an associated Language File.
Language Files are held at the includes/languages directory.
IMPORTANT: For a mono-lingual application the directory will always be named 'english' whether it be German, French or whatever. There's no need to rename or add another language setting.
Default Admin Language is also always named 'english' (of course the files can be translated)
To enable another language or translate the existing English definitions all the files in the 'english' directory must be edited, including the includes/languages/english.php
Other sections of the software require editing directly to the database. For example the Customer Sign Up fields can be translated directly at Admin>Shop Settings>Advanced>Customers
Products
- Reserved Seating
Reserved Seating is the Seat Plan Integration, most settings are now in the Admin>Concert Details>Seat Plan page of the Administration. There is such a thing as Seat Plan Cache. Seat plan cache are generated page memories of each seat plan page. It helps by improving performance for a faster download of pages for the visitor.
Unfortunately some users forget they will need to Clear the Seat Plan Cache if they want to see immediate changes made to the page by the Administrator.
Only enable Seat Plan Cache=yes after testing is done and to clear the cache use Admin>Clear Cache
- General Admission
At the core of osConcert is a basic shopping cart for product sales with Categories of Products.
Tickets are our Products and Categories are our Events with a set Quantity.
To create a category of products:
1. We go to the Admin>Products
2. Create a Category, create a Category Name, Category Heading, Category Venue, Category Date and Category Time.
3. We Add Product. Example we have a SHOW with a quantity of 100 tickets each ticket is $125
We set Ticket name, Product Type, Description, Cost and Stock amount. SAVE and we have our very basic general Admission Event.
Author: Gordon
Last update: 2020-09-10 06:48
Orders Status: What is the recommended set up?
Yes, this is important…!
Your ultimate goal is to allow your visitors to choose seats, register an account (which can be optional) and then to make an order for the products they have added to their shopping basket. Note that ‘Seats are Products’ and osConcert will help you to monitor the products sales or reservations as a visual aid. osConcert can also generate a sales report in the format of an Excel/CSV or PDF file.
For every order we must have an order status. This order status is governed by the payment method. The difference between these order statuses is very important; a 'Pending' status will tell us that we are waiting for full payment to be made for that order and a 'Delivered' status should tell us that payment for that order is completed.
osConcert is popular for its sales of Barcoded E-Tickets in PDF format. Normally, you should only allow release of PDF E-tickets when an order has a status of 'Delivered'
Now you know there is 'Pending' and 'Delivered'. As an Administrator you can update each order accordingly and the results will be reflected in the osConcert SALES report.
While every SHOW that you enable in osConcert will have a unique DATE ID, you can now use the osConcert-report Admin>Orders>osConcert SALES to filter ALL the sales with a status of 'Delivered' and download that report as a list in Excel/CSV or PDF format.
Finally, for every 'Reserved' seat you see in the front end SHOW, each of the seats should be noted as 'Delivered'; anything 'Pending' must be attended to. If you have not received full payment you may consider deleting the order and returning the seats back in stock.
If you prefer to Automate this process we now have a Pseudo Cron in Admin>Orders that can help delete and restock certain orders with a certain status. Example it is possible to have Pending orders be deleted after ...say....24 hours.
Author: Gordon
Last update: 2020-09-10 06:52
How do I create my Sign Up/Registration page.
Admin>Shop Settings>Advanced>Customers
The Advanced Shop Settings for Customers offers a selection of Customer Account Fields from a list that you want to configure for the registration of new customers at the front-end . The page is the Create Account page (create_account.php) . Also, osConcert will use these Customer Account values in automatic emails and orders.
Each Form field can be enabled at the Front End by clicking the 'green' button to 'red'. Each form field can be placed in the order you require.
Once again each Form Field can be edited and saved. It's very straightforward. We can even create brand new fields but the existing list is enough for most users.
Each Form field has options...especially if you want the field to be 'Required' or not.
NOTE: When PWA (Purchase Without Account) feature is enabled. Only 'Required fields will show in the Sign Up form.
IMPORTANT! Never disable the Country/State fields as Country/Zone is required for every customer. All modules i.e Payment/Shipping etc require a customer to be associated to a Tax Zone for their functionality.
Author: Gordon
Last update: 2018-08-27 08:16
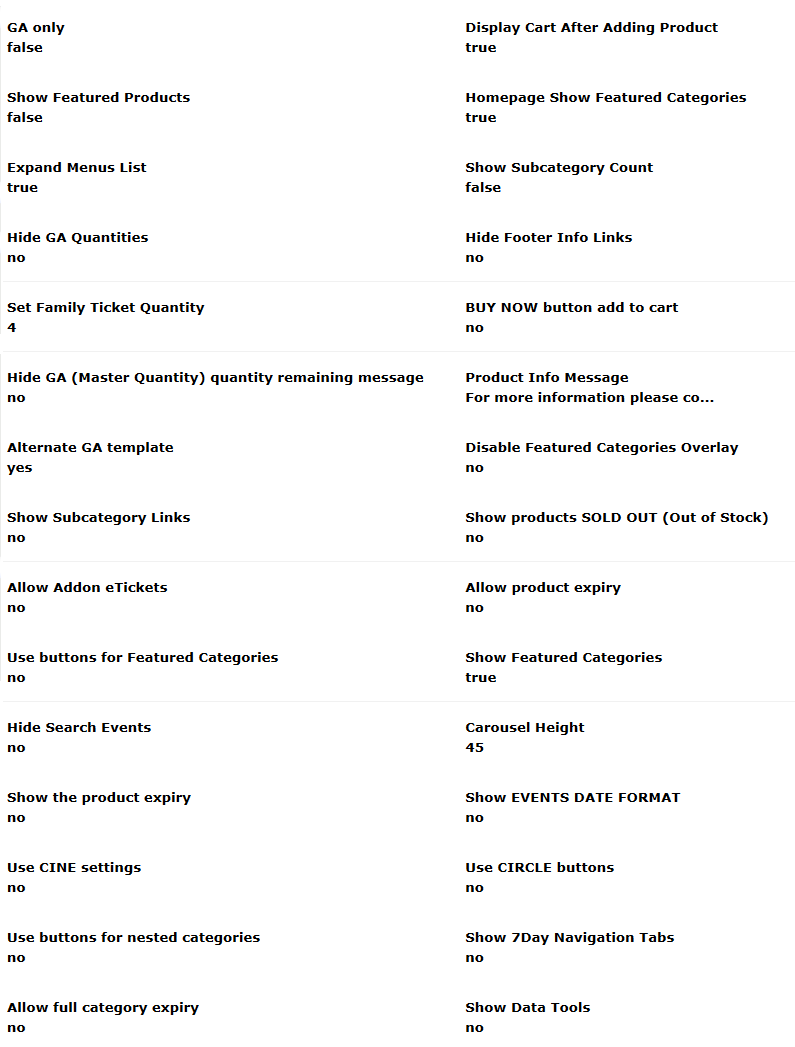
What are the osConcert Settings?
Admin>SETTINGS>osConcert Settings
In the “osConcert Settings” section, you configure specific osConcert related settings, switch on/off modules, set and change set specific system settings, edit error messages or and not limited to, switch on/off interactions with third party software applications.
osConcert Version
This setting may well show the osConcert Version text. But the text resides in the Front End Headerbar as an option TEXT HEADING.
Users can edit the text fortheir own use. e.g. Apollo Theatre Ticketing (this setting has been disabled in newer versions but can be used for easy edited FrontEnd Headings)
Hide Delivery Address
Set this to 'no' if you don't want the Customers Delivery Address to be shown in the Checkout Confirmation page. Used only for a Shipping/Delivery based application.
Expand Menu's List
Set this to 'true' if you would like the Concert Venue, Concert Date and Concert Time to be displayed on each listing on the Front End Left Category Menu.
These fields that are set in the Admin>Concert Details will appear below the SHOW name. (n/a when Left Menu is disabled)
Not required when the LEFT COLUMN is disabled in your template settings (RECOMMENDED)
Google Analytics Account
Insert your Google Analytics ID here if you want your osConcert Ticketing Application to be tracked by Google.
Add Extra Fields
This feature can be useful for those users that want to collect more data from customers in the Checkout Process.
There are 5 fields that can be enabled and the trick is to set the Heading Names and the Validation in the Language File includes/english.php
This can be configured to collect names and address or a drop drop down menu of preferences per order.
define('NEW_FIELDS_HEADING','Details');
define('FIELD_1','Name');
define('FIELD_1_VALIDATE', '0');//0 = no validation
define('FIELD_2','Address');
define('FIELD_2_VALIDATE', '0');//0 = no validation
define('FIELD_3','Contact');
define('FIELD_4','Email');
define('FIELD_4_VALIDATE', '0');//0 = no validation
define('FIELD_5','Other Comments');
define('PLEASE_ENTER_YOUR','Please enter your ');
define('TEXT_FIELD_REQUIRED','*');
//comments/drop down text area/optional
define('FIELD_5', 'Pick up Option');
define('FIELD_5_VALIDATE', '0');//0 = no validation
This feature is not nescessary for most users that collect enough data from the Sign Up Form. For GDPR (General Data Protection Regulation ) we must also make sure customer data is protected. If you are considering using this option we will need make sure we ask for customer consent.
Maximum quantity in cart
If you want to allow a maximum number of tickets per order enter a number in this field. Zero = unlimited.
Purchase without an account
If you want to allow customers to Purchase Without creating an Account set this field=yes.
Now when customers add products to the cart and proceed to checkout they will be presented with the option to continue to the Checkout without creating an account.
A basic form with 'shop required fields will still be visible for the very basic information required to complete a purchase:
Name. Email Address and Country/State at the least.
Disable creating account entirely? (Will override any setting under Purchase Without Account)
Do you want customers to skip the Login/Registration form entirely? Not recommended but very possible.
Show Subcategory Count
Only where there is 'sub categories' here we can enable/disable a count of tickets remaining or reserved. Useful for GA (General Admission) products only.
Hide GA Quantities
This is also useful for GA(General Admission) products. Mainly for when Master Quantities are enabled. Do you want to show the remaining product quantities or not?
Hide Footer Info Links
At the foot of the Front Page template their are links to static pages that are generated by osConcert. Mainly the default Privacy Statement, Terms and Conditions and Contact links. If you don't want them to appear here set this ='yes' (n/a with some template settings)
Enforced Coupon
This is an interesting feature that will allow the checkout process to complete only if the customer has a valid COUPON CODE and Discount Coupon feature has been enabled in admin/sales_coupon.php and in the payment/advanced/order totals.
Useful for allowing special access for complimentary tickets or access to friends and associates of a theatre group amongst other good reasons also.
Add Conditions
A very important and popular feature for the Checkout Confimation page. If you have Terms and Conditions you want your customers to agree with before they confirm an order. You must enable this setting. To create the actual page for the Terms and Conditions goto Admin>CMS>TandC, write your conditions in the WYSIWYG editor, save it and click the red button to green. Make a test order at the Front End to see the result. Text can be editied in the associated Language File includes/languages/engliush/checkout_confirmation:
define('CONDITIONS','Conditions of Use');
define('CONDITION_AGREEMENT', 'I have read and accepted the terms and conditions:');
define('CONDITION_AGREEMENT_ERROR', 'Please read the general business conditions. Only if you accept it, we can take your order.');
Hide Sign Up Page
Here we can hide the Sign Up page but allow customers to LOGIN only
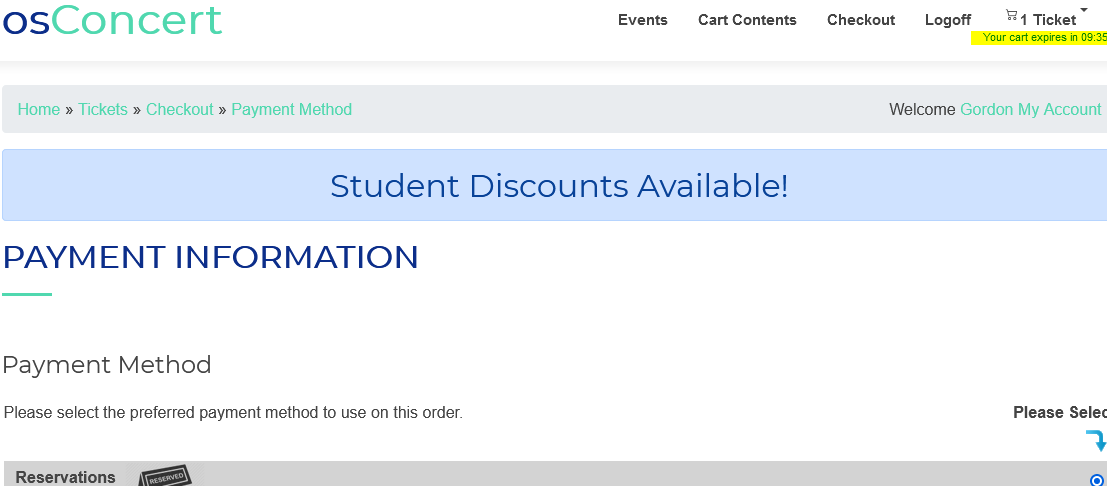
Skip Payment Method
If there is only ONE payment method installed (that includes any box office module) enabling this setting will alow the customer to go straight to the Checkout Confirmation.
Pop Up Discount Width/Height
Here we can configure the width and height of the SaleMaker Discount PopUp we enable when we have discount set up for Reserved Seating.
Furthermore an associated setting Show Discount Popup true/false gives the user the choice to show the Pop Up at all!...but a true setting is most advisable.
Set Family Ticket Quantity
When we want to sell Family Tickets in General Admission this setting can set the quantity of tickets included in a Family package.
We can sell 1 ticket for 4 people for example.
At checkout the quantities will be correctly decreased per order. The customer will receive one eTicket that will represent the 4 persons at the event gate.
Account Review
Set this to 'yes' if you want to review every new sign up before allowing access to purchase tickets. Useful in some circumstances but not a popular setting.
Hide GA only quantity left
For a GA (General Admission) event product created with 'concessions' and a 'master quantity' you may not want the customers to see the 'remaining' quantity of tickets that can be displayed at the event information page. This setting will hide that figure.
Hide CMS listings in the INFORMATION infobox
When the Left Column Menu is enabled and you only want to show a Contact Us Link and nothing else.....set this to 'yes'
Product Info Message
If you want to write a simple message to your visitors on ALL product_info.php pages just below the CHECKOUT button.
Hide Row Categories in Admin>Products
Useful for the administrator if you don't want to see the Category Products Tree everytime you visit Admin>Products. For big users the listing can be slow to load.
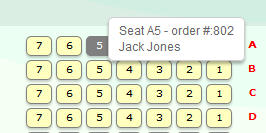
Allow PopOver Information for BO (Box Office Logged In User)
Allow Popover information about the order on SOLD seats at the seat plan. Box Office Only (IMPORTANT! disable seat plan cache or everyone will see the info)
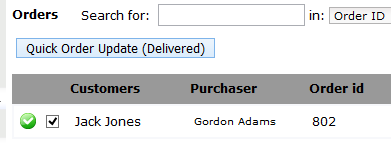
Quick Order Update Email
Set this to 'true' if you want a New Order Confirmation email to be sent everytime you use the Quick Order Update in Admin>Orders
Hide GDPR Links
Hide anything to do with strict EU Data Regulations if you are not an EU business. (See GDPR faq)
Contact Us form link
If you don't want to use the osConcert default contact form....you can add an alternative URL here to link to another online contact form.
Message at Checkout about Discount
Write a simple message here and visitors will see your highlighted message when they are in the checkout process.
Show osConcert Help Messages
If you don't want to see my Help Messages all around the Administration. Enable/Hide them here.
Set Conditions at Payment
This is an extra Terms and Conditions agreement. This time it is presented at the Payment method page. Useful if you want to get a serious message to potential ticket holders. e.g like COVID preparedness at the venue...etc text for this must be edited in the associated language file.
Display Contact Form on HOMEPAGE
Enable the contact form at the foot of the homepage
Enable Ticket Holder Name Form
Say that you really want customers to put a name to their tickets. This is a very simple / optional way for them to write a names at the confirmayion page. It is NOT required. ....and not really recomended.
Use placeholder %%Ticketholder Name%% instead of %%Billing Name%% or %%Customer Name%% in eTicket Editor
Close the login page
If you want to close the login page completely to stop or halt ticket sales and new sign ups or any activity.
Hide Choose Billing Address for customers
Unhide to allow customers to be able to Change Billing Name & Address at Checkout
Map URL for Contact Us Page
Add a google map url and the google map will show below the contact form on the contact form page.
Author: Gordon
Last update: 2022-07-03 06:03
What is the correct way to label your Show for the menu and headings?
In Admin>Concert Details there is a heading name and a heading title (Name and a Heading) The Name is best kept short and sweet and it will appear in the left menu, but the Heading can be longer and hold some more detail. i.e:
Name: Les Misérables
Heading: Les Misérables – Romantic Musical
This might not be entirely ideal but we have the option of expanding the menu to present a venue, date and time on the menu.
Admin>Products>Advanced>Category Products>Expand Menus List=true
Here we can show the Venue, Date and Time on the second line of the 'Name' on the left menu.
Now we shouldn't get too long a SHOW name in the left column shopping cart where there is already limited space.
Author: Masud
Last update: 2023-09-06 06:59
I have installed my osConcert. How do I configure it to start selling tickets?
Here is a summary of tasks that will help you configure your osConcert after you install your osConcert Application with your seat plan integrated.
1. Currency
Admin>Payment>Currency
Make sure you have set up your local currencies and selected your default currency.
https://www.osconcert.com/faq/content/9/49/en/what-do-we-need-to-know-about-currencies.html
2. Set up your preferred Payment Methods.
Admin>Payment
Install your Payment Modules e.g PayPal, Bank Transfer etc
Double check your settings especially 'Zone Settings'. If your locality is not in USA or Australia select World Zones as your Payment Zone.
3. Sign Up Form
Admin>Shop Settings>Advanced>Customers
Configure your own Sign Up/Registration Form for your customers to easily complete a purchase.
Try to collect as little data as possible. Because of NEW Data Protection Laws consider enabling the 'I give my consent' field.
4. Concert Details (LOADED Seat Plans)
Admin>Concert Details
Configure your SHOW names, Date and Time correctly.

Click into the input fields for inline editing.
IMPORTANT! Set a 'unique' DATE ID, this will help for correct reporting per SHOW.
Set your prices for your 'color banding' (Left Arrow) REMEMBER to click ENTER on your computer keyboard.

5. Set your PDF eTickets
Admin>Payment>Tickets>Events Customer Ticket
This page has all the information you require to set your eTickets.
In fact to start quickly make sure you edit the 'content pane' and change all references to the osConcert default eTicket.
Admin>Shop Settings>Advanced>eTicket Settings
If you want to have your eTickets sent as an attachemnt be sure to enable here.
6. QR Scanning (preparation)
If you plan to use the QR Barcode Scanning with the Smartphone App as described here:
https://www.osconcert.com/faq/content/8/10/en/how-can-we-scan-etickets-using-a-smartphone-app.html
Be sure to set the Admin>Concert Details>Date and Time correctly as written in the document.
IMPORTANT: Enable barcode scanning data in Admin>Shop Settings>Advanced>eTicket Settings
Use Barcode Scanning=yes
7. Featured Categories/Events
Without the LEFT COLUMN MENU (Full Page Template). We will rely on the Featured Events to appear as a 'responsive' list of Events. These can be enabled as Images or Buttons. Enabled in Admin>Marketing>Options>Show Featured Categories=true
8. Order Totals
If you want to enable Booking Fee, Global Quantity Discount, Donations or Booking Fee per Ticket.
Goto Admin>Payment>Advanced>Order Totals and enable your preferred modules here.
Likewise if you plan to have Shipping/Delivery , Coupon Codes, Season Tickets remember to set the Order Total modules here too.
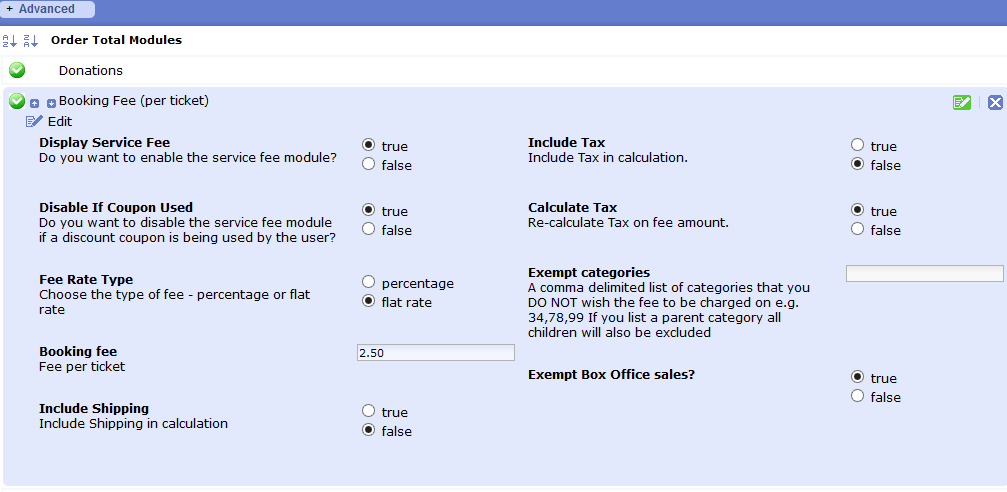
9. Email Templates
You most likely will want to customise the Email Templates as seen in Admin>Marketing.
The most important template is the Email Receipt at Admin>Marketing>Email Template
Be sure to set your own Email Subject Lines and Email Address reply-to fields for each and every template.
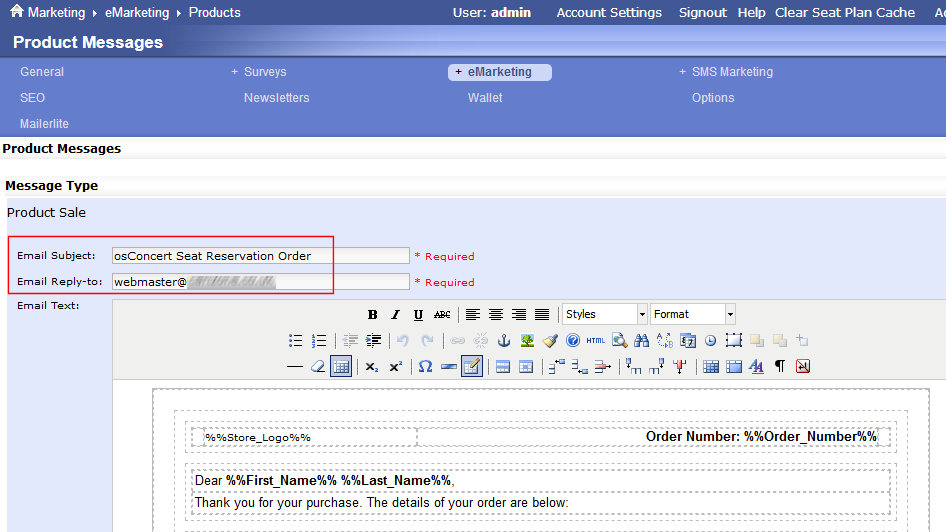
10. There are many more features such as Tax, Salemaker Discount and Content Managemet Systemj (CMS)
Look for the FAQ articles. There are also many tutorial documents in your /docs/ directory.
If there is something you dop not understand or that you cannot find email me in the first instance. My initial support is fast and free gordon@osconcert.com
Finally when you have made TEST orders and everything seems ready to go live you can enable Seat Plan Caching for a better performance.
You can read about that here: https://www.osconcert.com/faq/content/4/12/en/what-is-the-seat-plan-cache.html
Author: Gordon
Last update: 2020-09-10 07:00
How do i set up osConcert for FREE reservations only?
Let's suppose your organization is a Church and you want your patrons to reserve seats for services at your local church.
If we have LOADED seat plans or General Admission events, any of these kind of events can be set up as usual but with a zero price.
We can install a simple Reservations payment module in Admin>Payment (this will NOT ask your visitors for payment but is merely a gateway for a free checkout).
Now there are a few ways to organize a Free Checkout.
- If we prefer our visitors to a) Choose a seat/product (Add to cart) >Register> Checkout in the quickest way possible.
We can set a ZERO Price checkout. Admin>Products>Advanced>Free Checkout>No checkout for zero price events=Enabled. This option will always operate a truly Free Checkout (for any zero price) with no obstacles in the way. For this setting, visitors will NOT be able to choose any Payment Method at all but will only see a SUCCESS page when they click any Checkout Button.
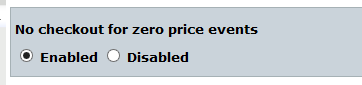
2. If you want your visitors to follow the Checkout Process disable the Free Checkout Admin>Products>Advanced>Free Checkout>No checkout for zero price events=Disabled. Your visitors will be first directed to the Payment Information page. Here there is an option for visitors to write comments to accompany their order.
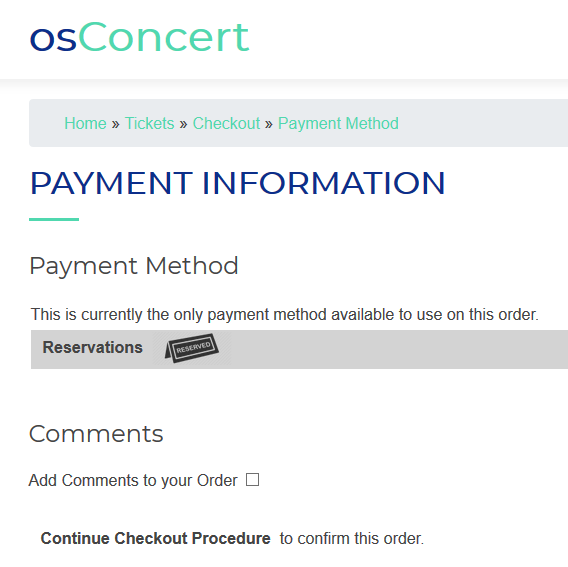
3. If you combine a Free Payment module with paid products be sure to set the payment status for the free payment module to 'Pending' so that customers do not unwittingly acquire paid products without submitting a payment.
4. Other ways to offer a Free Checkout may require issuing a 100% Discount Coupon.
Author: Gordon
Last update: 2020-09-24 07:23
We are NOT a Theater. How do we get started?
The osConcert default set up is primarily configured for Theatre Ticketing but osConcert is useful for all kinds of organizations, shops and businesses.
Here's is a list of approaches to take if you or your developer want to configure osConcert yourself.
Language
First we must configure the text to suit our organization.
The best place to start is the main language file.
(All pages have an associated language file)
To edit language definitions you must have access to a notepad editor and access to the raw files at your server.
Open includes/languages/english.php
and other files includes/languages/english/
Now you can change any default language definitions and replace the files at your server.
For example
// categories box text in includes/boxes/categories.php
define('BOX_HEADING_CATEGORIES', 'Church Services');
or in english/featured_categories.php
define('HEADING_TITLE', 'Church Services');
Settings
There are a huge amount of settings that may not be needed.
For example a Church won't really be selling tickets but offereing Free Reservations.
Most of the features you see enabled in osConcert can easliy be disabled in the osConcert Administration.
Payment Options
osConcert is loaded with many payment options and order total configurations.
Once again all modules can be installed or uninstalled and all modules have an associated language file.
For purely FREE reservations here is a guide:
https://www.osconcert.com/faq/content/3/64/en/how-do-i-set-up-osconcert-for-free-reservations-only.html
Images
Decide what images are suitable for your business.
For example each product can have an image for it's associated info page and checkout pages. The default is images/ticket_icon.png
You may want to replace that image.
Each Category and eTicket background images should be carefully selected and uploaded in the Administration. Admin>Products
Template
In the Administration there are some options for the default template
Admin>Shop Settings>Template
You may not want a Left Column, you may not want some infoboxes or there are other infoboxes available that are not useful for Theatres.
Also the "breadcrumb" can be disabled or even the header shopping cart can be removed completely.
Furthermore osConcert is styled with Bootstrap 5 (famous twitter template) https://getbootstrap.com/
That means all the CMS can be configured easily with Bootstrap code snippets...like this example:
https://www.osconcert.com/event/
You will find the examples from the template above in your osConcert Template 'theevent' templates/theevent/content/mainpage.php
Customer Registration
Decide what system of registration (if any)
The default Sign Up page 'osconcert/create_account.php' can be configured to your liking in Admin>Shop Settings>Advanced>Customers.
Some settings can HIDE the login or you can also switch to Purchase Without Account (PWA) settings.
Author: Gordon
Last update: 2021-12-21 06:10
What ways can we block seats?
In osConcert there are many ways to manage the seats/products.
That might not be ideal ...sometimes confusing but we have an adapted shopping cart.
Each product has a status in the database (products_status)
1=Active and For sale
2/8=Hidden completely
3=Blocked as grey cell
0=De-activated Reserved/Sold
We can block individual products, whole rows and whole categories
We can block as SOLD, HIDDEN or BLOCKED
We can block seats for Social Distancing requirements.
We can use Admin>Products (The Main Category/Products Editor)
We can use Admin>Products>Alternative Edit Categories
We can use in-house database tools (PRO Package)
We can make dummy orders.
Here's some scenarios:
- You simply want to block specific individual seats across the seat plan.
Goto Admin>Products. Locate the Category>Row Category>Seat Name and click the green button to red.
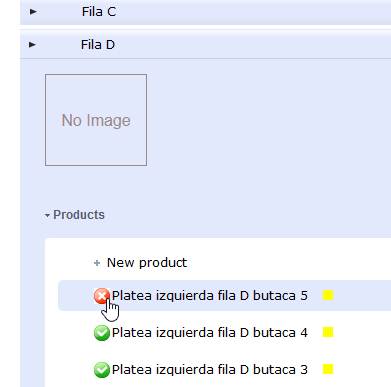
2. You want to RESERVE a whole row of seats (as sold) without an associated order.
Goto Admin>Products. Locate the row you want to edit. Find the CHANGE icon at the right hand side.
Follow the instruction to Block that Row.
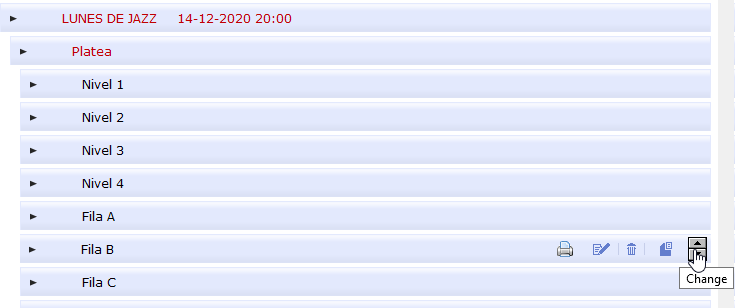
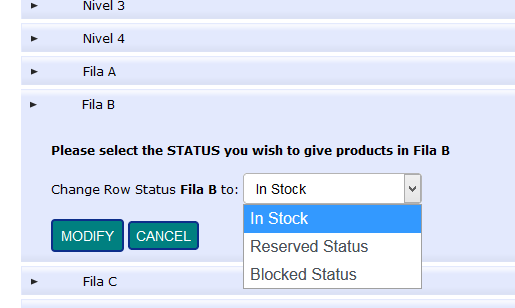
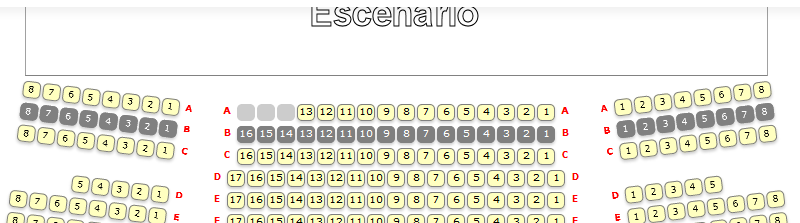
3. You want to RESERVE a lot of seats and associate it with an order. Login as a Box Office Agent and make an order through the Front End (Make a note of the purpose of the reservations)
4. You want to block and hide seats in a certain category
Goto Admin>Products>Alternative Edit Categories
Locate the Category and Category Row by clciking through the 'yellow' folder structure.
Click corresponding buttons green red or white Active/De-active or Hidden.

5. You want to block out many seats as part of Social Distancing requirements.
Goto Admin>Concert Details>Box Office
Enable Allow Box Office Blocker=yes
Login at the Front End with your Box Office Account
Goto the Seat Plan and click Box Office Blocker.
Choose the Seat Plan or ALL Seat Plans and simply click seats to BLOCKED.
More Info: Box Office Blocker
Author: Gordon
Last update: 2020-11-28 11:24
We are a Church, how do we get started?
How to set up osConcert with FREE Reservations? (Zero Prices)
You have just received your osConcert with your Church Seat Plan integrated.
So you will have a number of LOADED seat plans ready to activate.
Let's first go to Admin>Concert Details
We want to activate any one of the listings so we open the listing with the right hand pencil icon.
We want a short Name for the Event (Name)...and a long name for the Event (Heading)
We want to set the Event to be ACTIVE = check the active box (active)
It's optional to have a Description of your event (Description)
You can enter the Name of your Venue e.g St Mary's (Venue)
Next we must choose a DATE from the DatePicker (Date)
Also write the TIME as 24 hour e.g 1100 (Time) (it will be interpreted a 11am throught the FRONT END)
IMPORTANT: The last field DateID will be automatically set (if the Date ID Auto Fill enabled is enabled as default)
The Date ID gives the Event a unique identification for reporting purposes
With all the fields completed SAVE the listing by closing the inline editor (pencil icon)
If we open again and click the Left Arrow we will see a list of Colors and Prices....since seats are Free Reservations this should be left at 0 (zero) and usually there is only one color band.
Now if we go to the FRONT END in our browser we should see the Event listed as a Featured Event with the Name, Venue, Date and Time overlaying an image. We can change that background image by going to Admin>Products> edit the category of your created Event and we will see the option to upload a background image.
Upload any image and it will be resized to the restriction set in Admin>Shop Settings>Images>Image Upload Width (in pixels)
RESULT:
Now with the Event ACTIVE you can announce the Event to your patrons and they can come to the page to select and RESERVE seats at no cost. As osConcert has a REGISTRATION page by default you the Administrator may want to change the conditions of the Sign Up Fields. You can do that in the Admin>Shop Settings>Advanced>Customers to configure and activate your own sign up fields for the FRONT END Create Account Form.
Finally ...we don't really want your customers to see a Payment Page (even if the event is FREE!) so there is a hidden setting at Admin>Products>Advanced>Free Checkout that we should enable so that your customers will go starigh to the CONFIRMATION page when checking out their selected seat RESERVATIONS.
So now we have it so your vistors register/login and RESERVE seats from your Seat Plan. What will you do when the Event has finished and you want to RESET the Seat Plan so that we can use it again?...we will need to RESET all the seats that are unavailable to be available again. We do that by clicking the TRASH ICON in the Admin>Concert Details.
So that we have the abilty to RESET the Reserved Seats to be Available again
Please NOTE: The RESET option described here will only RESET the seats and NOT the existing Concert Details. They can be overwritten by inline editing anytime.
That's the basics of Set Up and Reset.
There are many other configurations but I hope this tutorial explains how to set up a Free Event.
Author: Gordon
Last update: 2021-08-13 10:52
How to set prices for the seat plan?
First go to Admin>Concert Details
Edit Prices of a complete show/category
IMPORTANT! Ensure the unique DATE-ID is set-up FIRST! If no DATE-ID is set up first, it will not be possible to edit prices of a complete show/category.
To edit or to set up prices for a Show or Category, click on the small blue arrow on the left to open up the sub menu and edit the prices section. Ensure the DATE-ID is set up first!
You will see your price banding listed with some information about total seats for the color-band and how many seats are sold. Double click to open a price text field.
IMPORTANT! Press ENTER on your keyboard to SAVE the new values.
To close the editing mode, click again on the small blue arrow on the left.
Author: Gordon
Last update: 2022-07-14 15:38
Everything is configured. How do I manage sales?
So you have received your osConcert and Gordon has gracefully set everything ready to start selling tickets.
What do I do?...what is Box Office?...is the eTicket correct? How do I set up the next show?.....etc etc
I think you need to learn how to be Administrator AND how to use the Box Office Method if you the only manager. There is a learning curve to deal with.
I have a number of existing tutorials about setting up events.
https://www.osconcert.com/faq/index.php?solution_id=1086
Basically for a seat plan integration, we need to set the Concert Details as explained. Each listing is a category, these categories can also be edited in the Admin>Products.
The Box Office Method is explained in a number of tutorials:
https://www.osconcert.com/faq/?action=show&cat=6
Basically if you have an assigned box office email account you can login at the Front End to make orders on behalf of your customers.
osConcert default eTickets are designed simply to allow 4 tickets per page A4 to be printed by a customer with a basic PC printer.
https://www.osconcert.com/faq/?action=show&cat=14
If this is all over your head you need to find somebody in your organization to help deal with Administration tasks.
If there are tasks you need doing a different way contact me webmaster@osconcert.com
Author: Gordon
Last update: 2022-11-28 18:11
How to create a General Admission Event in version 9.5?
There have been some slight changes in the latest versions but setting up a General Admission event is much the same as before. You create a category and create products with a quantity. For Concessions you must create your concession products and set a Master Quantity for the residing category.
Admin>Products>New Category
New Product> write the Name ...e.g. Adult Ticket
TYPE tab IMPORTANT: choose General Admission from the drop down menu
COST tab Insert the price of the ticket
STOCK tab inert the Quantity of tickets
SKU should always be 9 for General Admission
SAVE and Exit by clicking the GREEN SAVE button
Now go to Admin>Concert Details to set Date and Time
For a complete FAQ guide about setting Concert Details
How do I correctly set Date and Time in version 9.5?
go here
That just about sets the basics for a General Admission Event
Now go back and upload an appropriate image for you event Admin>Products>Edit
Go to the Front End and check everything is as you like it.
NOTES:
Author: Gordon
Last update: 2022-08-11 05:53
What do we need to know about our outgoing emails to Customers and Box Office?
The osConcert Email Settings will be found in Admin>Shop Settings>Advanced>Email Settings
There will be a choice......you use your basic server Sendmail (nothing to do)
or you can create a SMTP account in your server email section and complete the SMTP settings according to the guidance from your server support
You will need:
SMTP: Server URL
SMTP: Username
SMTP: Password
SMTP: Access port (usually 587)
Enable DEBUG=2 if you need to see a complete readout of the email output in your browser
I typical way will be to set DEBUG and use the Password Forgotten page to send yourself an email.
If you have problems ...you can contact me for advice (gordon@osconcert.com)
We use the world famous phpMailer and it works well...but osConcert has no control after emails are sent from the system. Please advise your customers about ways they can retrieve their eTickets if they say they did not receive emails. Usually they are to be found in Junk Mail Boxes or some emails are just unreliable like yahoo/hotmail and even gmail. I use a fastmail.com account which is far superior to gmail.
osConcert recommends using the customer account system so that customers have the ability to login to their account to view and retrieve order conformations including the eTicket download.
There are some configurations you'll need to know...and I will try to address them in this guide.
Let me just highlight the DEFAULT settings.
- NOTE: All emails send will have the reply address you set in the Admin>Shop Settings>Email from:
- All emails will send to the customers preferred account address they entered at sign up
- Adminstrator has the option of receiving all copies of all successful customer purchase confirmations:
- Box Office agents can be sent email confirmations if the Box Office Setting below is in favour.
A setting = yes will stop Box Office Users receiving confirmations to their box office email address
- Box Office agents can initiate email confrmations on behalf of their customers using the Change Address Box Office Billing Address page
So the setting above means we are NOT HIDING the Customer Billing Address and so ....if the customers email address for the Billing form is set=true (it is true by default)
Admin>Quick Configuration Links>Customer Details
The above conditions will send an email confirmation on behalf of the Box Office agent to the customers email they have entered in thier Billing Address Form
IMPORTANT: All email confirmations will receive email attachements if the payment status = Delivered (successful payment) AND......where the eTicket settings are set like below
Author: Gordon
Last update: 2024-05-05 09:41
General Support
How do we arrange Featured Events?
Featured Categories
We have added the option to show a responsive image gallery of the featured category events. For this to be most effective you’ll need to have a good image loaded for each SHOW category.
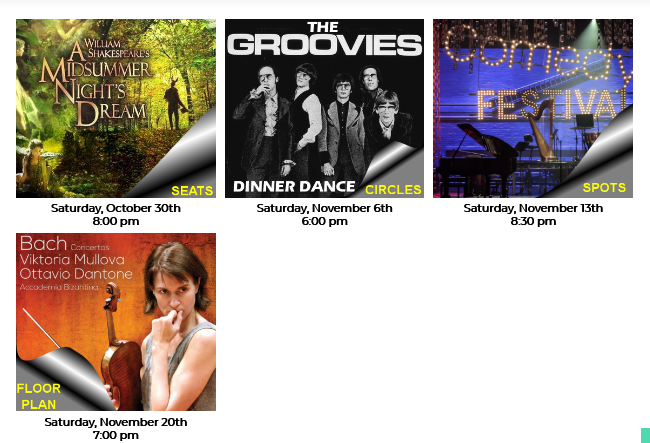
It's important to know that the arrangement/sort order is now related to the DATE PICKER settings in v9
There is a setting to choose manual sort order over the unix timestamp
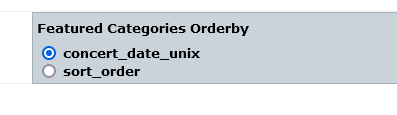
Another thing to know is the Bootstrap responsive column rules are hardcoded in the featured/nested category modules ...so if you want a more elaborate grid to your Event display you'll want to edit those files directly.
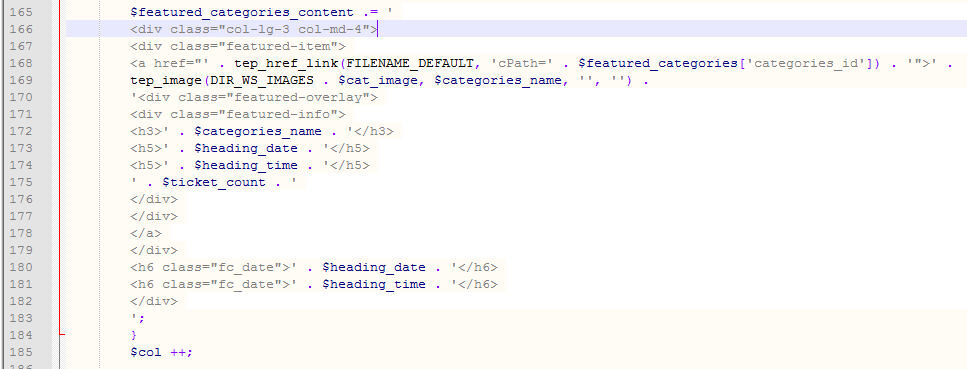
Email support if this is important to you and you want it to be different than the default
In v9 there is the option to have an overlay of text (category name) over the category image.
This can be enabled Admin>Products>Advanced>Category Products>Disable Overlay=NO
Admin>Marketing>Options>Show Featured Categories on Mainpage = true
Now at Admin>Products>Advanced>Category Products for v9
we can display all the ACTIVE events as clickable images with text and short descriptions on mouseover.
The ACTIVE images are the LIVE events you have listed
(active ‘green’ button in Admin>Concert Details)
We can omit all Homepage data Admin>CMS>Homepage>Edit and simply have the featured categories the first information your visitors see at the homepage…..as Featured Categories/Events
Furthermore we can also activate a Left Column InfoBox>Featured Categories and have a random featured category image to further publicize events in your osConcert
Featured Products
Similar to the Featured Categories we can do the same for certain Featured (GA) Products In Admin>Products>Featured>Featured GA Products>New Products
This is useful if you have only one GA product in its own category such as a single General Admission event with a quantity. Otherwise be careful how you use this feature….it may not be suitable.
We can select products from our GA stock and have them be featured as a ‘responsive’ clickable image gallery when we activate the Admin>Products>Advanced>Category Products>Show Featured Products = true
As with Featured Categories we can also activate a Left Column InfoBox>Featured to show random featured products (Ga products/events)
Warning: If this option is enabled and there are no featured products selected, osConcert will show some text – sorry nothing here!
It also worth mentioning that there is an Expiry Date feature for each selected product. It may be useful for selling merchandise products also.
If you want the Featured Categories ABOVE the Home/Mainpage Text....the file to edit is templates/content/index_default.tpl.php
Author: Gordon
Last update: 2021-12-22 08:49
What is the Seat Plan Cache?
Admin>Concert Details>Seat Plan>Seat Plan Cache
When the seat plan cache has been enabled (the cache creates a memory of the seat plan pages for faster rendering to the visitors browser.) If you are editing products, prices etc you may not see the changes immediately.
In this case then it would be better to clear the seat plan cache:
Admin>Clear Seat Plan Cache will do that for you.
Clear cache will empty the cached pages in the /cache directory
The most common support question i receive is related to the Seat Plan Cache
Those users who do not understand the Seat Plan Cache will see old information .e.g prices and seat names unless they wait for the cache to expire or they Clear Seat Plan Cache and re-cache by looking at the page again.
Author: Masud
Last update: 2022-10-26 06:11
How do we create CMS pages?
Home Page Edit ( CMS)
Admin>CMS>Homepage
On the Admin>CMS>Homepage, click the EDIT button. Then edit the text in the WYSIWYG editor.
DEVELOPERS:
The Homepage can be edited directly; templates/cartzone/content/english/mainpage.php
Static Pages (CMS)
Static pages are pages that are delivered to a user exactly as they are stored. Static pages in osConcert are the “Ticket Delivery”, “Privacy Notice”, and “Conditions of Use”.
In osConcert the Static Pages are stored in the CMS section (Content Management System).
Either switch OFF or EDIT the default complimentary ’text’ and replace all ‘osConcert’ references with your own shop-name or write your own in Admin>CMS>Static Pages
On the preview pane of the Ticket Delivery Static Page it is possible to change the display STATUS (green/red) by clicking the GREEN bullet.
The listing of the Static Pages is set by default by osConcert but the listing sequence of the Static Pages on the Front End can be changed by clicking the small blue UP or DOWN buttons next to the green status bullet.
Ticket Delivery
On the Ticket Delivery you write, for example “Refund” information or the “Right to cancel a show without prior notice”. Click on the Ticket Delivery to expand. On the expanded tab, click EDIT.
Use the WYSIWYG editor to edit PAGE NAME and type Your Ticket Delivery Article here. Click SAVE to save your Static Page text.
At the Front-End , the Ticket Delivery Static Page button will show on the left side Menu, under the Show-listings;
NOTE: Enable ‘Information’ infobox from Admin>Shop Settings>Template>Edit Template>infoboxes Edit
Save
Edit
Privacy Notice
In the Privacy Notice there is information about the scope of the website, text about Information Collection and the use this information. Admin>CMS>Privacy Notice
Either switch OFF or EDIT the default complimentary ‘text’ and replace ALL ‘osConcert’ references with your own shop-name or write your own!
Click EDIT to enter the WYSIWYG editor. If you require, an additional subpage can be added in the Level2.
At the Front-End, the Privacy Notice (and other Static Pages such as Conditions of Use) are listed in the INFORMATION >InfoBox Admin>Templates>template>Edit>Left Column InfoBoxes Save
Terms of Service
Terms of service (abbreviated as ToS or TOS) are terms to by which one must agree to abide by or sets the “rules” governing the use of the web site.
Either switch OFF or EDIT the default complimentary ‘text’ and replace ALL ‘osConcert’ references with your own shop-name or write your own!
To edit the text of the Terms of Service Static Pages, please follow above steps. Admin>CMS>Static Pages
Author: Masud
Last update: 2020-09-10 07:08
How to set up Admin User Groups?
The Admin User Groups allow you to manage the osConcert software safely. In the Admin User Group you can add and delete Admin Groups, Member accounts and change their system access permissions.
Admin>Shop Settings>Admin User groups
Adding Admin User Member
Osconcert has pre-loaded Admin User Groups, for example Instructor, Call Centre Manager and Reservation Manager. The access rights for each of these specific group are set to default but can be changed at will. Each Group can be populated with (new) group members. It is not required that these Admin users are first registered to the osConcert Front-end (as customers).
Select the group to add a new member to and expand the tab.
Click NEW MEMBER. Fill out the credentials of the new Call Centre Staff member. Click the Save button.
Edit (delete/move)
To assign a password for the new member that can be changed later at will, RE-OPEN the tab by clicking the EDIT button.
Assign a password and click the SAVE button.
Edit Admin Group Access/Rights
Of each Admin Group specific access/rights can be configured.
Admin>Shop Settings>Admin User Groups>New Permissions, then jump to Admin Group via pull down menu. Save
Of each Admin group, the following sections and osConcert menu options can be (un)ticked;
Customer >> Orders Cms >> Faq
Cms >> Level Cms >> News OsConcert
Customer Checkout Customer Create
Customer >> Edit >> Orders
Save
Customer >> Wallet Marketing >> Survey Payments
Products Reports >> Sales
Reports >> Products Sales >> Coupons
Ensure to SAVE the Admin Group access rights settings.
Create New Admin Group
If, for whatever reason a complete new Admin User Group needs to be created, click the NEW GROUP option. Type new Admin Group Name and click the SAVE button.
Via the Pull down menu, select the new group via Admin>Shop Settings>Admin User Groups>New Permissions
To grant Web Developer(s) access to the various osConcert sections, tick the respective options and click SAVE.
Author: Masud
Last update: 2020-09-10 07:09
What is Alternative Edit Categories?
Alternative Edit Categories
This is the original (pre ajax) shopping cart Category and Product Editor and is useful when a user needs to put a lot of seats out of stock quickly or for blocking seats for Social Distancing requirements. In fact there is an option to HIDE seats from the seat plan completely and this alternative editor is ideal for that task until we improve the product editor for a future version.
Admin>Products>Alternative Edit Categories
Click YELLOW folder to DRILL THRU to next level!
Or select EDIT
Click YELLOW folder to DRILL THRU to next level!
Click seats OUT OF STOCK by clicking Status = RED Click seats IN STOCK by clicking Status = GREEN
Clicking the WHITE button will HIDE the seat cell completely (blank) Useful if you want to hold back a row of seats.
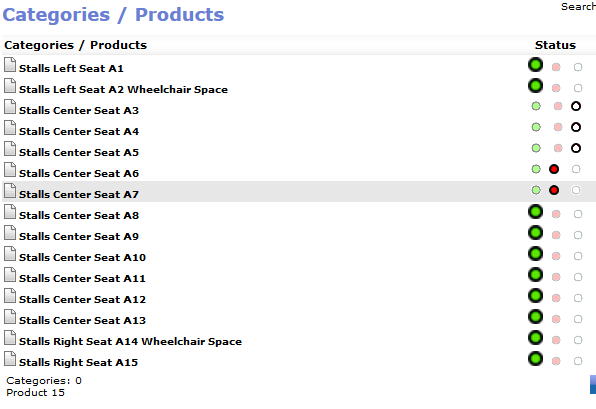
Author: Masud
Last update: 2020-09-10 07:16
How Can I Adjust Color Banding?
Color banding is referring to the colors used to identify and categorize seats in loaded seat-plans whereby each color represents a price range and/or a category (eg Stalls, Balcony, VIP, Student, Child etc).
Usually color banding per seat/product is arranged at the outset when the seat plan is integrated but there are other methods to achieve desired results.
If your seat plan is categorized by Rows there is an option in the Category Edit at Admin>Products. Here you can simply select the color you require for that Row , Save it and it will be reflected at the front end seatplan and listed at the Admin>Concert Details for pricing.
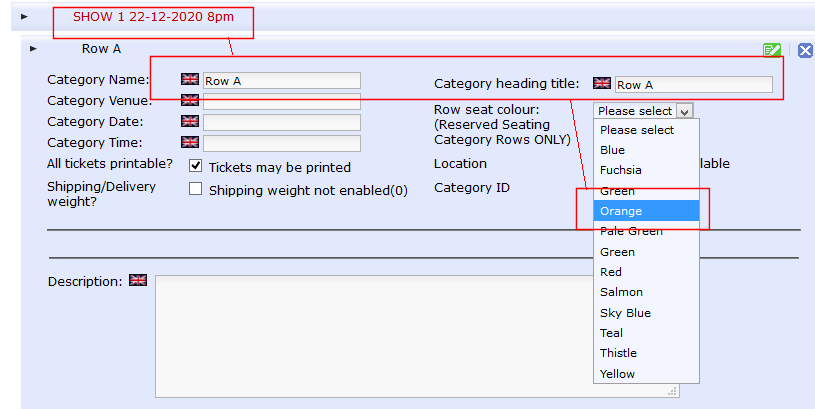
An automatic legend above the seat-plan at the front end displays all the colors/prices and any tickets that are currently in your seatplan, shopping basket or already sold (reserved).
osConcert is using a few colors by default (for example dark grey for ‘reserved/seats’). The following color-banding colors can be selected for color banding of seats;
Attention! COLOR BANDING NAME = ALL SMALL CAPS! (characters)!
Color-banding:
Here are my defaults. The color codes can be altered in your seatplan.css stylesheet.
Color:
Hex RGB:
red
#FA9C9F
blue
#C0FFFF
green
#80FF80
yellow
#FFFFC0
fuchsia
#FFC0FF
salmon
#FA8072
teal
#008080
orange
#FFA500
palegreen
#98FB98
skyblue
#87CEEB
thistle
#D8BFD8
DEVELOPERS: Actual Colors can be edited in the seatplan.css in the templates assets/css directory
Author: Masud
Last update: 2020-09-10 07:17
What is the correct way to label your Show for the menu and headings?
In Admin>Concert Details there is a heading name and a heading title (Name and a Heading) The Name is best kept short and sweet and it will appear in the left menu, but the Heading can be longer and hold some more detail. i.e:
Name: Les Misérables
Heading: Les Misérables – Romantic Musical
This might not be entirely ideal but we have the option of expanding the menu to present a venue, date and time on the menu.
Admin>Products>Advanced>Category Products>Expand Menus List=true
Here we can show the Venue, Date and Time on the second line of the 'Name' on the left menu.
Now we shouldn't get too long a SHOW name in the left column shopping cart where there is already limited space.
Author: Masud
Last update: 2023-09-06 06:59
How can I put a lot of seat/products ‘out of stock’?
There are a number of ways to put many products out of stock, here are some suggestions.
1-Go to Admin>Products
Locate the SHOW and ROW category
See the Seat Names with a ‘green’ button. Click the buttons to ‘red’
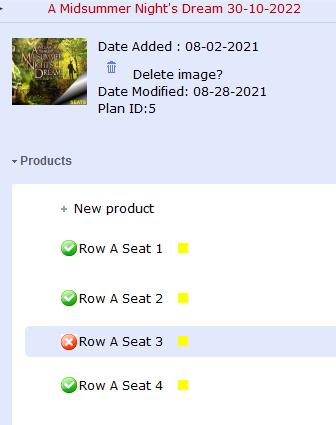
2-Got to Admin>Products>Alternative Edit Categories
Locate the Category>Row>Products by clicking the yellow folders
Click the green buttons to red, where it says STATUS. Furthermore to absolutely hide the SEAT product (as a total blank cell) Click the ‘white’ button.
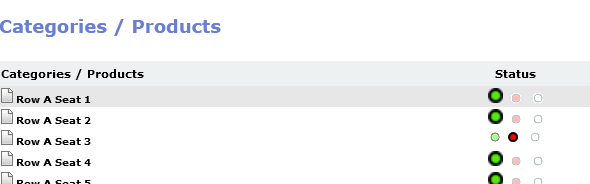
3-Goto Admin>Products
We can HIDE whole rows
But first we must add an ID to the products data
Goto Admin>Backups and RESTORE the file update_row_status_manufacturers_id.sql
Choose a Row you want to hide/block/reserve
Click the CHANGE button
Choose a status
Click Modify
The products in the Row will be hidden or reserved or blocked
When you want them back in stock....click the In Stock setting.
4-Alternatively, Make a DUMMY ORDER at the front end and DELETE the order without re-stocking the seats.
Author: Masud
Last update: 2021-12-22 09:05
How can I disable rows of seats quickly in osConcert?
In v9 there is a new feature 'Row Status'
Usually a 'Row' is a category of products that constitute a line of seats in a theatre.
IMPORTANT: What this really means is ...we can change the status of ALL products in a given Category not necessarily a straight ROW category.
Admin>Products>
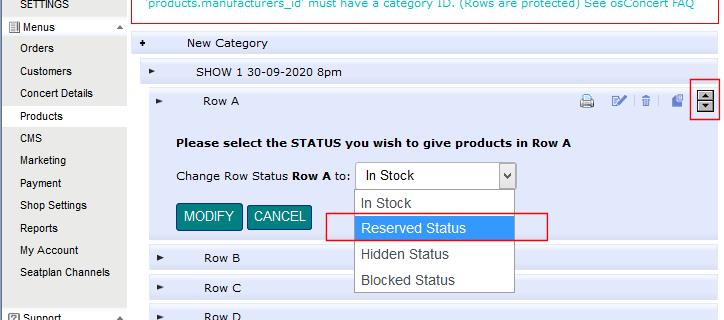
In fact there are 4 statuses to choose from
Hidden Status will hide the row seats completely
Blocked Seats will show grayed out seats for the whole row.
IMPORTANT:
Before you can change status of rows in Seat Plans you must set the 'manufacturers_id' to the category_id in the database. This can be arranged by running a SQL query:
UPDATE products
SET products.manufacturers_id=(SELECT products_to_categories.categories_id
FROM products_to_categories
WHERE products.products_id=products_to_categories.products_id);
You will find this query in the Admin>Backups folder.
update_row_status_manufacturers_id.sql
Author: Masud
Last update: 2020-10-07 11:54
How can I create a new GEO ZONE for TAX and PAYMENT modules?
This entry is in revision and can not be displayed.Author: Masud
Last update: 2020-10-07 13:17
What is the correct way set ‘company logo’ and ‘header background’ of your osConcert template?
This entry is in revision and can not be displayed.Author: Masud
Last update: 2018-09-22 04:47
How do we use the Location Filter
This entry is in revision and can not be displayed.Author: Masud
Last update: 2018-09-22 04:47
How can I migrate osConcert safely to another server host?
Points to know when migrating osConcert to another server
IMPORTANT: First you will have compressed and 'zipped' your existing osConcert application and downloaded to your computer.
You should have also SAVED the existing database. Usually exported via your phpMyAdmin Database Manager.
Make sure you application has the ‘install’ folder (ask osConcert for the correct version)
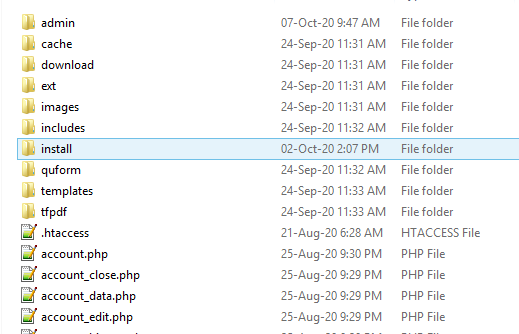
Make sure we have clean configure.php files (use includes/sample-configure.php)
includes/configure.php
admin/includes/configure.php
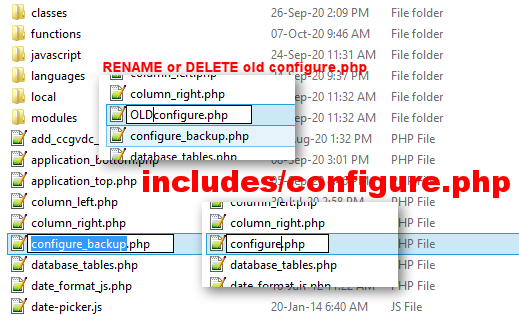
When you have created your new database
Go to your phpMyAdmin Database Manager and IMPORT your SAVED “osConcert” database
Upload an extract your SAVED application to your directory via File Manager or FTP

If it is for a sub-domain, we presume the folder will be name ‘tickets’
Find the application in your browser and run the install (Installation Guide)
THIS IS IMPORTANT
It tells us your database is already installed (you IMPORTED it earlier through your phpMyAdmin)
CONTINUE
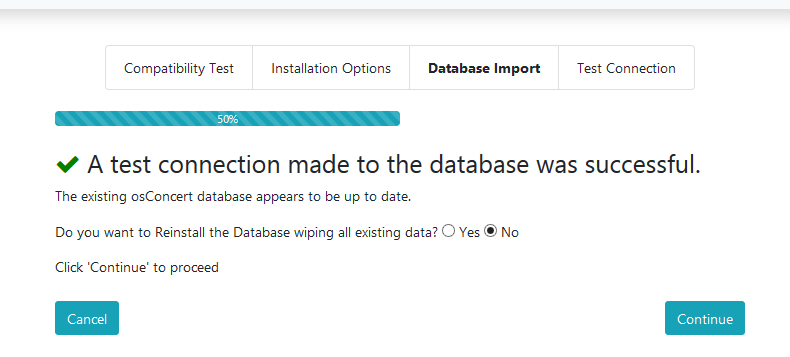
We just need to CONTINUE through the process to the end
Author: Gordon
Last update: 2020-10-07 07:58
What is the Season Tickets feature in osConcert?
osConcert Season Tickets Feature
Summary
These files will allow the store admin to create a ‘season’ or ‘multiple’ ticket which, when purchased, will permit a customer to go on and buy X number of tickets (where X is a pre-set number chosen by the admin).
The system operates by ticket quantities and not value – where tickets of different values are in the basket it will apply to the cheapest tickets first. If properly setup it will not apply to further season ticket purchases.
Admin>Products
1) (Create New Category) Create a new product – on the Type tab there is a new field ‘for Season Tickets’. You must enter the details here carefully – start with upper case SEASON then an underscore and then the number of tickets it should be valid for e.g.
SEASON_5 – five tickets
2) Then go to admin>payment>advanced>order_totals and install the season ticket module – if it is not installed then customers can still buy the tickets but will not be able to use them!
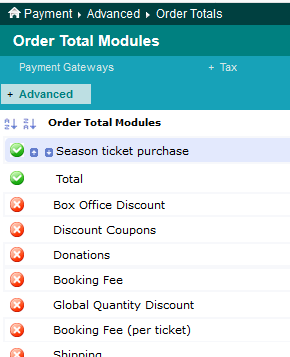
IMPORTANT – also go to the Admin > Payments page and install the free payments module ensuring that the zones are correctly setup – if neither of these are done then customers who fully cover an order with coupons cannot checkout.
osConcert Season Tickets
Operation – front end
Customers will purchase season tickets in the normal manner.
Once purchased they will be able to view their balance in their main account page:
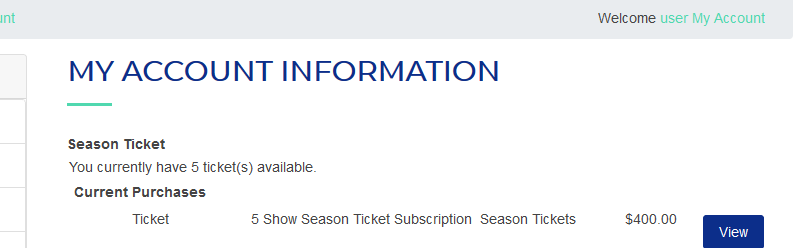
Then, once they have added normal tickets to their basket they will be provided the option to use a season ticket on the payment page:
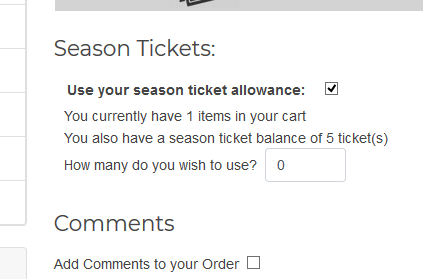
Once they have exercised the option there ...the confirmation page will reflect the financial results of their decision:
osConcert Season Tickets
As previously stated the module will apply credit on the cheapest tickets first if there are varying prices and it is not possible to make further season ticket purchases using a season ticket. (If a $0.00 total results you may have to verify that the default payment module can handle a zero purchase – some may not).
Here is a look at the settings:
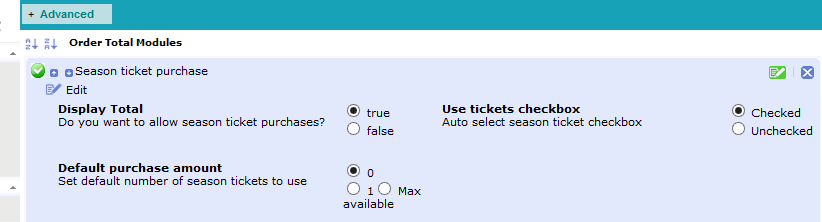
Author: Gordon
Last update: 2020-10-07 08:29
What is the Seat Plan Cache?
Admin>Concert Details>Seat Plan>Seat Plan Cache
When the seat plan cache has been enabled (the cache creates a memory of the seat plan pages for faster rendering to the visitors browser.)
If you are editing products, prices etc you may not see the changes immediately.
In this case then it would be better to clear the seat plan cache:
Admin>Clear Cache will do that for you.
Clear cache will empty the cached pages in the /cache/ directory
Author: Masud
Last update: 2020-10-07 08:31
How do we protect from server overload when encouraging a mad rush for tickets?
This entry is in revision and can not be displayed.Author: Masud
Last update: 2018-09-22 04:49
How can I set up a TAX for a specific ‘Country’ like UK and VAT?
At DEFAULT we have 3 GEO ZONES as USA, World Zones, and Australia
World Zones incorporates all the countries of the world outside of the USA and Australia.
However for a more focused exposure in your own country e.g. UK
We can create a new Geo Zone as UK (United Kingdom) especially for the purposes of setting a new Tax like VAT which is unique to that zone and not to all World Zones.
- Go to Admin>Payment>Tax>Zones and create a New Zone as UK – United Kingdom
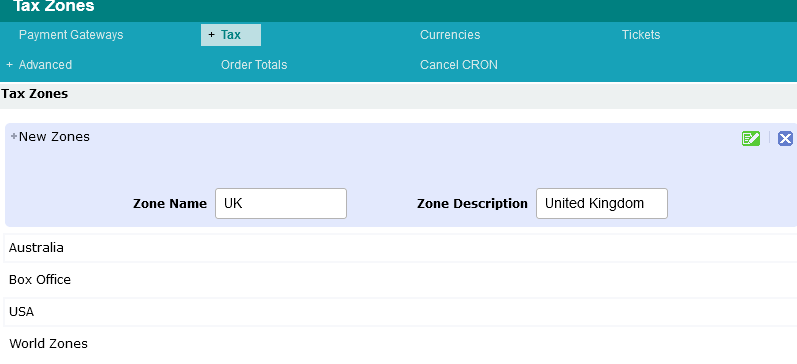
Further Edit this listing to select 'country'
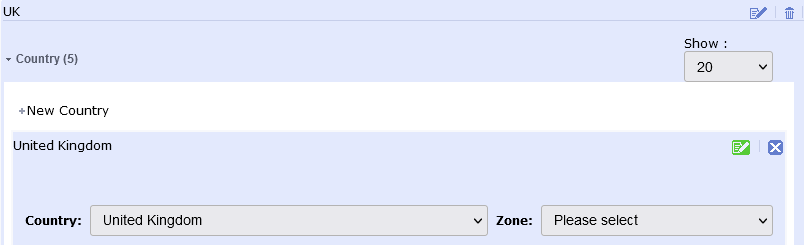
2. Next you should create the TAX that you require, in this example VAT at 20%

3. Create the Tax Rate Admin>Payment>Tax>Rates
And select the new zone = UK
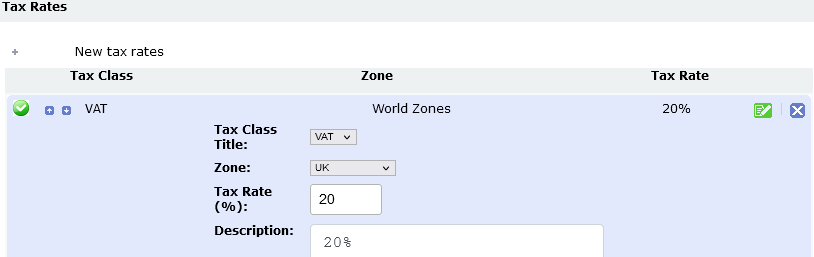
Now we can also go back to our Admin>Payments and select UK for a payment zones if required.
Author: Gordon
Last update: 2021-12-19 15:17
How do I apply the Restrict to Groups feature?
We are able to create specific ‘Customer Groups’ in Admin>Customers>Customer Groups
We are also able to apply a ‘discount’ for these groups so that if certain ‘Customers’ are selected by the Administrator in Admin>Customers>Edit
.........They will be eligible for such ‘discount’ and more importantly only customers in these groups will be able to select ‘products’ that have been restricted to their chosen group.
The default groups are:
Default - This will apply to all customers
Wholesale – This group has -20% Discount
We have added:
VIP – In this example we have added a group for VIP customers
#1 A ‘Customer’ is added to a ‘Customer Group’ eg Jack Jones is selected for the VIP Group
#2 Products are enabled in Admin>Products>Edit>General e.g perhaps all seats in Row A at the very front of the theatre can be enabled for VIP only
Now, when visitors or logged in ‘default‘ customers or customers not selected as a VIP Group visit the Front End seat plan..... they will see that all seats’ restricted’ to the VIP Group will be seen as ‘RESTRICTED’ –dark grey- and they will be unable to select the seats into their basket.
Those customers selected as ‘VIP’ however will be able to select the seats to their basket as soon as they log into their registered account.
DEVELOPERS:
Developers can apply the ‘customers_groups_id’ for the appropriate group from the ‘Customers Groups’ table directly in the database by running an SQL query to the ‘Products’ table for bulk products. The field is the ‘restrict_to_groups’
e.g Customer Group ‘VIP’ has a ‘customers_groups_id’=3
To apply the VIP status to all the seats with a ‘yellow’ color band. This is the type of query to run.
UPDATE products-
SET restrict_to_groups=3
WHERE color_code='yellow';
Author: Gordon
Last update: 2021-09-10 15:59
How can I change the 'reference_id' that is generated for each order?
Yes ...you can....Everything is Configurable!
reference_id is generated from line 161
checkout_payment.php and is inserted in TABLE 'orders' for each order.
The eTicket will reference this ID as a PlaceHolder %%Ref ID%%
$referenceID= substr(strtolower($order->customer['username']),0,5) . $order_timestamp ;
if (!$FSESSION->is_registered('referenceID')) $FSESSION->set('referenceID',$referenceID);
The default reference_id as of SEPT 2018
will create an ID beginning 5 letters of the customer 'username' and further expanded with an order timestamp.
Author: Gordon
Last update: 2018-10-16 04:16
How can we improve the Meta Search Tags?
About Meta Tags and improving search engine listings
Meta Tags
For your osConcert application….you will find your Meta Tags in the /templates/ folder
Specifically, file ‘main_page.tpl.php’
<title><?php echo STORE_NAME; ?> | <?php echo META_TAG_TITLE; ?></title>
<meta name="description"color: #ff0000;"><?php echo META_TAG_DESCRIPTION;?>">
<meta name="keywords"color: #ff0000;"><?php echo META_TAG_KEYWORDS;?>">
You will find your STORE_NAME in Shop settings.
Many users will remove the placeholders and set their own Meta Tags information.
If you choose to keep the osConcert placeholders….
You can manually improve Meta Data for specific category paths.
Admin>Marketing>SEO
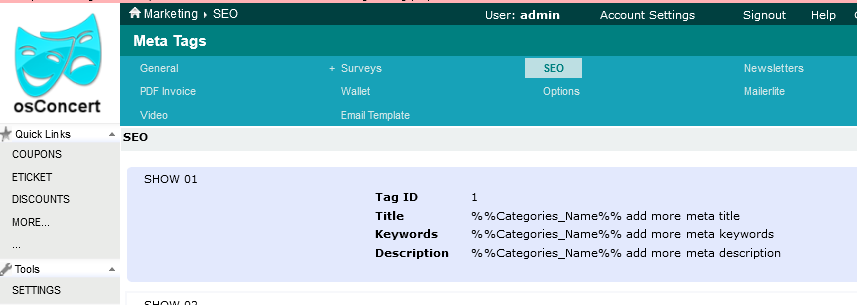
As you can see the SECOND part of our Meta Title, Meta Keywords and Meta Description is defaulting to the Categories Name Only
META_TAG_TITLE, META_TAG_KEYWORDS, META_TAG_DESCRIPTION
To improve Meta information for your specific SHOWS……edit the category paths for each of your SHOWS here.
Author: Gordon
Last update: 2021-09-26 11:16
How do I RESET my seat plans AFTER my events have ended?
It's easy to RESET your seat plans........but we only RESET the status of the seats to available again.
We don't reset your text: Headings and Dates etc. That is for you to re-edit when you set up for the next events.
To RESET goto Admin>Concert Details
Click the trash can icon at the right of your listings.
One by one rest each listing and you will be prompted with a small pop up.
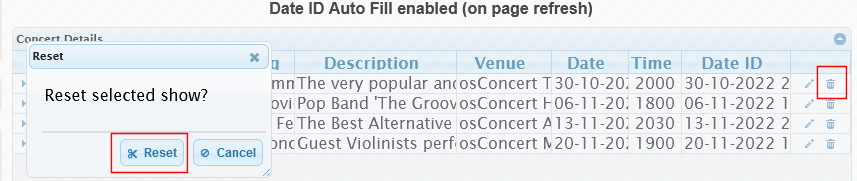
Author: Gordon
Last update: 2021-12-22 09:09
How to set Events to Expire automatically?
How to use Category Event Expiry Feature?
NOTE: This feature has been updated for osConcert Version 9.5 (May 2022). Contact support for patch files if you want to use it.
When events are created and the Date is picked from the calendar in Admin>Concert Details a UNIX Timestamp is recorded in the database for that category.
We can refer to this Timestamp to run functions to expire categories.
Before using the expire features make sure you have your TIMEZONE set correctly for your store.... e.g this a New York setting. Admin>Shop Settings:
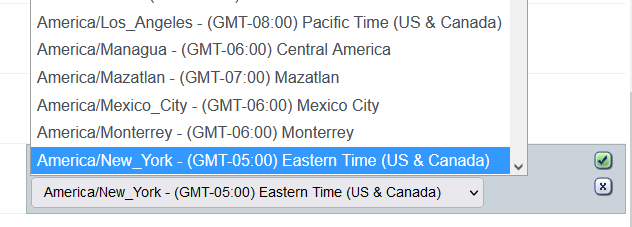
Tucked away in Admin>Products>Advanced are the Event Expiry Settings
When Allow full category expiry is actvated = yes. We can choose two ways to expire date enabled events.
1. UNIX expire Date and Time
Enable date_&_time to expire at the true DATE ID of the event.
So if you set DATE ID @ 11-10-2022 2000 (11th October 2022 at 8pm) then the full UNIX timestamp will be calculated and the expire function will de-activate the event. In concert details the ACTIVE button will appear as red for the expired event.
2. UNIX expire Date only
Enable date and use Categories Hour of Expiry and the event will expire from midnight of the date that you set for your event. So if you set date 11-10-2022 and hour of expiry 18 then 18 hours after midnight in relation to your TimeZone setting e.g Europe/London 6pm UK time your event will be de-activated.
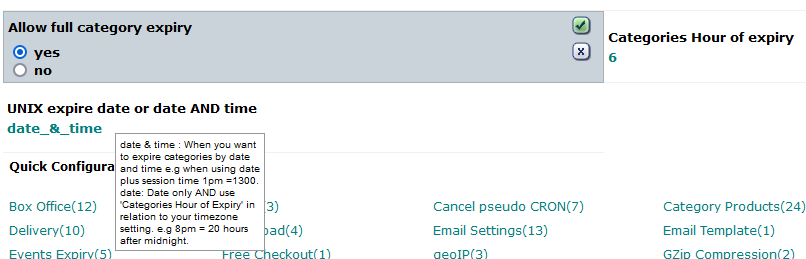
There will be a reminder in Admin>Conert Details

Author: Gordon
Last update: 2022-05-16 06:39
How to generate eTickets that are NOT sold as a downloadable zip file or to a folder in your server?
As of May 2022 the Print ALL Tickets feature has been updated and is available in osConcert 9.5
In Admin>Products where the show categories and products can be edited there is a print icon at every category.
This is a very useful feature if you want to generate and print all or the unsold PDF eTickets of a particular SHOW category. Click on the print icon and you will be be given the option to create PDF eTickets.

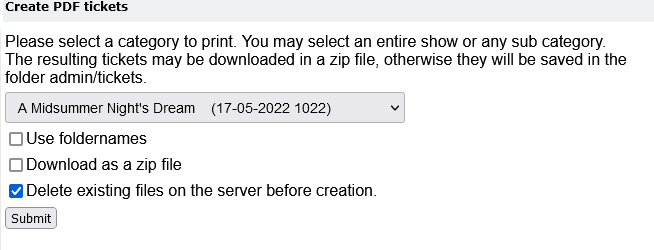
Selecting Folder Names will generate directories e.g a_midsummer_night_s_dream/osconcert_theatre/tuesday_may_17th10_22_am/ ........that may not be nescessary.
Download as a zip file is the best option.
You'll get something like this:
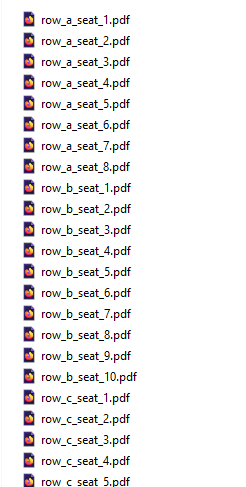
IMPORTANT: The default eTicket template is template_id=3 (TIC3)
from the TABLE ´general_templates´
Author: Gordon
Last update: 2022-05-16 07:12
How to set prices for the seat plan?
First go to Admin>Concert Details
Edit Prices of a complete show/category
IMPORTANT! Ensure the unique DATE-ID is set-up FIRST! If no DATE-ID is set up first, it will not be possible to edit prices of a complete show/category.
To edit or to set up prices for a Show or Category, click on the small blue arrow on the left to open up the sub menu and edit the prices section. Ensure the DATE-ID is set up first!
You will see your price banding listed with some information about total seats for the color-band and how many seats are sold. Double click to open a price text field.
IMPORTANT! Press ENTER on your keyboard to SAVE the new values.
To close the editing mode, click again on the small blue arrow on the left.
Author: Gordon
Last update: 2022-07-14 15:38
How to create a General Admission Event in version 9.5?
There have been some slight changes in the latest versions but setting up a General Admission event is much the same as before. You create a category and create products with a quantity. For Concessions you must create your concession products and set a Master Quantity for the residing category.
Admin>Products>New Category
New Product> write the Name ...e.g. Adult Ticket
TYPE tab IMPORTANT: choose General Admission from the drop down menu
COST tab Insert the price of the ticket
STOCK tab inert the Quantity of tickets
SKU should always be 9 for General Admission
SAVE and Exit by clicking the GREEN SAVE button
Now go to Admin>Concert Details to set Date and Time
For a complete FAQ guide about setting Concert Details
How do I correctly set Date and Time in version 9.5?
go here
That just about sets the basics for a General Admission Event
Now go back and upload an appropriate image for you event Admin>Products>Edit
Go to the Front End and check everything is as you like it.
NOTES:
Author: Gordon
Last update: 2022-08-11 05:53
How to enable Gift Vouchers for purchase and redemption?
It's now possible to allow your customers to purchase Gift Voucher/Coupons at a price they determine above $1.
They will recieve an eTicket as a GIFT VOUCHER with a generated coupon code that can be transferred but used only once for purchases at your store.
Here's how to set up a GIFT VOUCHER within your Administration
In Admin>Products create a General Admission category for your Gift Coupon product
Save it and create a product
If yours is version 9.7 in the TYPE tab set C: Gift Coupon (for older versions select General)
In tab COST set price=1
Create an unlimited stock or if you have a limite set it here as quantity.
IMPORTANT: Now set SKU = 6. This is a specific setting for Gift Vouchers
Save the product and go to the front end. You should see the product like this.
Don't forget to give the product an image and the category an image in the usual way.
Follow the instructions for setting up coupons for order totals in this FAQ
Now when a customer wants to purchase a GIFT VOUCHER they can set thier own price and purchase through your payment system just like buying a normal event ticket.
The customer will see the eTicket PDF and the Gift Code will be presented on the printable ticket/coupon. Now the recipient of the coupon code will be able to use it at your store just like any other coupons that are provided by you for discounts. They simple redeem the code at the checkout payment.
Author: Gordon
Last update: 2022-12-09 05:22
Can we remind customers of specific product at checkout?
For version 9.8 we have a simple feature that will allow the user to add a REMINDER product (or products) at the shopping cart page, the payment method page and the checkout confirmation page.
The administrator can choose which pages they would like to show the reminder and there will be a place to input Product ID's. There is also a place to edit the REMINDER text for the customer to read.
For example....perhaps you have an Event Programme you want to sell or some refreshments for the interval?
It's a simple nudge for the customers at checkout.
Author: Gordon
Last update: 2023-03-12 10:35
How to create discounts for the seat plan tickets?
If you want to offer a reduced price for your seat plan tickets rather than the full ticket price.
We have a feature called SaleMaker
Salemaker allows the user to create a special discount and when enabled the visitorcan choose the discount that suits them. For instance if we set a discount for Students for example...we can set a 20% reduction and insist that the Student Must Provide Proof of ID when the customer arrives at the door of the event.
We can apply this discount to All Categories or Specific Categories and we can create multiple types of Discounts.
To set up a Seat Plan Discount goto Admin>Products>Discount
Click > New Sale and follow the guide below to set up your first discount for the entire catalog
When you save this set up and goto the your seat plan at the front end ....the visitor will see a Pop Up like this screesnhot below and the discount will be applied to the shopping cart unless the custome clicks the No Thank You button.
Thats the very basic and recommended set up.
If you want to apply discounts to specific categories then you must UNCHECK the Entire catalog and check the categories to which this sale applies and then proceed to uncheck the categories that you DO NOT want the discount to be applied to.
Author: Gordon
Last update: 2023-09-11 04:58
What do we need to know about our outgoing emails to Customers and Box Office?
The osConcert Email Settings will be found in Admin>Shop Settings>Advanced>Email Settings
There will be a choice......you use your basic server Sendmail (nothing to do)
or you can create a SMTP account in your server email section and complete the SMTP settings according to the guidance from your server support
You will need:
SMTP: Server URL
SMTP: Username
SMTP: Password
SMTP: Access port (usually 587)
Enable DEBUG=2 if you need to see a complete readout of the email output in your browser
I typical way will be to set DEBUG and use the Password Forgotten page to send yourself an email.
If you have problems ...you can contact me for advice (gordon@osconcert.com)
We use the world famous phpMailer and it works well...but osConcert has no control after emails are sent from the system. Please advise your customers about ways they can retrieve their eTickets if they say they did not receive emails. Usually they are to be found in Junk Mail Boxes or some emails are just unreliable like yahoo/hotmail and even gmail. I use a fastmail.com account which is far superior to gmail.
osConcert recommends using the customer account system so that customers have the ability to login to their account to view and retrieve order conformations including the eTicket download.
There are some configurations you'll need to know...and I will try to address them in this guide.
Let me just highlight the DEFAULT settings.
- NOTE: All emails send will have the reply address you set in the Admin>Shop Settings>Email from:
- All emails will send to the customers preferred account address they entered at sign up
- Adminstrator has the option of receiving all copies of all successful customer purchase confirmations:
- Box Office agents can be sent email confirmations if the Box Office Setting below is in favour.
A setting = yes will stop Box Office Users receiving confirmations to their box office email address
- Box Office agents can initiate email confrmations on behalf of their customers using the Change Address Box Office Billing Address page
So the setting above means we are NOT HIDING the Customer Billing Address and so ....if the customers email address for the Billing form is set=true (it is true by default)
Admin>Quick Configuration Links>Customer Details
The above conditions will send an email confirmation on behalf of the Box Office agent to the customers email they have entered in thier Billing Address Form
IMPORTANT: All email confirmations will receive email attachements if the payment status = Delivered (successful payment) AND......where the eTicket settings are set like below
Author: Gordon
Last update: 2024-05-05 09:41
How to enable Gift Vouchers for purchase and redemption?
It's now possible to allow your customers to purchase Gift Voucher/Coupons at a price they determine above $1.
They will recieve an eTicket as a GIFT VOUCHER with a generated coupon code that can be transferred but used only once for purchases at your store.
Here's how to set up a GIFT VOUCHER within your Administration
In Admin>Products create a General Admission category for your Gift Coupon product
Save it and create a product
If yours is version 9.7 in the TYPE tab set C: Gift Coupon (for older versions select General)
In tab COST set price=1
Create an unlimited stock or if you have a limite set it here as quantity.
IMPORTANT: Now set SKU = 6. This is a specific setting for Gift Vouchers
Save the product and go to the front end. You should see the product like this.
Don't forget to give the product an image and the category an image in the usual way.
Follow the instructions for setting up coupons for order totals in this FAQ
Now when a customer wants to purchase a GIFT VOUCHER they can set thier own price and purchase through your payment system just like buying a normal event ticket.
The customer will see the eTicket PDF and the Gift Code will be presented on the printable ticket/coupon. Now the recipient of the coupon code will be able to use it at your store just like any other coupons that are provided by you for discounts. They simple redeem the code at the checkout payment.
Author: Gordon
Last update: 2022-12-09 05:22
Can we remind customers of specific product at checkout?
For version 9.8 we have a simple feature that will allow the user to add a REMINDER product (or products) at the shopping cart page, the payment method page and the checkout confirmation page.
The administrator can choose which pages they would like to show the reminder and there will be a place to input Product ID's. There is also a place to edit the REMINDER text for the customer to read.
For example....perhaps you have an Event Programme you want to sell or some refreshments for the interval?
It's a simple nudge for the customers at checkout.
Author: Gordon
Last update: 2023-03-12 10:35
What's new in osConcert Version 9.9?
If you didn't already know osConcert was upgraded for PHP8.1+ servers in Version 9.8
Click here to read about that
Version 9.9 is reserved for user upgrades, seat plan integrations and PRO Package users.
Now for 2024 I have my new version 9.9 I will be listing the improvements here in this FAQ
Updated Expiry feature....Now Global Event Expiry
Some users want to have an automated expiry of shows...in the older version there was a way to expire shows but it was too complicated to use....so I have simplified it for version 9.9
Many users wanted their events to expire a few hours or a maybe 30 minutes BEFORE the show start because they could then sell tickets at the door. Some users want shows to expire a few hours AFTER the show start. The show start is of course the Date & Time that is set in the Admin Concert Details as DATE ID.
I decided to make it easier and allow the Administrator to select one expiry setting for all events.
Now the expiry setting is a Global Expiry Difference in Admin>Marketing
Simply put ....if you choose Global Event Expiry as 30 Minutes BEFORE the show start & time ALL YOUR EVENTS will be disabled 30 minutes BEFORE your Event DATE ID's that you set in Admin>Concert Details
New improved Bootstrap 5.3 Templates with multiple color themes.
Yes..I have worked hard and learned a lot from my work developing my Dynamic Bootstrap Showcase Website database template system. Now I have an almost perfect responsive adjustable front end template system for osConcert.
Now apart from a professional default template in Light or Dark.....there are options for Static Hero, Fullscreen Hero and Fullscreen Video Background Hero and a Carousel Hero (Bootstrap Hero is the first Front Page Feature that a visitor will see when visting your default website)
Also there is an image slider for your Sponsor Logos at the footer...that will be very useful for users.
For a demonstration of my new updated template system visit my main Reserved Seating DEMO at my website...there you can try the Color Switcher
Now there is also a footer switch basic or more interesting for the 2 new templates Lightzone and Darkzone
Furthermore an improvment for the Newsletter Subscription Button now with a link to your Email Service Landing Page
Other improvements
Email debug: There is a setting in Admin>Emil Settings where you can DEBUG your SMTP service...a setting = 2 will show you a page of trace information about the email authentication and send details.
New Payment Sales CSV Report: Download a CSV report with an emphasis on sales made by different Payment Methods including Booking Fees and Tax
Fixed Create PDF tickets: One click and create basic PDF eTickets for any category...useful if you want to print the tickets that you didn't sell online.
New INFORMATION about seats blocked manually
BEFORE:
AFTER:
Now there are clues if there is ever any confusion about seats blocked or restocked
Here you can check details about specific seats and if they were blocked manually by staff or not.
UPDATED Design Mode
Now your Seat Plans can work with Left Column or Right Column enabled.
Add to cart is correctly disabled when in Box Office Design Mode.
UPDATED Seat Plan Cloning.
Now integrated Seat Plans large and small can be cloned correctly only for versions 9.9 and usually after an upgrade as your old seat plans will need to be updated. (Section ID must be perfect in all 5 category and product database tables)
Improved Coupon Discount Usage Report
UPDATED templates
Your seat plans made with Design Mode can now handle Left Column setting.
Now users can enable the Left/Right Columns for blog style and seat plans will collapse as expected on all devices.
Before Design Mode was only functional in full page mode.
NOTE: It is still recommended you build your seat plan in full page mode. After completion then try with Left Column enabled. (Some seat plans won't look that good with Left Column enabled)
If there are further features and imrovements I will add them here through 2024.
UPGRADE HERE
Author: Gordon
Last update: 2024-03-26 02:02
Box Office Method
How do we use the New Box Office Billing Address System?
In osConcert the basic Box Office Method was a simple way for assigned Agents to Bypass a Credit Card payment and to make fast orders, most probably for Cash at the Point Of Sale. This method is strictly for Front End only because we can select seats directly from the integrated Seat Plan.
2018 we developed a more improved way for Box Office staff to assign orders to customers by adapting the existing Billing Address system so that agents can create a Billing Name and Address for the order OR searching from the existing customer address book. We can even have the Order Confirmation sent to the customer's email address if we so wish.
The set up is simple! First we must enable Hide Choose Billing Address for BOX OFFICE=no ..... in Admin>Concert Details>Box Office settings.
This will allow Box Office users to CHANGE ADDRESS (change Billing Name and Address) for the order. Or it will remain as a Box Office order.
These orders will now appear as Customer =Box Office User and Purchaser = Billing Name and Address when the order is confirmed.
Here are the screen shots of what the Box Office User will see:
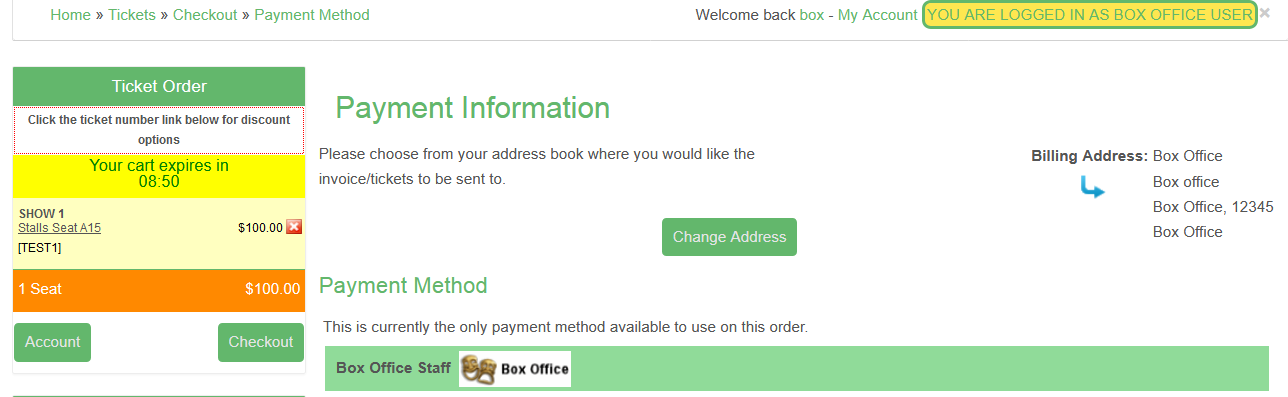
Box Office >Change Address

Search Address
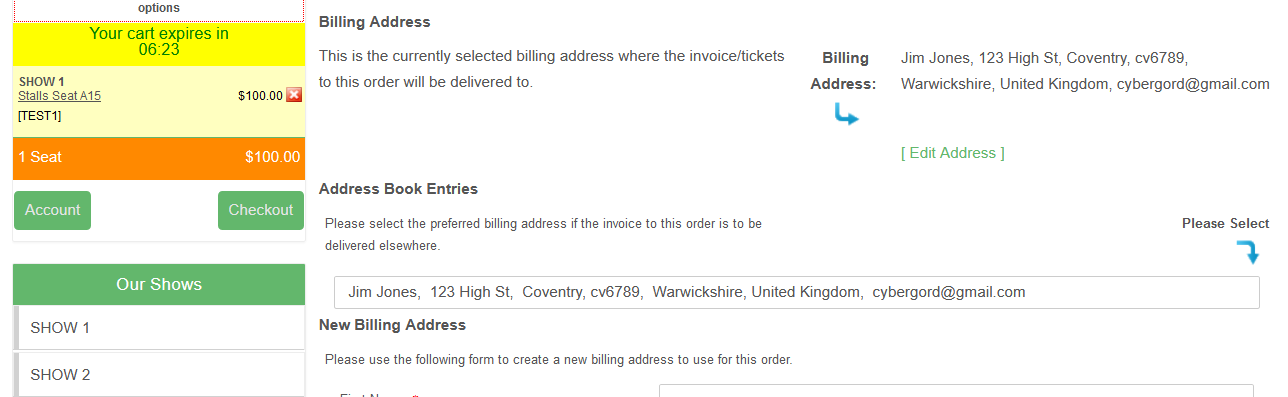
Selected Billing Name and Address
Here is the New Billing Address Form
All fields are configurable in the Admin>Shop Settings>Customer Details
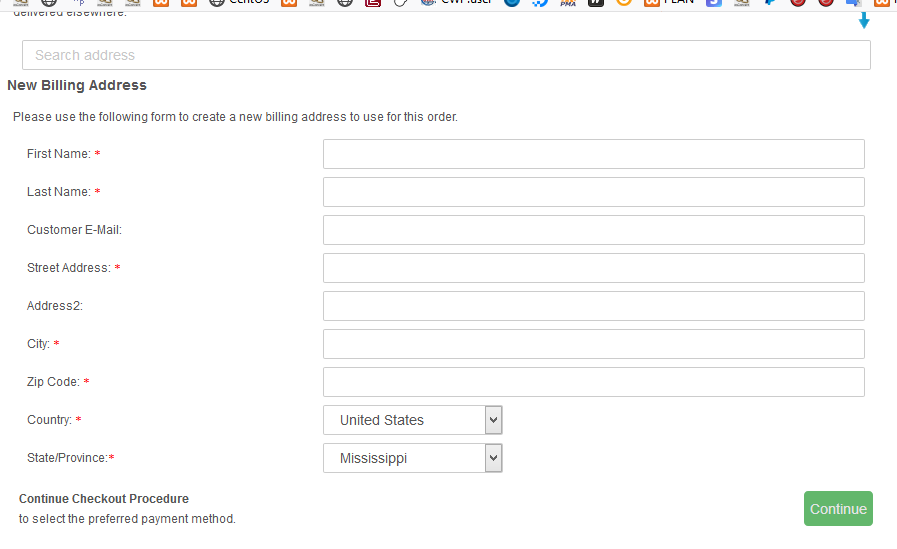
Author: Gordon
Last update: 2020-12-03 11:58
How do we set up Box Office checkout?
Because this is a VISUAL Seat Reservation tool, it’s better that reservations are made through the FRONT END checkout process.
We have the ability to nominate special customer accounts to be in the BOX OFFICE (Country Zone=Box Office).
Payment modules are Zone specific, and with Box Office = 'Country' we can enable an account to bypass any credit card modules and also be invisible to the public.
Orders can be noted as BO in the Admin and can be made by nominated staff/agents anywhere.
#1 The Administrator should nominate a (Customer) account to be a Box Office Staff or Agent, therefore they may well register through the Front End or YOU the Administrator may make the customer account in the Admin>Customers>New Customer.
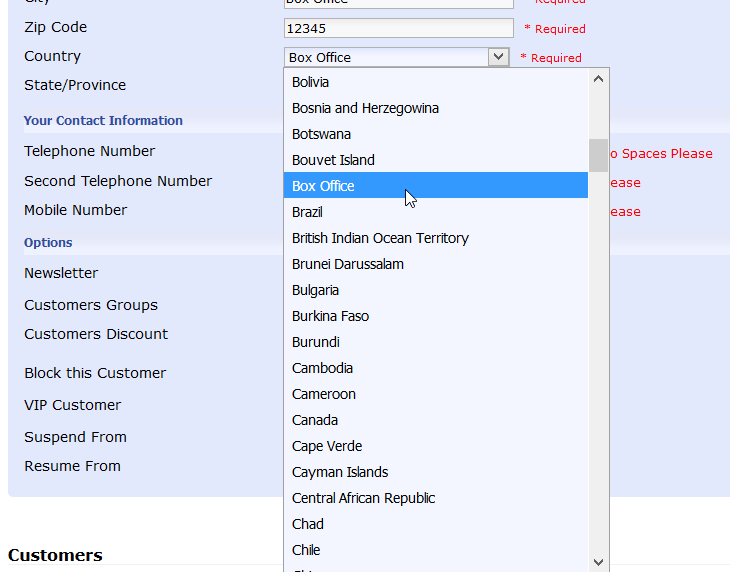
As the payment modules are very country specific, we can make our Box Office a country! Therefore when creating an account for BO we can select Box Office from the Country Dropdown in Admin>Customers>Edit.
Now BO staff are the only one’s who will be able to see Payment Modules that are Box Office Zone enabled.
Normal customers will never see or be able to choose the ‘Box Office’ country from the Front End Sign Up. ONLY the Administrator has permission to nominate accounts in Admin>Customers.
Create a user/customer account(s) in Admin>Customers edit the COUNTRY field to 'Box Office' now BO can use a payment module i.e. Admin>Payment>Box Office payment will bypass any credit card system. This doesn’t take the place of a customer order but allows the BO to make quick orders through the Front End.
#2 Set the payment module for Box Office access
Enable the Box Office payment module.
In Admin>Payment>

Now SAVE this set up and go to make an order at the Front End of the application.
Your staff can choose seats and make orders because they will see the Box Office payment method and can fly through checkout and even print the e-ticket if they set their payment status to ‘Delivered’
You can see the Order made by Box Office account ‘boxoffice’.
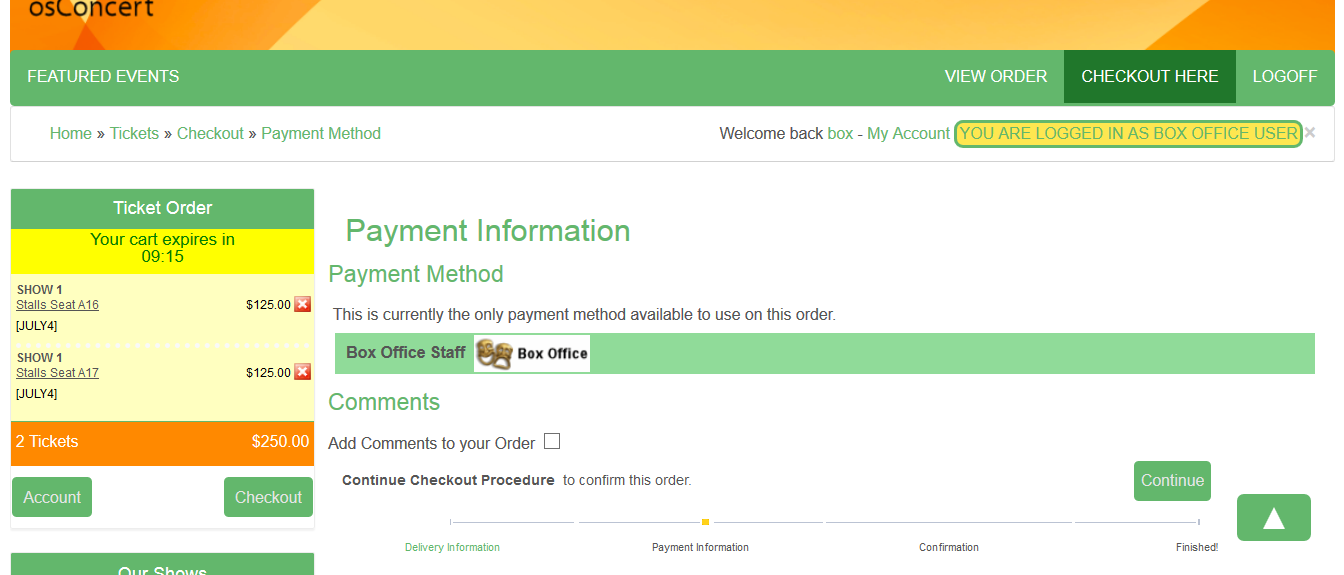
Now you are further able to edit the ‘Order’ details e.g the Billing Name and Address could represent the BUYER of the tickets.
In the osConcert SALES Report now the Administrator can identify and download specific sales reports for each nominated Box Office Staff by selecting the name of the nominated Box Office staff from the first drop down menu and clicking the Search button.
Author: Masud
Last update: 2020-09-10 07:30
How do I set a Billing Name for Box Office Staff orders?
Sometimes it’s necessary to identify the buyer of eTickets when making orders with a nominated Box Office account.
We can have a ‘Billing Name’ on the eTicket and Billing Name and Address in the order details.
The possibility is that we can have a ‘Customer Name’ (the registrant), the Billing Name, and if Shipping/Delivery is enabled a Delivery Name.
In this instance let’s just say we want the billing name on the eTicket.
When at the checkout confirmation page we have the opportunity to click a link to edit the Billing Name and Address:
(NOTE: You can show the Add Billing Address module in the checkout process if you like by editing the osConcert Settings. Hide ‘Choose Billing Address’=No)
Admin>Concert Details>Box Office
Create a new Billing Name and Address here and continue the order
Now at the checkout confirmation page you will see the new Billing Name and Address:
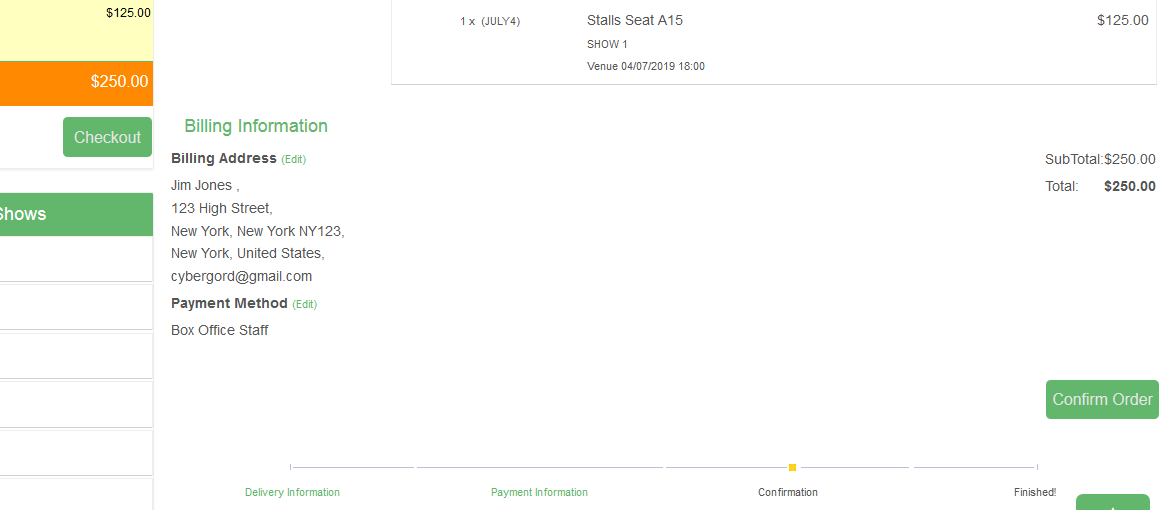
Before this will take affect we must edit our eTicket template and add another ‘Placeholder’ (%%Billing Name%%) to show the new Billing Name on the PDF eTicket
Admin>Payment>Tickets:
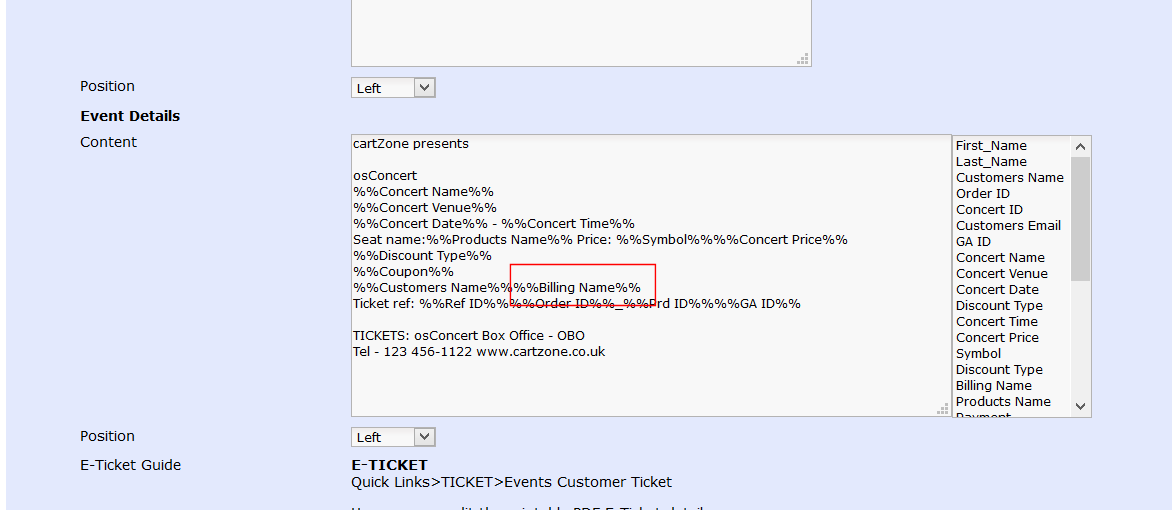
Finally when the Box Office Staff has made the purchase with the new Billing Name the eTicket will be generated :
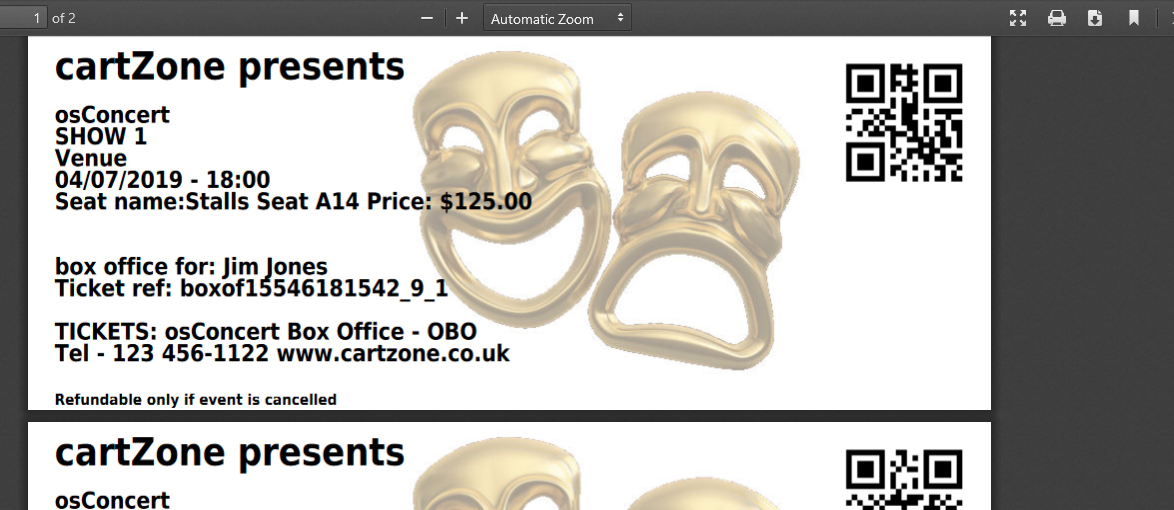
Also in Admin>Orders>Edit you will see the new details:
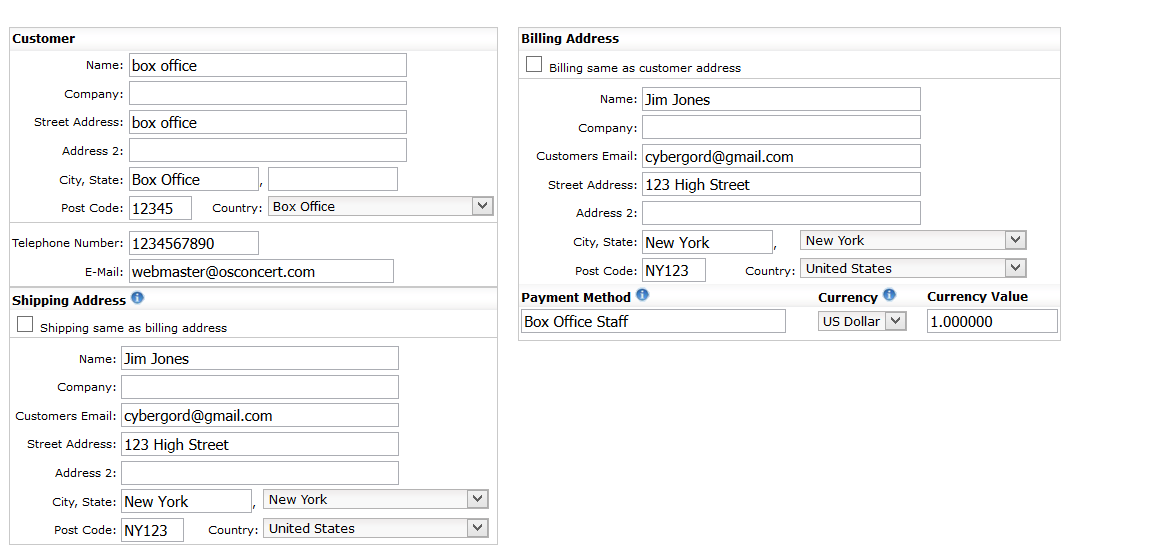
Author: Masud
Last update: 2020-09-10 07:33
What is Box Office Reservation Mode?
Box Office Reservation Mode is a payment/checkout module devised for Box Office teams. Agents can work together ....take RESERVATIONS and adjust the Orders Status later when payment is confirmed.
Admin>Payments>Box Office reservations
Enable this module
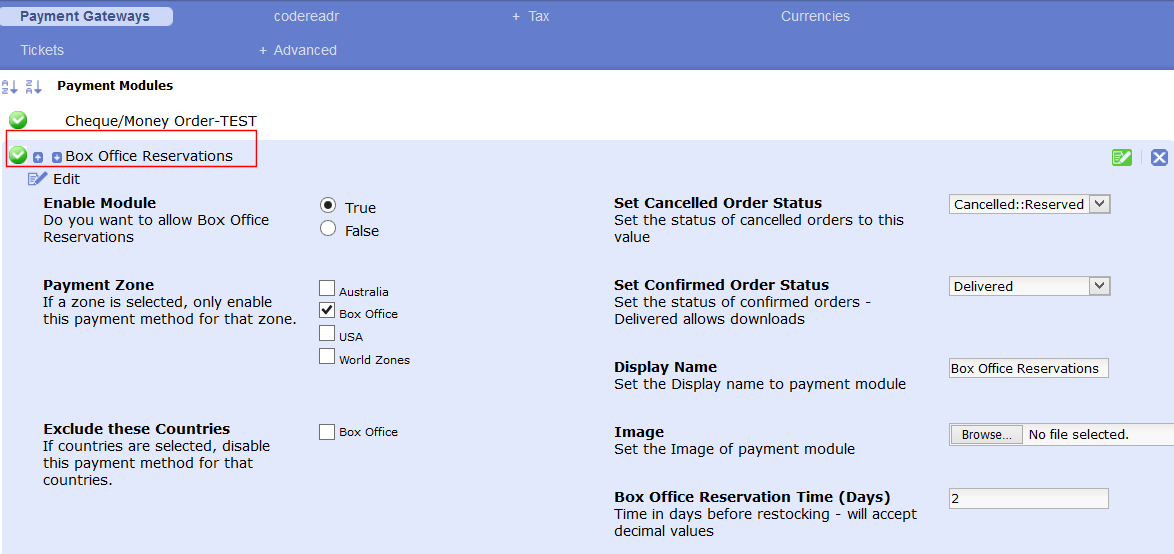
With a team of assigned Box Office agents working to secure payment for reservations... staff can make multiple orders with a ‘Reservation’ status.
No eTickets can be printed until an agent confirms the order from a list of Reservations made by themselves or other staff.
A time limit can be set at the module installation set up in Admin>Payments
Box Office Reservation Time (Days)=2 Time in days before restocking - will accept decimal values
If the Reservation extends the limit the seats will be automatically re-stocked and the Reservation will disappear from the list.
Once such an order is Confirmed the agent securing the payment becomes the Purchaser.
If a Reservation is unsuccessful or part successful any agent can Re-stock seats from that Reservation order.
A successful Confirmation will set the order status to ‘Delivered’ and only the successful/paid reservations can generate PDF eTickets for Box Office Staff to print.
All BO Agents can 'View reservations' from the link in the Front End.

A cancelled reservation order will have the status ‘Cancelled::Reserved’
The osConcert Sales Report will reflect sales made by each Staff member for download as CSV/PDF
Author: Masud
Last update: 2020-09-10 07:36
How Can We Enable oConcert For Box Office Sales Only?
Your osConcert will be installed on a server somewhere and will be accesable in a browser by all visitors but what if you don't want to sell to the general public but you want your Box Office Staff to continue to make reservations?
You can read more about the Box Office Method in this FAQ category
All Event Pages can be accessed by a Box Office Agent when the event is INACTIVE in Admin>Concert Details
First we need to enable a shop setting Admin>Quick Links>SP Settings>

I know it's not a good description for what we want but it does allow visitors to see the associated message in the same settings page

However, now visitors will see the message Sorry, the event is over......Box Office can see the whole page and continue to view it and make orders. The only challenge is that you will need to know the full URL address of the event because it will not be in any menu avaialable.
Usually and Event URL is like this index.php?cPath=123
You can find the cPath of an event in your Admin>Products page e.g ID= 13

Author: Gordon
Last update: 2023-06-15 07:43
Barcode Scanning
How can we scan eTickets using a Smartphone App?
osConcert generates PDF eTickets per order and the most popular choice of barcode is 2D QR
Here’s a short tutorial explaining how we can validate our eTickets using a smartphone app.
In fact a very powerful scanning app called ‘pic2shop Pro’ purchased from
http://www.pic2shop.com/pro_version.html for a small fee per device.
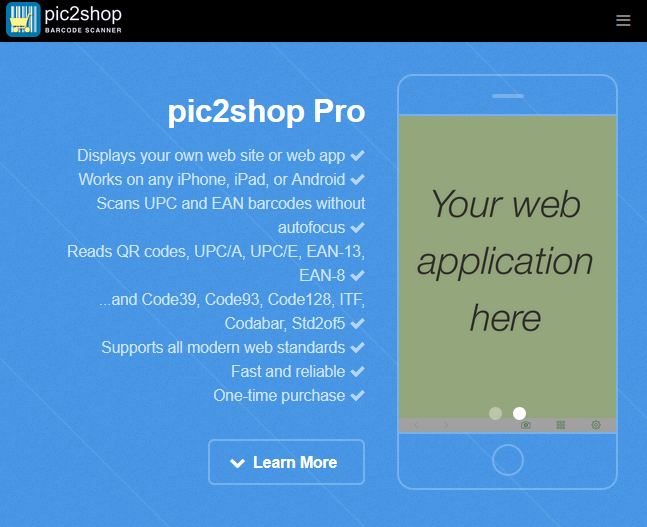
FYI: osConcert already has a database table ‘orders_tickets’ that collects the ticket data per order and makes it into a
unique ticket ID.
However for the Barcode Scanning we have a database table ‘orders_barcode’ that collects ticket data when the PDF
eTicket is generated. This data is accessed by the scanning app and updated for each successful QR scan.
Here’s a brief overview
In Admin>Concert Details. We set a correct concert date and concert time. (The time and date your Concert will begin!)
IMPORTANT! Users with applications BEFORE June 2019 must set EU/UK date format for the concert date

Users with applications AFTER June 2019 now set the DATE ID field for the scanning:

UPDATE 2022: Version 9.5 can automate the DATE ID setting when the user selects the the Date and writes the time. Below is also OK:

We set a PLUS TIME and MINUS TIME in the eTicket Settings

PLUS TIME is the period of time AFTER the Concert Start Time, therefore setting an expire time e.g. (+2 hours) BEFORE expiry
MINUS TIME is the period of time BEFORE the Concert Start Time, therefore setting a time to start acceptable scanning at the door of the venue. e.g. (-3 hours). BEFORE concert start
Now when osConcert starts selling the tickets and recording the orders. The database will record each eTicket generated and associate the eTicket with an Order and ultimately the purchaser. Somebody at the door of the concert will have the smartphone app and the app will have a location url for
identification. (There can be an app at different locations) . In this example we just use ‘demo’ as our location ID.
Barcode/QR lookup URL (for the settings in your smartphone app only!)
https://YOURDOMAIN.COM/osconcert/scanner.php?barcode=CODE&location=demo
Along comes a customer before the start of the concert with an eTicket either printed or downloaded to their phone.
The doorman simply scans the QR code and the app will respond in certain ways to tell us a status.
What we will want to see is a SUCCESS page on the app after each scan.
The status messages will be big bright and colourful. Ticket OK!
After each successful scan the database will be updated with a positive entry, the DATE, and the location ID.
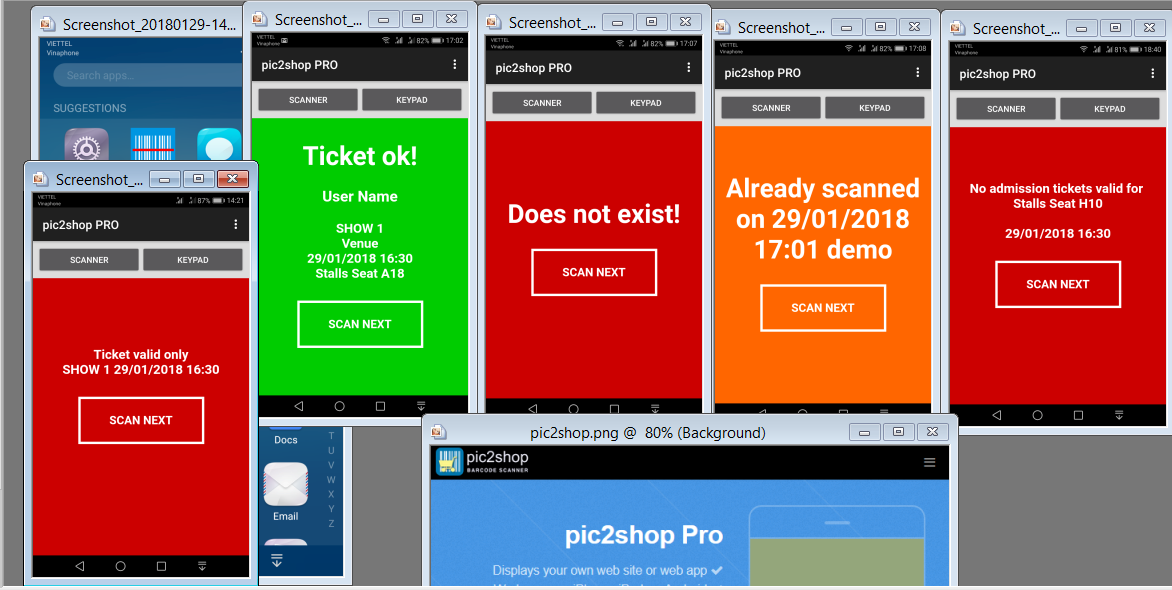
Other status message are self-explanatory as you see in the screenshots above.
Screenshot of the scanning report helper in Admin>Orders> Orders Barcode Scanned
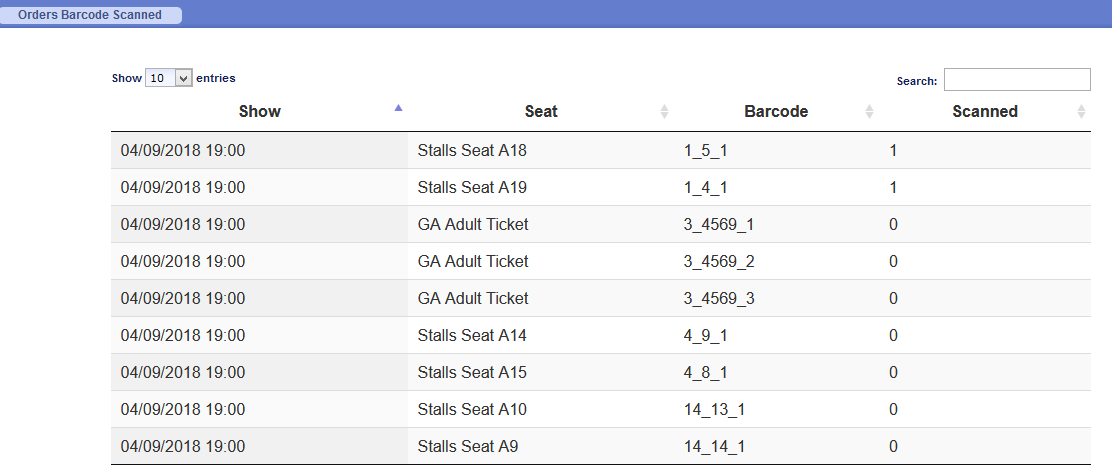
Author: Gordon
Last update: 2022-01-22 06:34
Payment System
How can I set up a TAX for a specific ‘Country’ like UK and VAT?
At DEFAULT we have 3 GEO ZONES as USA, World Zones, and Australia
World Zones incorporates all the countries of the world outside of the USA and Australia.
However for a more focused exposure in your own country e.g. UK
We can create a new Geo Zone as UK (United Kingdom) especially for the purposes of setting a new Tax like VAT which is unique to that zone and not to all World Zones.
- Go to Admin>Payment>Tax>Zones and create a New Zone as UK – United Kingdom
Further Edit this listing to select 'country'
2. Next you should create the TAX that you require, in this example VAT at 20%
3. Create the Tax Rate Admin>Payment>Tax>Rates
And select the new zone = UK
Now we can also go back to our Admin>Payments and select UK for a payment zones if required.
Author: Gordon
Last update: 2021-12-19 15:17
What do we need to know about Currencies?
In osConcert any currency can be created and edited at any time. The default currency of osConcert is USD ($) but this default setting and any other currency settings, including the denotation (symbol), Decimal or Thousands Point can easily be edited to suit your needs
If you don’t plan to have more than one available currency simply edit the existing currency ($) Just make sure it has a default setting.
Setting up a New Currency
Click on NEW CURRENCY in Admin>Payment>Currencies
Click to expand the NEW CURRENCY tab then click the EDIT button to fill out the respective fields.
Save
Title
Type here the TITLE of the new currency (=back end information) used for
the listing at the Admin>Payment>Currencies.
Code
Type here the CODE or an abbreviation of the Currency, Code is used in the preview of the expanded currency tab.
Symbol Left (front end)
Type the denotation (symbol) at the LEFT of the amount. For international currency codes, see also www.oanda.com.
Tip! Use a word processor to generate the symbol, then copy&paste the symbol into the Symbol left field in osConcert.
Symbol Right (front-end)
Some currencies require a symbol or string of characters after the amount, for example “cents”. Type here the right symbol.
Decimal Point
Type here the symbol for the decimal point.
Thousand Point
Type here the symbol for the Thousand Point.
Value
If this is the “Default currency”, set value to 1.00000000. If this not the default currency, type here the exchange-rate value for your currency, eg the value in relationship to your Default Currency.
NOTE: the exchange rate values need to be manually updated periodically. See also www.oanda.com.
IMPORTANT! EVERYTIME a currency is set up OR edited, ensure to tick the default-tick-box to set the currency as the default currency and click the SAVE button! Failure to do so will result in osConcert displaying “Price=0” without a Currency.
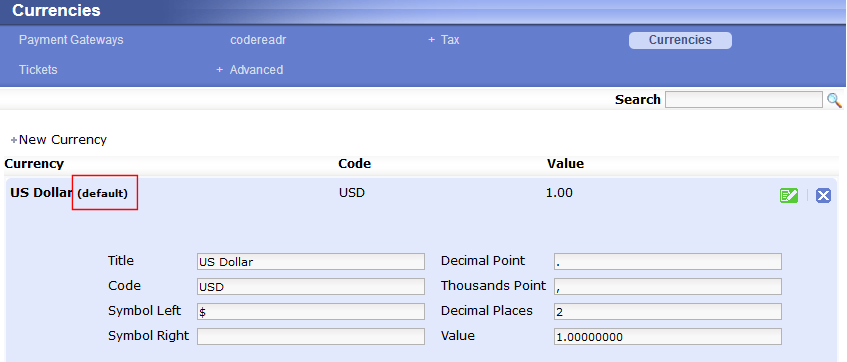
Displaying Currencies (front end)
After setting up 2 or more currencies, ‘Enable Currency’ module in Admin>Shop Settings>Templates>Info boxes. This will add a currency pull-down module at the front end that allows your customers to make a currency selection at the left side menu at the front end at the moment of ordering. After selection of a different currency, all prices will automatically display in the selected currency.
Author: Masud
Last update: 2020-09-10 07:39
What do we need to know about Payment Selection (at Front End)?
Regardless how you configure osConcert offering tickets to your customers (eg. Paid, Free, with Seat-Plans, General Admission or with a Box Office), in order to complete a successful transaction, osConcert needs to be configured with 1 or more pre-installed payment modules.
Payment Modules in Admin>Payment>Payment Gateways
Payment, Order Status and Ticket Delivery
In osConcert as in any shopping cart it is important to understand the ‘order status’. We should remember that a ‘Pending’ status will mean that we have yet to collect full payment and a ‘Delivered’ status will mean that we have full payment and we can release our PDF E-Tickets for download and printing.
All our Payment Modules will need the correct payment status. We have ‘Pending’(1), ‘Processed’(2), ‘Delivered’(3),’Backorder’(4), ‘Refund’(5), and ‘Preparing [Paypal]’(6), -where () is the programming element.
IMPORTANT!: It is recommended that new users DO NOT set the delivery status of a Payment Module to “Processed” as the final status.
The Payment Modules for paid ticket sales with osConcert are programmed in such way that the default delivery status of e-tickets is set to the appropriate delivery setting to ensure a successful transaction. If osConcert is set up to offer e-tickets for which first a payment needs to be received (=processed), for example by a Cheque/Money Order or Bank Transfer, the default delivery status in these Payment Modules is set to “Pending”.
And, for example for FREE tickets, the default delivery status is set to “Delivered”. OsConcert will send an automatic email with the e-ticket and customers can also access their account to retrieve e-ticket(s) immediately as there is no need to first process (receive) any payment.
Payment Module Inclusions/Exclusions
A customer’s sign up address will determine the zone and/or the country of ordering. The Payment Modules has to be configured to be zone and/or country selective; if zones and/or countries are set to be included or excluded in a Payment Module, this payment method is either enabled or disabled for customers in these zone and/or countries.
This is a handy feature if, for example, to focus money orders from only customers in a certain zone and/or country. For all customers from all other zones and/or countries the Money Order option will not be visible at the front end but these customers will see the other payment options for which they are not excluded.
Payment Modules enabled in Admin
Payment selection at Front End
For Free Tickets, osConcert has a pre-installed Free Payment module; if a true “0” order value is detected i.e from a 100% COMP (coupon discount) , there is a modified check-out, bypassing the selected payment method altogether.
Installing Payment Modules
osConcert offers a list of Payment Modules that you can install, rename, edit and delete (uninstall) from the listing. For example Cheque, Money Order, PayPal or a dedicated payment processing option of one of many national Banks.
Admin>Payment>Payment Gateways
In the Payment gateways the INSTALLED and the UNINSTALLED Payment Modules are listed. The order of the installed Payment Modules (=Back-end and Front-end) can be changed by clicking the up or down arrow next to the Payment Module name.
For UNINSTALLED payment modules, select a payment Module from the uninstalled modules and click to expand the payment module tab. Click the INSTALL button.
The installed Payment Module will now be listed in the Installed Payment Gateways summary.
Deleting a Payment Module
It is possible to delete a Payment Module. However, it may be more convenient just to HIDE a payment module at front end and preserve the settings; to do so, click to expand the Payment Module tab, click EDIT and change the TRUE status to FALSE.
If the payment option you want to use is not listed and you want to have a customized payment module, osConcert may be able to assist but please do not underestimate this (credit card) processing; you will need a merchant account with a bank and your bank might recommend third party software extensions that needs to be integrated into osConcert. For more info, please contact us
Payment Modules – introduction
IMPORTANT: PLEASE SET YOUR DEFAULT CURRENCIES BEFORE enabling any payment modules
In osConcert, as in any shopping cart it is important to understand the 'order status'. We should remember that a 'Pending' status will mean that we have yet to collect full payment and a 'Delivered' status will mean that we have full payment and we can release our PDF E-Tickets for download and printing.
All our Payment Modules will need the correct payment status. The most important payment statuses are; 'Pending'(1), 'Processed'(2), 'Delivered'(3). (the other statuses are 'Backorder'(4), 'Refund'(5), and 'Preparing [Paypal]'(6), where ()is the programming element)
Each payment module has its own language file, which you will find in the includes/languages/english/modules/payment folder.
All installed Payment Modules in osConcert are listed in alphabetical order and can be previewed by double clicking on a Payment Module tab. To edit, install the module first, then click the EDIT button to configure the Payment Module fields.
Admin>Payment>Payment Gateways
Reservation
This module is a simple way for customers to make a reservation. A 'Pending' status must be set.
Cheque/Money Order
This module serves as a simple starting point for use with ‘Pending orders’.
Money order payment message displayed at the Front End:
COD (Cash On Delivery)
Similar to Cheque/Money order Payment Module, Cash on Delivery (COD) Module is also a simple module for use with “Pending” or “Back-order” orders.
This module also has a feature to restrict to certain Customer Groups.
Restrict to customer groups (default=1).
Comma separated list of customer group numbers.
So it can be used in different ways.
Paypal/Paypal Credit Cards (API)
You will need to have a Business Email and have access to the https://developer.paypal.com/developer to collect your Keys and Secret Key
Bank Transfer Payment
The Bank Transfer is configurable for all banks for ‘Pending’ orders and not for Direct debit.
DEVELOPERS:
It’s important to know we can relay the Bank Transfer information to be displayed in the resulting Email Receipt and the Invoice.
The information is configured in the includes/languages/english/modules/payment/bank_transfer.php As definition: MODULE_BANK_TRANSFER_INFO
This can be presented in the Email Receipt and Invoice templates Admin>Marketing>eMarketing>Products>Product Sale and Custom Invoice template with place holders:
Bank Deposit Message as place holder %%Bank_Deposit_Message%%
Box Office
The Box Office Payment Module (BO) is the associated module for the osConcert Front End Box Office system. OsConcert has the ability to nominate special customer accounts to be in the BOX OFFICE (by selecting BO in the Country Zone).
The Administrator should nominate a (Customer) account to be a Box Office Staff or Agent, therefore they may well register through the Front End or the Administrator can create the customer account in the Admin>Customers>New Customer or edit an existing account. Details described here: Box Office Checkout.
Free Payment
The Free Payment is an invisible module introduced recently to help users issue complimentary tickets.
The Free Payment Module works in tandem with the Gift Voucher/Coupon feature.
After the administrator installs and enables the Free Payment Module, whenever anybody uses their complimentary coupon code (100% discount) e.g ‘COMP’ they will be able to complete the checkout process with as ‘zero’ order total and if the order status of the module is set at ‘Delivered’ they will be able to generate and print their tickets without problem.
IMPORTANT! A truly FREE concert is taken care of by a free checkout process, bypassing the whole checkout process altogether if a ‘zero’ order is detected. (If price is set to zero)
How to use Free Payment with 100% Coupon Discount
It is important to get the correct set up when enabling the Free Payment module so that you can give out complimentary tickets.
First make set up a new Coupon/Voucher Admin>Orders>Vouchers/Coupons>Discount Coupons Set the discount to 100% and a suitable Coupon Code e.g COMP100
Make sure you have set the Order Totals Admin>Payment>Advanced>Order Totals to accept Discount Coupons. This is very important because if we make a mitake here we will have errors.
To correctly set the Order Totals, first DELETE all the existing order total modules and RE-INSTALL them all again but start with the Discount Coupon module, then Sub Totals and lastly Totals.
Enable the Free Payment module in Admin>Payment (only for the time you will allow complimentary tickets)
Now your family and friends can redeem their Discount Coupon (code COMP) at the checkout and the actual selected payment module will be ignored and the confirmation will itemize the discount and the total will be zero.
As an added feature, we can enable Enforced Coupon at checkout. This way the whole application can be restricted only to those that have a valid Coupon Discount.
Therefore a theatre can offer pre-show sales and complimentary tickets to family and friends before actual sales begin.
Wallet Payment.
Wallet Payment (WP) is a wonderful seldom used payment option. Registered users are able to top up their digital wallet account and use the balance later for purchasing tickets. One advantage is that the Administrator is able to top up user-accounts with money for whatever reason.
Customers can login to their accounts and top up using one of your payment methods e.g Paypal/Paypal Credit Cards
When Wallet Payment is enabled a customer is able to go to their Account and Upload Funds to their own Wallet Account
When the customers Wallet Upload is complete funds won’t be immediately available until the Administrator receives notice of the Wallet Upload and Updates the status to ‘Delivered’
For the Administrator to complete this process go to Admin>Reports>Wallet>Wallet Uploads, locate the upload and update the status from the drop down list
PayPal PayFlow
We do have a working module but there may be an more updated version available. This module is over ten years old.
Author: Masud
Last update: 2020-09-10 08:00
Discount Mods
How do I correctly set Free Payment (complimentary tickets)?
The Free Payment is an invisible module introduced to help users issue complimentary tickets. The Free Payment Module works in tandem with the Gift Voucher/Coupon feature.
After the administrator installs and enables the Free Payment Module, whenever anybody uses their complimentary coupon code (100% discount) e.g ‘COMP’ they will be able to complete the checkout process with as ‘zero’ order total and if the order status of the module is set at ‘Delivered’ they will be able to generate and print their tickets without problem.
IMPORTANT! A truly FREE concert is taken care of by a free checkout process, bypassing the whole checkout process altogether if a ‘zero’ order is detected. (If price is set to zero)
How to use Free Payment with 100% Coupon Discount
It is important to get the correct set up when enabling the Free Payment module so that you can give out complimentary tickets.
First make set up a new Coupon/Voucher Admin>Orders>Vouchers/Coupons>Discount Coupons
Set the discount to 100% and a suitable Coupon Code e.g COMP100
Make sure you have set the Order Totals Admin>Payment>Advanced>Order Totals to accept Discount Coupons.
This is very important because if we make a mistake here we will have errors.
To correctly set the Order Totals, first DELETE all the existing order total modules and RE-INSTALL them all again but start with the Discount Coupon module, then Sub Totals and lastly Totals.
Enable the Free Payment module in Admin>Payment (only for the time you will allow complimentary tickets)
Now your family and friends can redeem their Discount Coupon at the checkout and the actual selected payment module will be ignored and the confirmation will itemize the discount and the total will be zero.
As an added feature, we can enable Enforced Coupon at checkout. This way the whole application can be restricted only to those that have a valid Coupon Discount. Therefore a theatre can offer pre-show sales and complimentary tickets to family and friends before actual sales begin.
Author: Masud
Last update: 2020-09-10 08:01
How do I set up Discount Coupons?
Sales Discount-Coupons
With osConcert... it is possible to generate unlimited Discount-Coupons or Gift Vouchers.
The Administrator can send COUPON CODES to registered customers.
Customers can REDEEM codes at the Checkout Payment page.
Admin>Orders>Vouchers/Coupons>Discount Coupons (Enable existing Coupons here)
Goto Admin>Orders>Vouchers/Coupons (Set up new coupons here)
Click the ‘New Discount Coupon’. Create the conditions for your Coupon with the help of the guide on the right side.
We can create Fixed Discount or Percentage Discount (add % to the value)
Usually the “All Categories” is suffice but you can apply the discount coupon to a certain category or product.
Click the PREVIEW button and click the CONFIRM button when you are satisfied the conditions are correct.
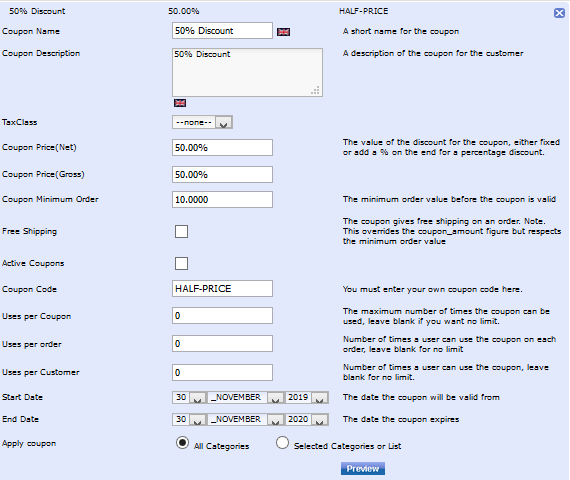
This should save the coupon to the Coupon Name list and you may need to click the status button from RED to GREEN to activate it. Admin>Orders>Vouchers/Coupons>Discount Coupons
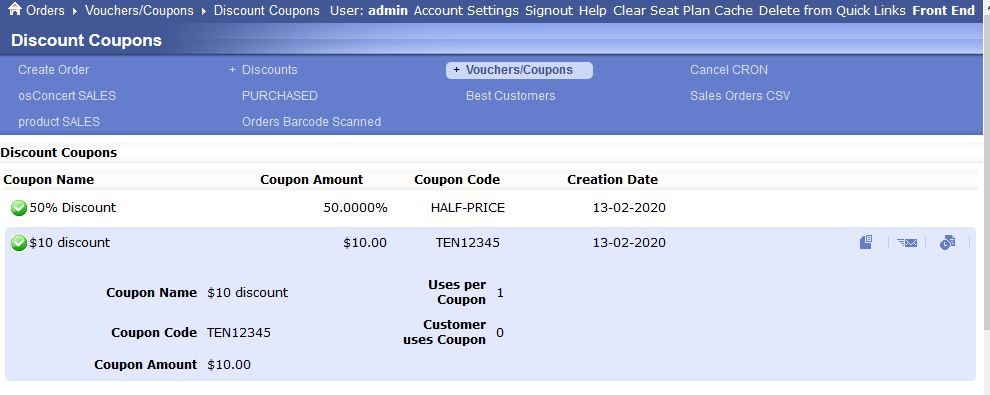
That should have created and activated a coupon and its COUPON CODE that you can send to your customers.
Customers will be able to see this page...where they can enter their given Coupon Code and Redeem their coupon with the Validate Button
But before we do that we should also set the Order Totals in the osConcert to display coupon discount correctly at checkout.
Admin>Payment>Advanced>Order Totals
In the Order Totals module first DELETE the already installed modules (SubTotal, Total etc) and then RE-INSTALL with Discount Coupons most likely your second module, AFTER SubTotal and then the Total module must be the last to install.
This will give a correct order display in the checkout confirmation page.
Sub-Total
Coupon Discount
Total
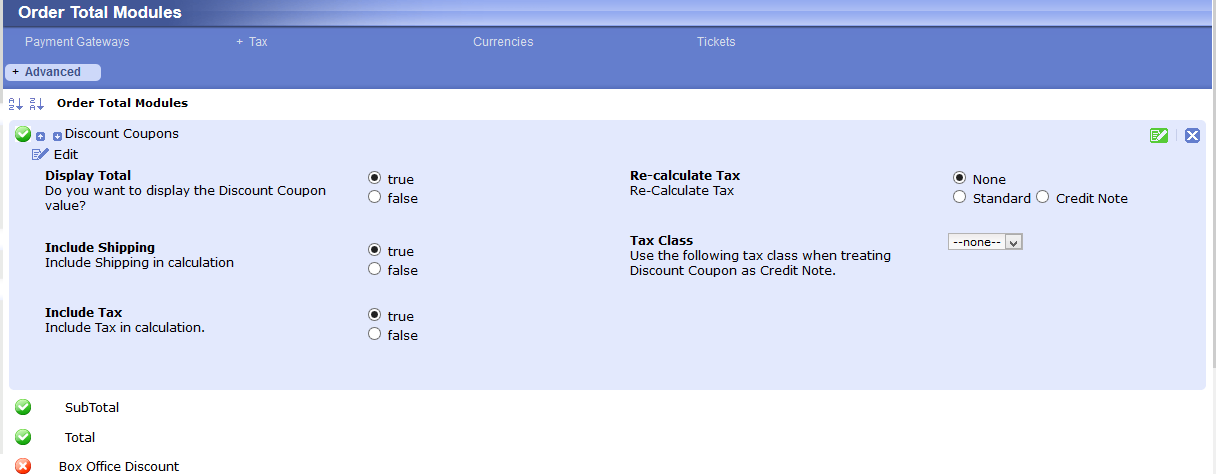
Emailing Discount Coupons
After the Discount-Coupon is created it can be emailed to your customers. Click and highlight the Coupon-tab and click on the EMAIL icon to open the coupon-email generator.
From the pull down menu, select to whom you want to email the Discount Coupons to. Use the wysiwyg editor to edit the Discount Coupon text.
Click the PREVIEW button to preview the Discount Coupon Email. Then click the SEND EMAIL button.
Your customers will receive the Coupon by email.
All a customer need to do when they receive the COUPON code from you, is tick the Redeem Gift Voucher tick-box on the front end and enter the Voucher code in the appropriate REDEEM box where it now appears in the checkout payment process.
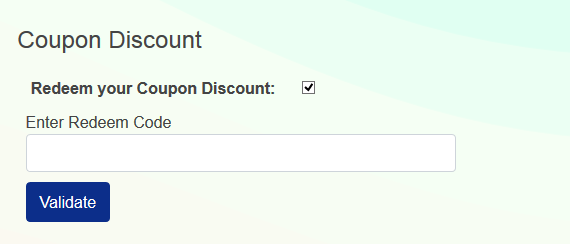
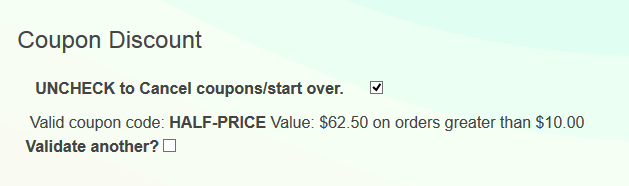
Note that the discount will be calculated and shown in all Order Details and in Reports inside osConcert.
Author: Masud
Last update: 2020-10-08 06:17
How can I set up bulk coupon codes? (Advanced)
This entry is in revision and can not be displayed.Author: Masud
Last update: 2020-09-10 08:05
How can I arrange priority booking using a Coupon Code?
We can use the COUPON system to allow friends to access the system to purchase tickets at full price before opening to the public
Go to Admin>Shop Settings>Advanced>osConcert Settings>Enforced Coupon=YES
Now we can create a New Discount Coupon in Admin>Orders>Vouchers and Coupons
We can make the discount zero
Don’t forget to enable Discount Coupons for the Orders Totals
Now at checkout a customer is asked to provide a Valid Coupon Code
Those with a valid coupon code can now checkout and purchase their tickets as priority
When you want to open up to the public set Enforced Coupon =NO
Author: Masud
Last update: 2020-09-10 08:04
How to set Sale Maker Discounts?
How to set SaleMaker Discounts to the seat plan products?
Admin>Orders>Discounts>Products>SaleMaker
SaleMaker gives us the ability to set discounts for our seatplan products/tickets ...preferably as a customer choice setting only.
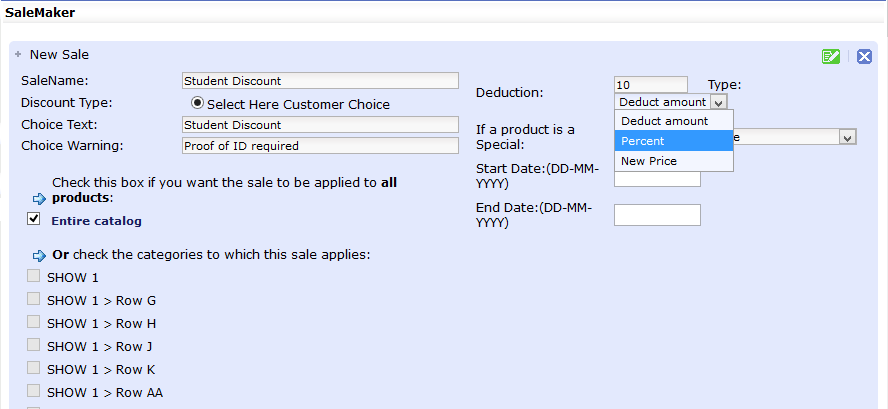
The option is ‘Customer Choice‘…great for setting concession types.
We can presume the default price is an Adult Ticket, while setting a Child Discount, Student Discount or Senior Citizen Discount for example.
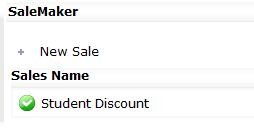
In osConcert Version v8 every time a visitor selects a seat from the seat plan a pop up box will appear with the options to select discount. If discount is not the choice the pop up will disappear…..if discount is chosen from the options the discount is immediately applied to the shopping cart.
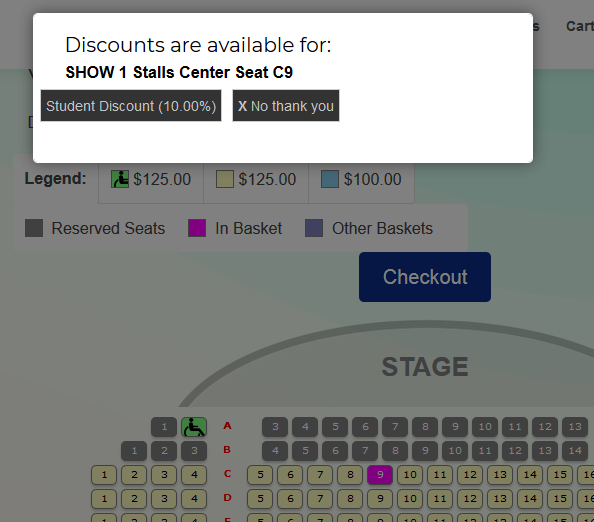
SalesMaker Discounts can be applied for ‘Entire Catalog’ or selected Categories and Products
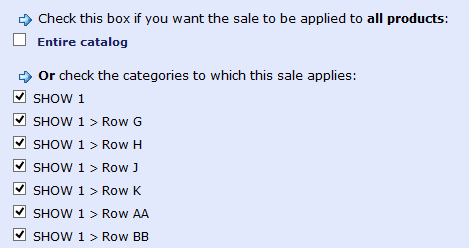
Author: Masud
Last update: 2020-09-10 06:24
How to set up Global Quantity Discount?
Global Quantity Discount is a discount module and it can be found in Admin>Payment>Order Totals
It is ideal if you want to provide a discount to customers that purchase a higher quantity of products.
WARNING: All products will be included as Global and for ALL Events advertised.
For example if you have a Ticket Event and you want to give a 5% discount for a customer that buys 10 or more tickets and a 10% discount for a customer that buys 20 or more tickets. The set up will be like the default below:
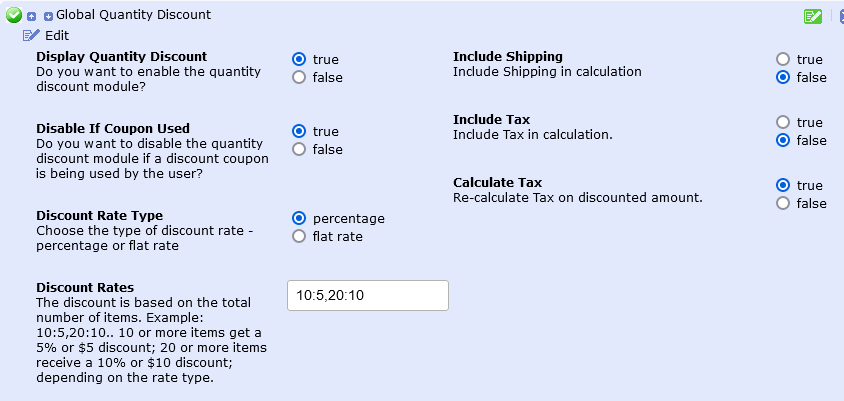
How to install Global Quantity Discount?
First DELETE the already installed modules (SubTotal, Total etc) and then RE-INSTALL each module in your preferred order, followed by SubTotal and then Total module. This will give a correct order display in the checkout confirmation page.
Customers will see their Discount Total at the Checkout Confirmation only.

Author: Gordon
Last update: 2022-10-25 18:08
How to enable Gift Vouchers for purchase and redemption?
It's now possible to allow your customers to purchase Gift Voucher/Coupons at a price they determine above $1.
They will recieve an eTicket as a GIFT VOUCHER with a generated coupon code that can be transferred but used only once for purchases at your store.
Here's how to set up a GIFT VOUCHER within your Administration
In Admin>Products create a General Admission category for your Gift Coupon product
Save it and create a product
If yours is version 9.7 in the TYPE tab set C: Gift Coupon (for older versions select General)
In tab COST set price=1
Create an unlimited stock or if you have a limite set it here as quantity.
IMPORTANT: Now set SKU = 6. This is a specific setting for Gift Vouchers
Save the product and go to the front end. You should see the product like this.
Don't forget to give the product an image and the category an image in the usual way.
Follow the instructions for setting up coupons for order totals in this FAQ
Now when a customer wants to purchase a GIFT VOUCHER they can set thier own price and purchase through your payment system just like buying a normal event ticket.
The customer will see the eTicket PDF and the Gift Code will be presented on the printable ticket/coupon. Now the recipient of the coupon code will be able to use it at your store just like any other coupons that are provided by you for discounts. They simple redeem the code at the checkout payment.
Author: Gordon
Last update: 2022-12-09 05:22
How to create discounts for the seat plan tickets?
If you want to offer a reduced price for your seat plan tickets rather than the full ticket price.
We have a feature called SaleMaker
Salemaker allows the user to create a special discount and when enabled the visitorcan choose the discount that suits them. For instance if we set a discount for Students for example...we can set a 20% reduction and insist that the Student Must Provide Proof of ID when the customer arrives at the door of the event.
We can apply this discount to All Categories or Specific Categories and we can create multiple types of Discounts.
To set up a Seat Plan Discount goto Admin>Products>Discount
Click > New Sale and follow the guide below to set up your first discount for the entire catalog
When you save this set up and goto the your seat plan at the front end ....the visitor will see a Pop Up like this screesnhot below and the discount will be applied to the shopping cart unless the custome clicks the No Thank You button.
Thats the very basic and recommended set up.
If you want to apply discounts to specific categories then you must UNCHECK the Entire catalog and check the categories to which this sale applies and then proceed to uncheck the categories that you DO NOT want the discount to be applied to.
Author: Gordon
Last update: 2023-09-11 04:58
Templates
What do we need to know about Theme Templates?
osConcert has three starting templates...possibly more later
'newzone' (green default) 'blackzone' (blue/black) and 'theevent' (red)
Both are ‘responsive’ for cellphone and tablet viewing and are styled with the very powerful ‘Bootstrap 4+’ by ‘Twitter’
In Admin>Shop Settings>Templates>(template)>EDIT
DEVELOPERS: You can create other color themes editing a css stylesheet: templates/ <template>/ assets/css/ themes /
In Admin>Template><template>> Template Color
Choose from a drop down list of theme colors
Green, Blue, Golden Belt, Maroon, Valencia, Orange, and Victoria+++
Not every theme stylesheet is perfect here.
Here is a short PDF tutorial to help with the Template Options. Admin>Shop Settings
and help for DEVELOPERS to easily edit the Front Page
osConcert-Bootstrap-4-Template-Options-2020.pdf
Author: Masud
Last update: 2020-09-10 08:08
Customers
What else should we know about Customer Info Fields?
This entry is in revision and can not be displayed.Author: Masud
Last update: 2020-09-10 08:11
Concert Details
How do I set up my concert and the details of the performances?
Concert Details
In osConcert THE dedicated place to set up, edit and reset loaded shows (LOADED visual seat plans) is in “Concert Details”.
In “Concert Details” each available loaded show will be listed and new shows can be set up or re-priced –even in a hurry!
Admin>Concert Details
At the preview pane of the console it is possible to change the SHOWS display STATUS (green/red) by checking the checkbox to GREEN in the “active” column
Edit a SHOW
In Admin>Concert Details simply highlight and double click on of the text fields to expand and open the entire row for editing. (inline editing)
ID
Type here an ID (eg. A note) as a quick identifier at the back end. Can be text field, HTML or left empty.
Active
Tick-box to set Show ACTIVE. Green status bullet=Show is Live!
Red status bullet=Show is hidden from the front end but visible in the Menu
Name
Type a NAME of the Show at the back-end (console). Text field, no limit. Can NOT be left empty. Can be a short name.
Heading Title
Type a HEADING text to be shown at the front-end. Text field, no limit. Can NOT be left empty.
NOTE: this HEADING will be used on page category headings and will also be used on final e- ticket. It can be a longer name.
Description
Type a short DESCRIPTION here. Text field or HTML. Can be left empty but Venue, Date, Time and Description can also provide more detail whenever a visitor views a seat plan.
Venue
Type VENUE details here. Can be left empty but Venue is the name of your Theatre or Event
Date
The Date can be selected with a Date Picker but it can be written the way you want...by pasting text in the field.
Time
Type the TIME of the show as 24 hour digit e.g 2000 will be translated as 8:00pm. As the Date and the Time is incorporated together to make a unique ID we recommend you set the time your event starts here.
For a manual Date or Time [PASTE] into the field input.
Date ID
As of Version 9.5 the DATE ID is incorporated together using the Date + Time and will automatically set (after Admin page refresh)
Therefore your unique DATE ID will look like this e.g. 30-10-2022 2000 = 30th October 8pm
If you don't like this ...the AUTO setting can be set = false in Seat Plan Settings and you can set your own.
If you plan to use barcode scanning the AUTO setting is highly recommended.
Edit Prices of a complete show/category
IMPORTANT! Ensure the unique DATE-ID is set-up FIRST! If no DATE-ID is set up first, it will not be possible to edit prices of a complete show/category.
To edit or to set up prices for a Show or Category, click on the small blue arrow on the left to open up the sub menu and edit the prices section. Ensure the DATE-ID is set up first!
You will see your price banding listed with some information about total seats for the color-band and how many seats are sold. Double click to open a price text field.
IMPORTANT! Press ENTER on your keyboard to SAVE the new values.
To close the editing mode, click again on the small blue arrow on the left.
How to arrange SHOWs in a sort order for the Front End menu.
Simply drag rows to arrange a sort order for the Front End main menu.
How to reset the SEAT PLAN after the show has ended
Seat products can be RESET to be available status.
To reset a show, click the dustbin icon and a pop up will appear to prompt you.
After clicking the “reset” button, all reserved (sold) seats will be set to available again.
RESET DOES NOT empty the text fields
How to DELETE old orders
If you want to clear test orders or just start afresh with new orders we have a new function in Admin>Orders
You will have the option to DELETE all orders and if you want them back an option to reverse the procedure. (orders will be backed up in a new database table(optional))
How to add your Event Image
We must go to the Admin>Products
Identify and edit the Category and you will see a place to upload the category image. Simply choose your best image in jpg/png or gif format. (if you only have a wepb image use a converter online)
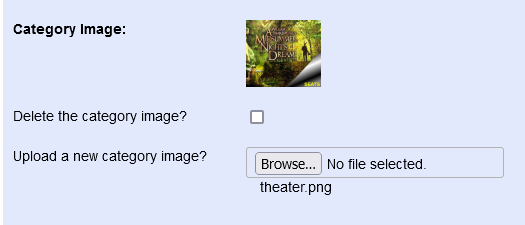
Now at the Front End your Event Image will be part of the Featured Events. The sort order will be set by the DATE (unix) by default or you can enable manual sort order in Admin>More..
View the osConcert DEMO
Author: Masud
Last update: 2022-07-03 08:04
How do I RESET my seat plans AFTER my events have ended?
It's easy to RESET your seat plans........but we only RESET the status of the seats to available again.
We don't reset your text: Headings and Dates etc. That is for you to re-edit when you set up for the next events.
To RESET goto Admin>Concert Details
Click the trash can icon at the right of your listings.
One by one rest each listing and you will be prompted with a small pop up.
Author: Gordon
Last update: 2021-12-22 09:09
eTickets
How can I Print all eTickets in bulk?
This entry is in revision and can not be displayed.Author: Masud
Last update: 2021-02-07 05:53
How to create and edit the PDF eTicket
osConcert comes standard with a printable PDF ticket template, the “Events Customer Ticket”.
If you don’t want the option for customers to view and print PDF E-Tickets. Disable the option in:
Admin>Shop Settings>Advanced>eTicket Settings>Disable E-Tickets
UPDATE:2023 v9.8
Standard osConcert e-ticket, with standard [[placeholders]] (=words/text that osConcert is using and referring to).
Admin>Payment>Tickets>TIC :: Main eTicket
NOTE Editing the Event Customer Ticket template is limited but it may be possible to provide a more Advanced eTicket Editing Module with a more advanced class on request.
Admin>Payment >Tickets or via TICKET in the Quick Links Menu (left side).
IMPORTANT!
Ticket Background Image default='images/ticket.png'
Upload images for each category/SHOW in Admin>Products>Category>Edit>Upload Ticket Image
We can have a different background image for each SHOW.
Furthermore...Each category of products can be selected to have eTickets be printed or not. (Default: Tickets can be printed)
Here’s how to do it!
Go to Admin>Products>SHOW (your show category or sub-category) >EDIT You will see the Ticket Image> Upload an new ticket image?
Upoad a jpg or png image file now and it will be restricted to a width of 1000 pixels.
1000 pixels is the default width for uploading category and product images in Admin>Shop Settings>Image Upload Width. This means the image will be resized to this value.
You can temporarily decrease the upload width here of you feel images are too heavy.
Or you could upload a much higher resolution image directly by FTP and reference the image name in the TABLE ‘categories’, but the higher the resolution the higher the load time of the image.
Whatever size you upload, it will stop at it’s longest size either width or height so try to get the image into good proportion to match the proportion of the eTicket dimensions.
If there is no ticket to upload via Admin>Products>Category>Edit then the default /images/ticket.png will be used.
So if you only need a general background image for all your shows then it may be easier to simply replace the default images/ticket.png in the application.
Test eTickets with a test order Admin>Orders>Ticket
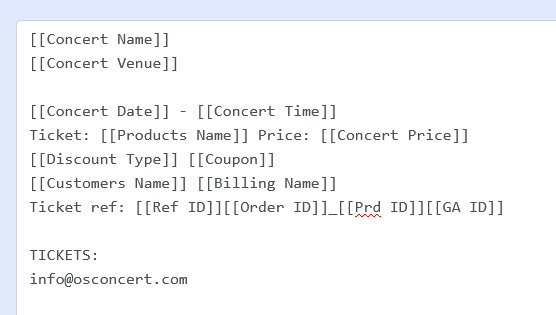
Ticket Fonts Admin>Shop Settings>Advanced>eTicket Settings>
Top Line is the Bigger Arial Font. Top Font Size (from 10px to 26px)
Anything in between is grouped mid- sized Arial font. Mid Font Size (from 10px to 26px)
Bottom Line is the smallest font (=Event Condition). Bottom Font Size (7px to 12px)

While you are editing there are also many other parameters for spacing and positioning elements of the eTicket
QR Code Width
Text Positioning from Top
Middle Text Spacing
Text Positioning from Left
Ticket Placeholders
GUIDE TO PLACEHOLDERS:
[[Concert Name]] = Concert Heading Titles
[[Concert Venue]] = Venue
[[Concert Date]] = Date of the event
[[Concert Time]] = Time of the event
[[Discount Type]] = Type of discount added
[[Coupon]] = If Coupon Discount used or not, if so it will print 'Coupon Discount'
[[Concert Price]] = Price of ticket with currency
[[Customers Name]] = Customers fullname taken from the actual order.
[[Products Name]] = Seat Name and Number or whatever the name of your product
[[Ref ID]] = reference ID
[[Prd ID]] = product ID
[[Unique Number]] = Complete Unique Number per ticket/barcode e.g 00002000019001335871
[[Payment]] = Payment Method - Free Checkout read Free Event
NEW! [[Ticketholder Name]] = Ticket Holder Name if enabled
[[Billing Name]] = Useful if you are mostly Box Office sending to Billing Address Customers.
[[GA ID]] = Should be here if you intend to itemize GA Tickets 1, 2, 3, 4, etc per order.
SPACING (Spacer Bar Clicks): [[SPACE 5]] [[SPACE 10]] [[SPACE 15]] [[SPACE 20]] [[SPACE 25]]
Ticket Printing
Customers should be informed that they need to set their printing options to allow ‘page handling’ which will enable multiple tickets per page to be printed at once;
Adobe reader; File/Print/Page Handling pull down, select “Multiple pages per sheet.
The PDF tickets generated by osConcert consist of 2 sections;
#1. the PDF Event Ticket (PDF section)
#2. the Ticket Bar PNG (Barcode section)
From time to time you will need to clear out the PDF Event Tickets and Ticket Bar PNG as they are generated in the /images folder and will use unnecessary web-space over time.
Author: Gordon
Last update: 2023-11-07 06:46
How to generate eTickets that are NOT sold as a downloadable zip file or to a folder in your server?
As of May 2022 the Print ALL Tickets feature has been updated and is available in osConcert 9.5
In Admin>Products where the show categories and products can be edited there is a print icon at every category.
This is a very useful feature if you want to generate and print all or the unsold PDF eTickets of a particular SHOW category. Click on the print icon and you will be be given the option to create PDF eTickets.
Selecting Folder Names will generate directories e.g a_midsummer_night_s_dream/osconcert_theatre/tuesday_may_17th10_22_am/ ........that may not be nescessary.
Download as a zip file is the best option.
You'll get something like this:
IMPORTANT: The default eTicket template is template_id=3 (TIC3)
from the TABLE ´general_templates´
Author: Gordon
Last update: 2022-05-16 07:12
How to enable Gift Vouchers for purchase and redemption?
It's now possible to allow your customers to purchase Gift Voucher/Coupons at a price they determine above $1.
They will recieve an eTicket as a GIFT VOUCHER with a generated coupon code that can be transferred but used only once for purchases at your store.
Here's how to set up a GIFT VOUCHER within your Administration
In Admin>Products create a General Admission category for your Gift Coupon product
Save it and create a product
If yours is version 9.7 in the TYPE tab set C: Gift Coupon (for older versions select General)
In tab COST set price=1
Create an unlimited stock or if you have a limite set it here as quantity.
IMPORTANT: Now set SKU = 6. This is a specific setting for Gift Vouchers
Save the product and go to the front end. You should see the product like this.
Don't forget to give the product an image and the category an image in the usual way.
Follow the instructions for setting up coupons for order totals in this FAQ
Now when a customer wants to purchase a GIFT VOUCHER they can set thier own price and purchase through your payment system just like buying a normal event ticket.
The customer will see the eTicket PDF and the Gift Code will be presented on the printable ticket/coupon. Now the recipient of the coupon code will be able to use it at your store just like any other coupons that are provided by you for discounts. They simple redeem the code at the checkout payment.
Author: Gordon
Last update: 2022-12-09 05:22
General Admission Events
How do I create a General Admission Event with Concessions?
General Admission Events with Master Quantity
For General Admission (GA) events, osConcert offers a GA Master Quantity option. A GA Master Quantity is often used for concession ticket sales that are created as (sub) products.
Concession tickets normally involve lesser priced tickets as a consideration and therefore you may want to ‘cap’ ticket quantities. The Master Quantity is NOT the combined total of the sub categories but is the number you decide to ‘cap’ ticket-sales in the Main Category as the number of available seats/tickets the venue is offering for that created Event.
If the master quantity is reached (i.e the venue is full) by 1 or a combination of the sub-categories, then when the order is processed and it does reach the Master Quantity figure, the code will prevent any further purchases of all ticket types.
Why do we need a Master Quantity?
The basic ‘SaleMaker’ Discount system Admin>Orders>Discounts>Products
A customer can only choose a ‘concession’ for one ordered GA Ticket at a time. That works well for a single GA product, that’s why SaleMaker Discounts are enabled for Reserved Seating ONLY.
For a customer to purchase an adult ticket and a child ticket for example, we need to dedicate a whole (sub) product for each concession and then we should assign a GA Master Quantity to the category of these products because we can’t sell 100 Adult Tickets and 100 Child Tickets if the Venue holds only 100 Tickets only.
IMPORTANT! Each event/product MUST have default quantities, preferably the same as your Master Quantity. DO NOT SET products at zero. Individual quantities are still important!
Master Quantity is not an option for Reserved Seating.
Master Quantity is strictly for General Admission (GA) shows.
The below example explains the Master Quantity.
Create or open a General Admission (GA) show in Admin>Products
Here we have an Event titled 'Talent Show' limited to 100 tickets quantity
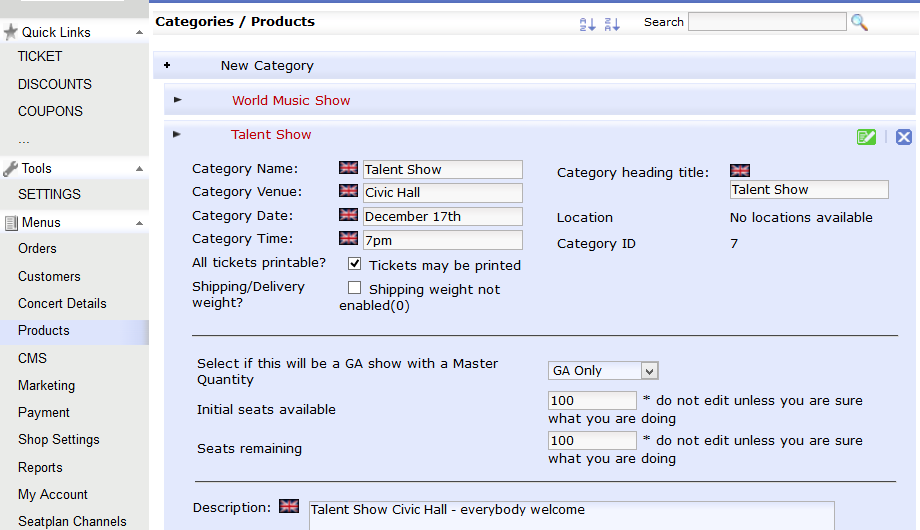
We must enable as GA Show with Master Quantity (GA Only) UPDATE now Category with Master Quantity
Set initial seats remaining to the total of seats in your venue. Set seats remaining to the same value (or a lesser one if you wish to reserve some tickets). Make sure you save your settings by clicking the SAVE icon.
The new Master Quantity will be displayed in the SHOW-tab.
Now add ticket types to the event using ‘+New product’. We start with an Adult Concession Ticket.
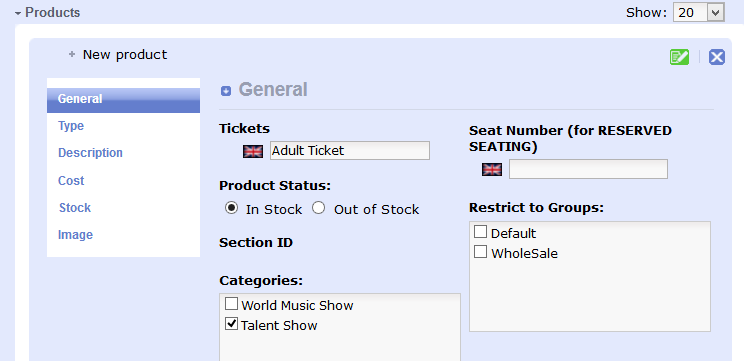
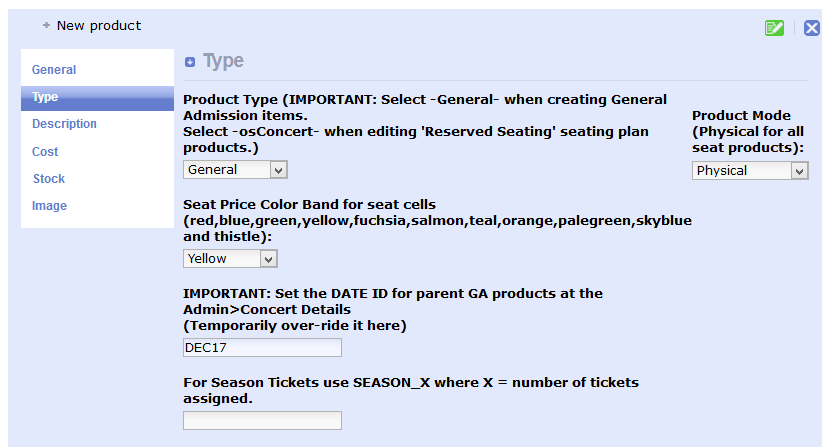
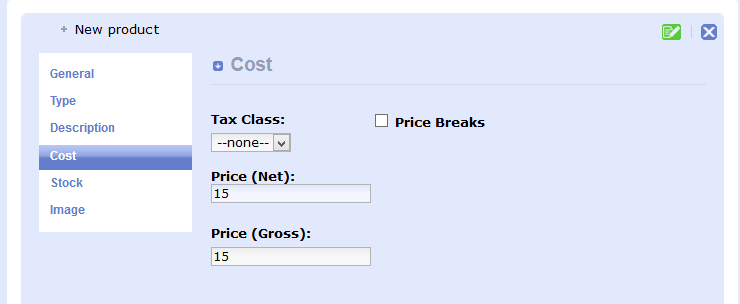
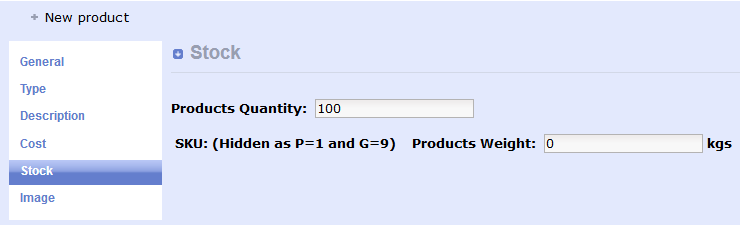
Note: set the individual product STOCK-QUANTITY! ...so that it is possible for 100 child tickets or 100 adult tickets can be sold. Unless of course you want to restrict certain ticket types.
Save your settings by clicking the SAVE icon.
Now create your other concession tickets....in this example we are only creating Adult Tickets @$15 and Child Tickets @$10
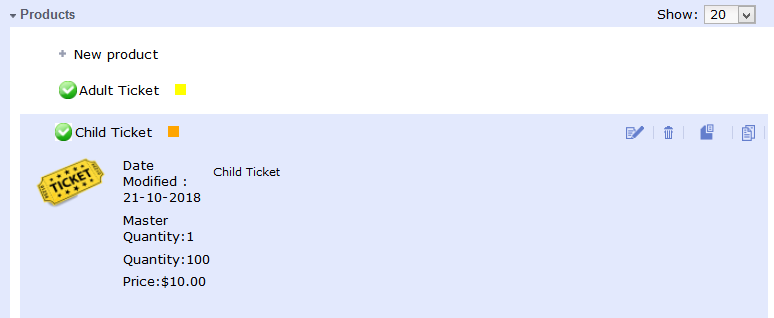
Now we should have a list of concession products e.g Adult Tickets, Child Tickets and the Front End should look like this at the outset.
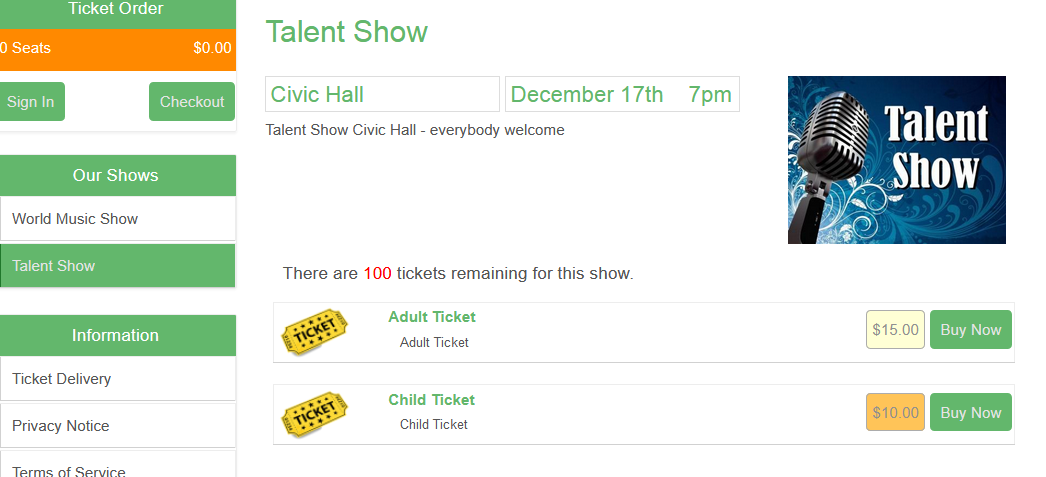
Clicking the ‘order’ button will take a customer to the page for that ticket – here there will also be a reminder as to how many tickets are available
There are 100 tickets remaining for this show.
(this can be disabled completely with setting: Admin>Shop Settings>Advanced>osConcert Settings>Hide GA only quantity left=true)
Note that this total is valid at the point the page loads and does not include quantities in this customer’s (or any other customer’s) basket – only those tickets already (physically) sold
If you DO NOT require a MASTER QUANTITY …DO NOT activate this feature at all.
NOTE: It is advisable to HIDE the visible quantity count that is usally enabled for GA products. e.g Adult (100)
Got to Admin>Shop Settings>osConcert Settings>Hide GA Quantities=yes
Now here the visior can click through to a dedicated page and select the amount of tickets required to be added to the shopping basket.
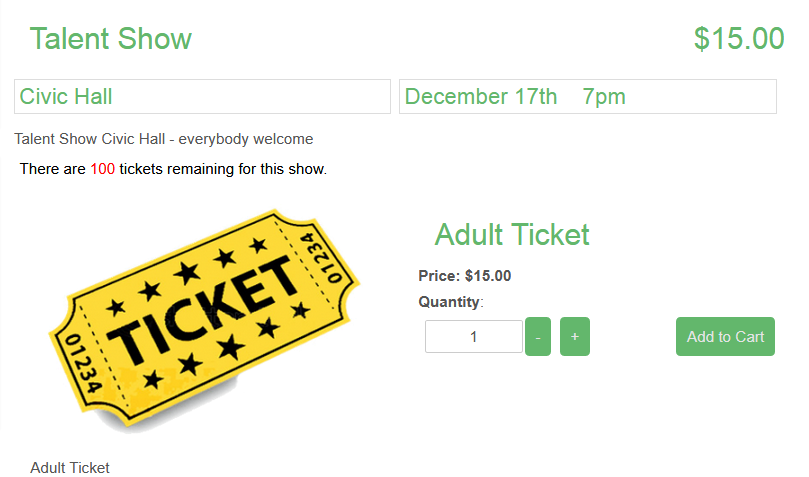
Alternatively the Administrator can enable the Alternative GA products template as shown below for the same example.
This way the visitor can select multiple tickets on the same page and go directly to the Checkout.
We can enable this GA option for the whole application in Admin>Products>Advanced>GA Settings>Alternate GA template=yes
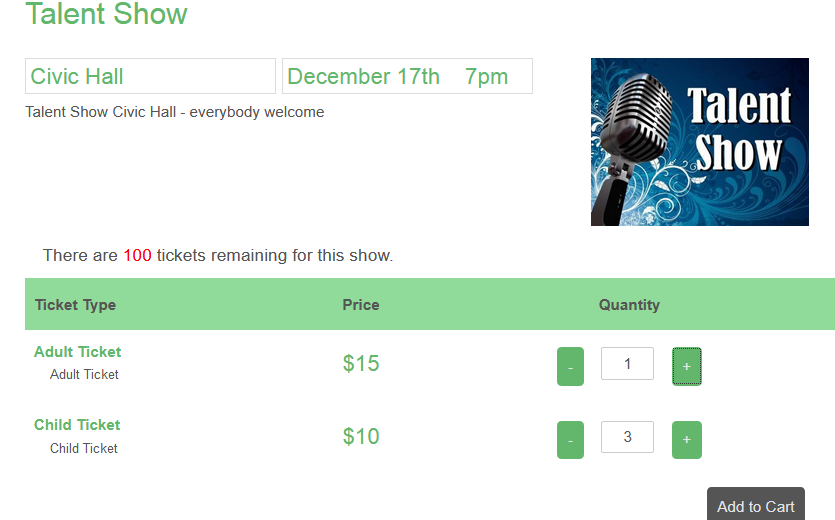
In case a customer is trying to select more tickets than your set Master Quantity of your event category the customer will get redirected to the shopping cart page with a Warning message.
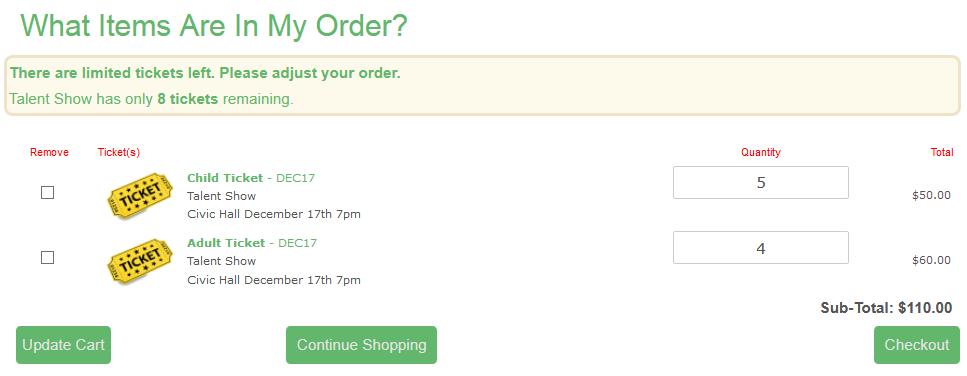
If eventually the master quantity is reached (i.e. the venue is full...tickets are sold out) the code will prevent any further purchases of all ticket types: There will be a message “There are 0 tickets remaining for this show."
All ORDER buttons will change to “SOLD”.
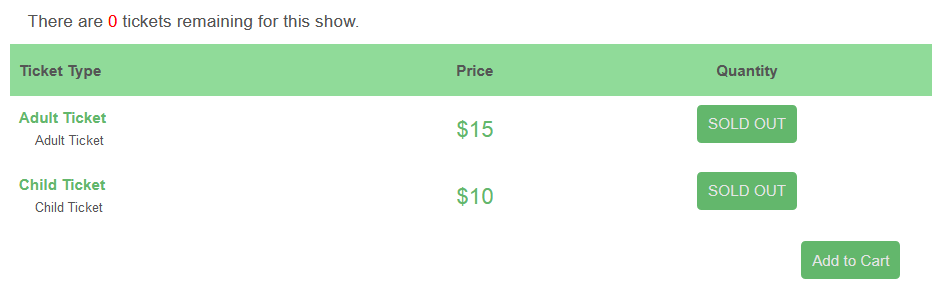
Author: Masud
Last update: 2020-10-26 21:51
How do I set up ‘General Admission’ as a SHOW in osConcert?
We want to sell General Admission Tickets at it's most basic.
One SHOW with a Quantity of Tickets e.g 500 and NO concessions or discounts.
It will be one product in a category with a quantity.
Go to Admin>Products we’ll need to start there to add a category then a new product
We want to create a ‘New product’
For example we want to create an Event...let's name it "World Music Show"
First we create the New Category:
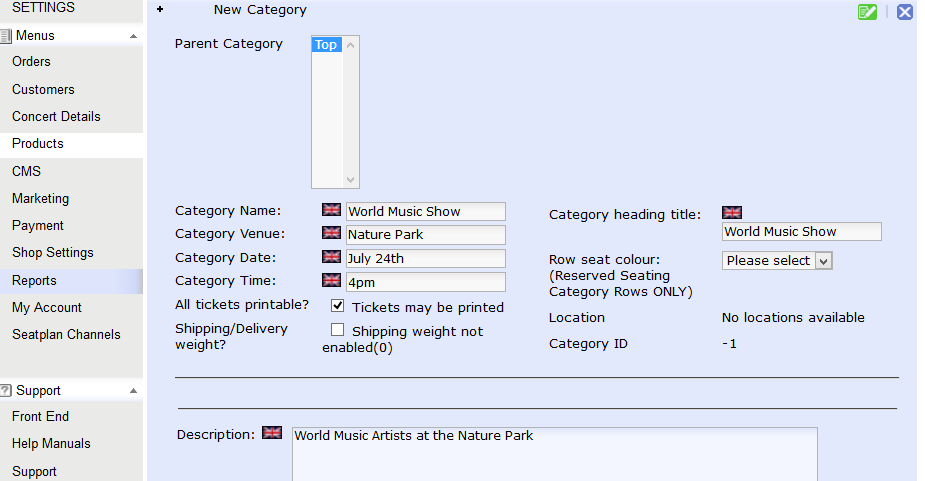
Click the green SAVE button and we will be promted to create a new product
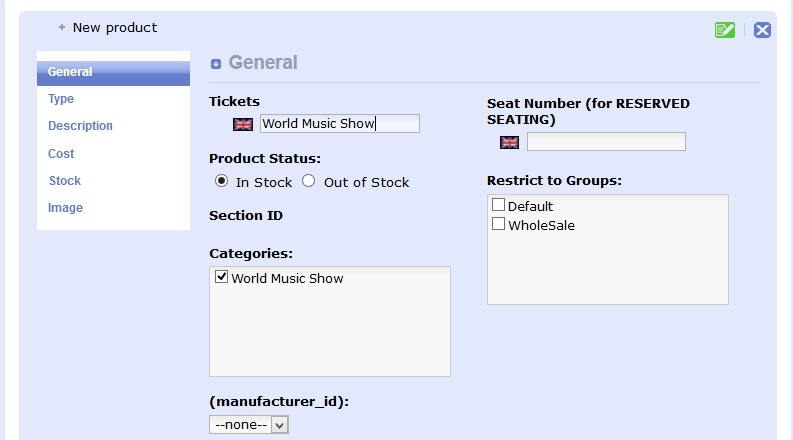
Product Type Tab should be ‘General’ and Product Mode also default ‘Physical’
Next we will want to add a short description about the product: (You can also use the WYSIWYG editor to create something more elaborate)
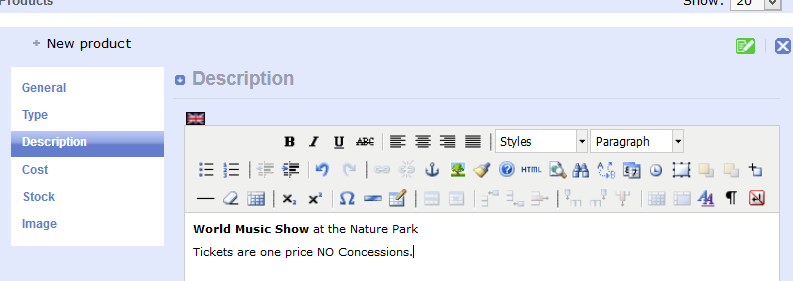
Set a product price:
.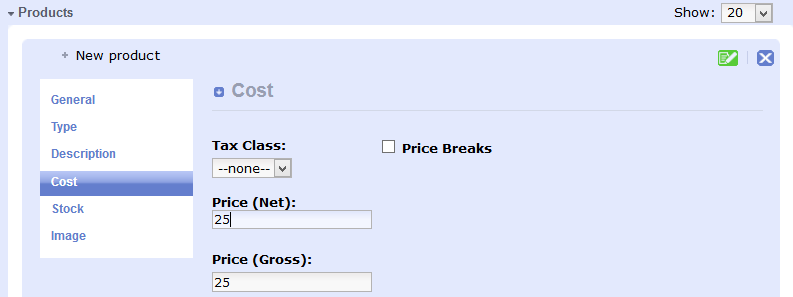
Set your price (and also your tax if you have that set)
Set your quantity, ...the remaining stock quantity will be visible for each product and the ‘Order’ button will be disconnected when quantity reaches zero. (eg Sold Out)
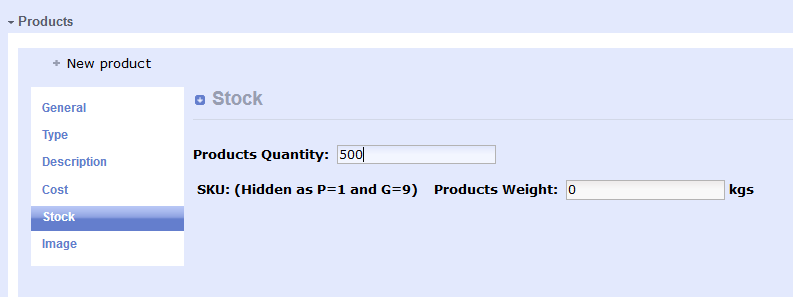
.
Upload an image for the ‘Product Info’ page here. The thumbnail image dimension is set at Admin>Shop Settings>Images>Small Image Width=75
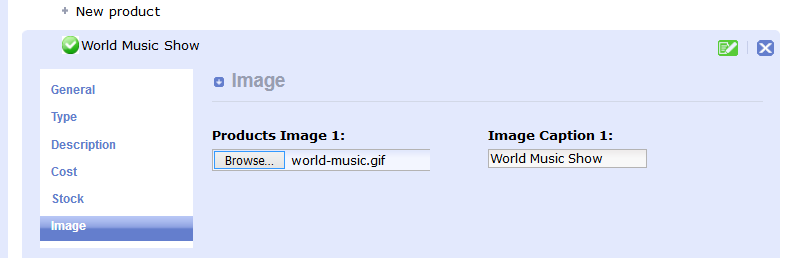
DEVELOPERS The big image at the product info page is hard coded at 350px in admin/includes/classes/upload.php – line 283 - $b_width=350
When ‘product creation is complete’ and you have SAVED and exited.
Go to your front end and the osConcert default view, you will choose Category ‘General’ and be redirected immediately to the single GA product
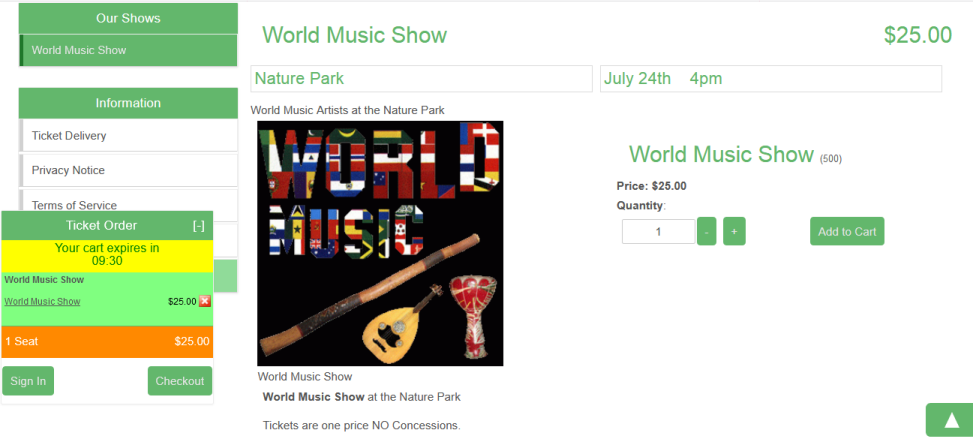
You can also edit the details in the Admin>Concert Details
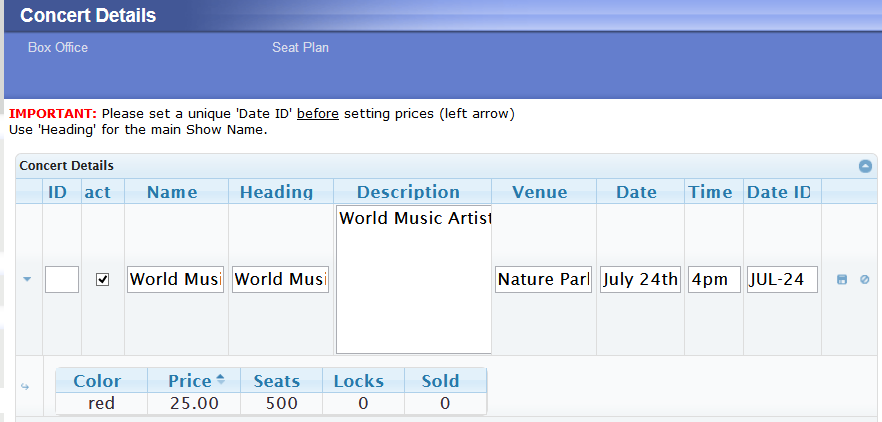
IMPORTANT: Re-confirm your unique DATE-ID here
When we set Price Color band in tab TYPE, we can now set a price for the color ‘red’ in our Concert Details
The product will also be as it’s own E-Ticket for printing.
Author: Masud
Last update: 2020-09-10 08:20
How to create a General Admission Event in version 9.5?
There have been some slight changes in the latest versions but setting up a General Admission event is much the same as before. You create a category and create products with a quantity. For Concessions you must create your concession products and set a Master Quantity for the residing category.
Admin>Products>New Category
New Product> write the Name ...e.g. Adult Ticket
TYPE tab IMPORTANT: choose General Admission from the drop down menu
COST tab Insert the price of the ticket
STOCK tab inert the Quantity of tickets
SKU should always be 9 for General Admission
SAVE and Exit by clicking the GREEN SAVE button
Now go to Admin>Concert Details to set Date and Time
For a complete FAQ guide about setting Concert Details
How do I correctly set Date and Time in version 9.5?
go here
That just about sets the basics for a General Admission Event
Now go back and upload an appropriate image for you event Admin>Products>Edit
Go to the Front End and check everything is as you like it.
NOTES:
Author: Gordon
Last update: 2022-08-11 05:53
Marketing
What should we know about Marketing/Email templates?
Marketing Templates.
One of the useful features of osConcert is the editable built-in set of templates for email responses and a custom invoice. These email-templates have default reply email-addresses and subject lines and you will need to change these details to your own details and wishes.
There are total 8 editable email Templates stored in 2 sections of osConcert; 7 USER related Templates in
Admin>Marketing>General;
Email receipt template in Admin>Marketing>eMarketing>Products;
Message to All Customer -Template
In Admin>Marketing click to expand the “Message to All Customers”. Click the small envelope to open the WYSIWYG editor.
Select the Customer(s) via the pull-down option you want to email this message to;
Create a text and add/remove the %%PLACEHOLDER%% references as you wish. Do not forget to edit the “From” field and fill out the Subject line.
NOTE the tick-box “CREATE PASSWORD” in the lower section (this can be handy in case you need to inform all your customers a new user password).
IMPORTANT; when you click the SEND envelope, your email will be uploaded to your server and the following warning message will show; Click “SEND EMAIL” or “CANCEL”.
SEND
Customized Invoice Page – Template
Discontinued
Contact Us –Template
In Admin>Marketing click to expand on the “Contact Us Template” Click on the EDIT option to open the WYSIWYG editor. Save Edit
Edit
Product Sale –Template
IMPORTANT! The “Product Sale Template” is located in; Admin>Marketing>Email Template
The “Product Sale Template” is used for the EMAIL RECEIPT that every customer will receive after completion of the sale.
Click EDIT to edit text in WYSIWYG or click the small envelope to send a Test Mail.
Edit the text and add/remove the %%PLACEHOLDERS%% references as you wish. Do not forget the required “Subject” and “Reply-to” fields. Click the SAVE button to save your settings.
Save
Edit
SEND test email
DEVELOPERS: edit ‘email_messages’ table directly in the database to add a bunch of html
Author: Masud
Last update: 2020-09-10 08:21
How can we set up Social Networking links?
This entry is in revision and can not be displayed.Author: Masud
Last update: 2018-09-22 04:51
Language Support
How do I correctly set up osConcert for Multi Language?
This entry is in revision and can not be displayed.Author: Masud
Last update: 2020-09-10 08:23
Does osConcert support other languages?
osConcert MONO language support
When we require a complete translation of the osConcert application for only one dominant language here is the basic procedure
Files:
Front End Language
Front end language name settings must remain as ‘english’, there’s no need to rename to another language name, we just translate the definitions that exist in the ‘english’ files i.e:
includes/languages/english.php
includes/languages/english/
Back End Language
Back end language settings must remain as ‘english’, there’s no need to rename to another language name, we just translate the definitions that exist in the ‘english’ files i.e:
admin/includes/languages/english.php
admin/includes/languages/english/
Database
A lot of translation can be completed via the osConcert Administration
1. Customer Sign Up/Registration In admin>shop settings>advanced>customers
2. Content Management Static/Main Pages In admin>cms>homepage admin>cms>static pages
3. Orders Status In admin>shop settings>orders status
4. Marketing Templates In admin>marketing>email messages Order Email Response: admin>marketing>emarketing>products>product sale
5. Admin>Products>Categories>Categories Descriptions Admin>Products>Categories>Products>Product Descriptions
Others
There are some lines of text mostly in admin files that do not have definitions assigned. If you need them defined let me know. Otherwise we’ll need to access the file code to make the translation.
Author: Masud
Last update: 2020-09-10 08:25
Order Totals
How to I set a Fixed Booking/Service Fee for each ticket sold?
This is the quickest and simplest method if you just want to add a fixed fee per ticket sold calculated at the checkout confirmation and applied to the order totals.
#1 Go to Admin>Payment>Advanced>Order Totals
DELETE all your Order Total modules installed and we need to RE-INSTALL them including the Booking Fee (per ticket) module. (this is so that we get a correct order of modules that calculate the costs)
Set the Booking Fee at a Flat Rate or Percentage as shown.
SAVE this module
#2 Set the language file
We may need to edit the language file...
Includes/languages/english/modules/order_total/ot_service_fee.php
Author: Masud
Last update: 2020-09-10 08:26
How do I set up shipping in osConcert for delivery of tickets?
Shipping Weight
Before we decide which shipping modules to enable in Admin>Products>Shipping
We need to add a products weight to all products/seat we want to associate with a shipping/delivery cost.
Admin>Categories>Edit>Shipping/Delivery weight? = Shipping weight checkbox
Next we should enable a shipping module to calculate the cost in our checkout process
If we just want to add a fixed price e.g. $5 per order then we should enable the Flat Rate
Enable and install the Flat Rate shipping module and edit:
Admin>Products>Shipping
Flat Shipping Cost e.g. 5 Flat Tax Class (if you have a tax set up and need to tax shipping) Flat Shipping Zone e.g USA/World Zones
Note: You may have to rename the Display Name for this module. You can edit this in the language files, usually includes/languages/english/modules/shipping/flat_rate.php
There are some other options in Admin>Products>Shipping>Options but these are usually best left at default.
Enabling the Shipping Modules will now activate the shipping cost in the checkout process. (if you don’t see anything?...check the correct shipping zones are selected and above all make the products have a weight as explained earlier)
A customer will have a choice of shipping modules or be told this is the only option.
IMPORTANT: If you have nominated a Box Office account (by selecting Box office as country in Admin>Customers) make sure there is a FREE SHIPPING module installed so that the Box Office can bypass that as well as bypassing any Credit Card payment.
FREE SHIPPING/NO SHIPPING – Pick up tickets only etc You can enable the FREE SHIPPING module and the Display Name can also be edited in the language files.
We are not finished yet, it would be a good idea to itemise the shipping cost in the Order Totals at the checkout confirmation. Admin>Payment>Advanced>Order Totals
Whenever we install a new order total ...it is usually best to uninstall all the modules and re-enable each module one by one including in this instance the Shipping. For example DELETE the Sub Total and the Totals, Install Shipping, Sub Total and Total
More about Order Totals: What should we know about Fees, Tax and other Order Totals?
Author: Gordon
Last update: 2021-12-19 14:25
How can I set up a TAX for a specific ‘Country’ like UK and VAT?
At DEFAULT we have 3 GEO ZONES as USA, World Zones, and Australia
World Zones incorporates all the countries of the world outside of the USA and Australia.
However for a more focused exposure in your own country e.g. UK
We can create a new Geo Zone as UK (United Kingdom) especially for the purposes of setting a new Tax like VAT which is unique to that zone and not to all World Zones.
- Go to Admin>Payment>Tax>Zones and create a New Zone as UK – United Kingdom
Further Edit this listing to select 'country'
2. Next you should create the TAX that you require, in this example VAT at 20%
3. Create the Tax Rate Admin>Payment>Tax>Rates
And select the new zone = UK
Now we can also go back to our Admin>Payments and select UK for a payment zones if required.
Author: Gordon
Last update: 2021-12-19 15:17
What should we know about Fees, Tax and other Order Totals?
osConcert has a number of modules that can be installed to highlight the final Order Totals at checkout. These module must be carefully set and tested as different modules combine can give different results.
Admin>Payment>Order Totals
First DELETE the already installed modules (SubTotal, Total etc) and then RE-INSTALL each module in your preferred order, followed by SubTotal and then Total module. This will give a correct order display in the checkout confirmation page.
Always test thoroughly as mistakes could be costly. Ask for support if possible. My support is free.
Tax Module
osConcert comes standard with a Tax module that is integrated in the Payment Modules. After a complete setup, the Tax module calculates an unlimited amount of Taxes, General Service Charges or Fees at the moment of sale. The Tax or Service Charges are Zone (=Country) specific and the rate(s) can be fully customized.
IMPORTANT! To display a TAX, ensure that (all) products have gotten a ‘products_tax_class_id’ in the TABLE ‘products’ database
This may require using an SQL Query to update the products.products_tax_class_id for large seat plans
UPDATE products
SET products_tax_class_id='1';
Tax – Setting up
Taxes and Service Charges are set up in 3 steps in:
Admin>Payment>Tax
Step-1 Set up in osConcert the Tax or Service Charge specifics, e.g. Tax-Class (this includes Tax name and Tax description) and a Tax Rate (this includes Tax rate in % and assigns a Zone (country).
Step-2 Edit the database to get the Tax (or Service Charge) an ID to each product through the database to eventually have a Tax(es) displayed in the order confirmation page.
NOTE: at this moment there is no setting for this and you may want to ask help of a webmaster to assist you with this as linking the Tax to products (or zones) is usually managed at your phpMyAdmin.
Step-3 Set up osConcert to display the Tax (or Service charge) in the Order Totals-Module (Admin>Payment>Order Totals).
IMPORTANT!: Whenever a new ‘Order Totals’ related module such as a Tax or Service Charge is installed, it is best to “uninstall” ALL the ‘Order Totals-modules’ and then re-enable each module one by one.
Taxes and Service Charges are Zone (=country) specific. At this moment osConcert has 4 built-in GEO ZONES; USA, Australia, Box Office and World Zones.
NOTE: “World Zones” incorporates ALL the countries of the world outside of the USA and Australia and Box Office. This means the Tax or Service Charge you set to be charged for World Zone will be charged for ALL customers from the selected zone(s) (=country, including orders generated by the nominated Box Office).
Normally, the 4 default installed GEO-zones are sufficient to get started with osConcert and do not require any additional set-up.
However, for a more focused exposure in your own country e.g. UK .it is possible to create a new GEO Zone as UK (United Kingdom) especially for the purposes of setting a new Tax or Service Charge like VAT that will be unique to that zone and not seen to any other (World Zone) customers. You may want to ask the help of a webmaster to assist you with this. For more information, please see Setting up a Tax for a specific Country.
Tax Classes – Adding a new Tax Class
In most countries a Sales Tax is applied to the sale of a product or a service. These Tax “Classes” are called “Sales and Use” Tax in the United States, “Value Added Tax” (VAT) in the European Community and “Goods & Service Tax” (GST) in several other Countries.
To create a new Tax Class, click Admin>Payment>Tax>Classes
Click the NEW TAX CLASS tab. Edit the Tax Class Title field with the TAX abbreviation and add a short
Description. Click SAVE to save your settings.
Tax – Adding a new Tax Rate
A Tax is calculated in % of the total ticket price(total). Set this % Tax rate in Admin>Payment>Tax>Tax Rates
Click the NEW TAX RATE. Click to open New Tax Rates tab. Make a selection from the pull down to set the Tax Title. Select a GEO Zone and set a Tax Rate (%).
Click SAVE to save your settings.
To enable click the GREEN/RED status bullet. To change the listing sequence, click the arrow up/down. To edit or to delete a Tax Rate, click the Tax Rate tab and click the Edit or Delete icon.
NOTE:
Tax Decimal Places
To “pad” the Tax value with a decimal value, click Admin>Payment>Tax>Tax Decimal Places. Default=0
Display Prices with Tax
The order price can be displayed included in the ticket price or state the Tax separately at the confirmation page.
Admin>Payment>Tax>Display Prices with Tax.
TRUE= display ticket price with the Tax included.
FALSE= tax will be stated separately at the end. Default= FALSE.
IMPORTANT! Adding a new Tax Class will create a Tax Class ID in the database. The ID can be found in the ‘tax_class’ table as the “Value Added Tax” eg. The class that was just set up.
At this moment there is no setting for this and to proceed you may want to ask help of a webmaster to assist you with this as linking A Tax, Service or Booking Fee to products and to the correct GEO zone is usually managed at your phpMyAdmin. ALSO See How to set up a tax for a specific country
Advance Fee
If we want to ADD a fee to specific events, perhaps an earlybird fee or just a separate fee and we want to add this fee to the Order Total we must install this module. The actual fee is set in the Admin>Products in the Top Category of the Event.
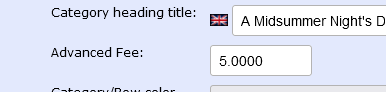
In the module settings ....you can choose Fee per show or per ticket?
Details: include Concert name? Concert venue? Concert Date? Concert Time?
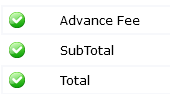
When a purchase is made the customer will see this result at the Checkout Confirmation:
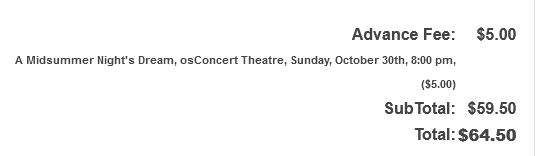
Booking Fee (per order)
We can add a simple Booking Fee for each order, we can also choose to include this fee for a Box Office order or not.
Booking Fee (per Ticket)
We can add a Booking/Service Fee per ticket/product that can be also disabled when a Discount Coupon is used. It can be percentage fee or flat fee. Also features Exempt Categories and Exempt Box Office
Other Order Total Modules are self explanatory
Box Office Reduction
For Box office to create their own discounts during checkout.
Coupon Discount
You must install this module if you intend to enable Coupon Discounts
Donations
Make donations possible in the checkout process. Donations can also be mandatory or minimum payment.
Global Quantity Discount
If the customer's basket reaches a certain quantity you are able to apply a discount per quantity reached.
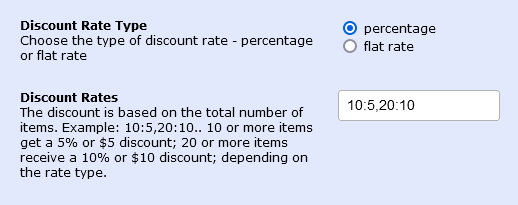
Shipping
Must be installed if Shipping Delivery is enabled
Sub-total
Total
Author: Gordon
Last update: 2021-12-19 15:12
What is 'Advance Fee' in Order Totals?
Advance Fee is a fee that you can add to specific products in advance of an event.
It can be a fee per show or per ticket....and you can itemize the details at the checkout confirmation.
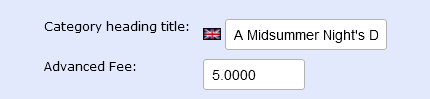
The actual fee must be set in the Admin>Products>Edit Category and the 'Order Total' module must be enabled from Admin>Payments>Order Totals with other fees.
As usual you must arrange the order of the modules very carefully. Either delete and install all again or arrange the data in Module Options e.g ot_service_fee.php;ot_advance_fee.php;ot_subtotal.php;ot_total.php
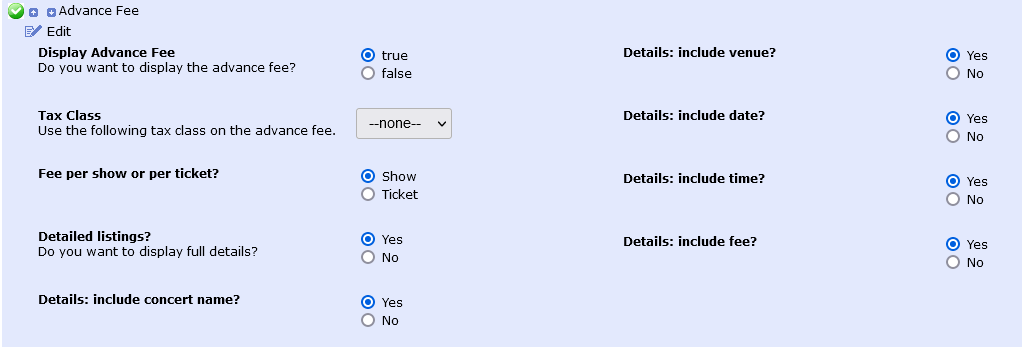
You'll get something like this at the checkout confirmation order totals if there are multiple Advance Fees.

The text can also be edited in the associated language file:
includes/languages/modules/order_total/ot_advance_fee.php
define('MODULE_ORDER_TOTAL_ADVANCE_FEE_TITLE', 'Advance Fee');
Author: Gordon
Last update: 2022-07-17 10:19
How to set up Global Quantity Discount?
Global Quantity Discount is a discount module and it can be found in Admin>Payment>Order Totals
It is ideal if you want to provide a discount to customers that purchase a higher quantity of products.
WARNING: All products will be included as Global and for ALL Events advertised.
For example if you have a Ticket Event and you want to give a 5% discount for a customer that buys 10 or more tickets and a 10% discount for a customer that buys 20 or more tickets. The set up will be like the default below:
How to install Global Quantity Discount?
First DELETE the already installed modules (SubTotal, Total etc) and then RE-INSTALL each module in your preferred order, followed by SubTotal and then Total module. This will give a correct order display in the checkout confirmation page.
Customers will see their Discount Total at the Checkout Confirmation only.
Author: Gordon
Last update: 2022-10-25 18:08
Orders
How do we manage incoming orders?
osConcert is an 'order' based system.
Customers at the front end will register and purchase products, an order is processed and the system records the order details. The inventory will be adjusted and each order is given a unique ID and presented at the Admin>Orders page in the Administration Backend.
In osConcert the order is usually for Event Tickets. The Administrator can view and edit each order and perform many tasks if required.
What if the order is wrong or the customer wants to change or cancel their order?
It will be the responsibility of the Administrator if the customer contacts the Store Owner and requests changes.
Here is a brief overview of the types of changes possible.
1. The customer did not complete payment and does NOT want to complete the order.
The Administrator must Delete and Restock. Admin>Orders>DELETE (You will be prompted to RESTOCK selected products) The tickets/products will be released for sale again.
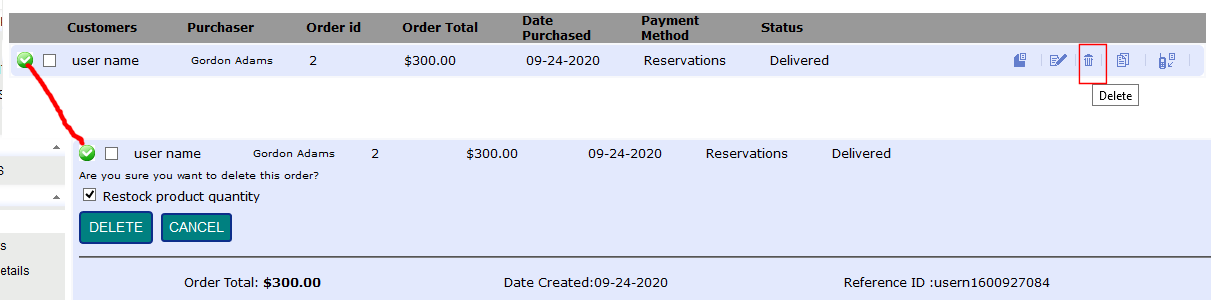
2. The customer wants to cancell the order and asks for a refund.
The Administrator can mark the order as REFUNDED Admin>Orders>Refund (You will be prompted to RESTOCK selected products). To complete the full refund by returning the payment taken. The Administrator must perform the actual payment return in the associated payment module dashboard. osConcert will only record the refund for the order history. The tickets/products will be released for sale again.
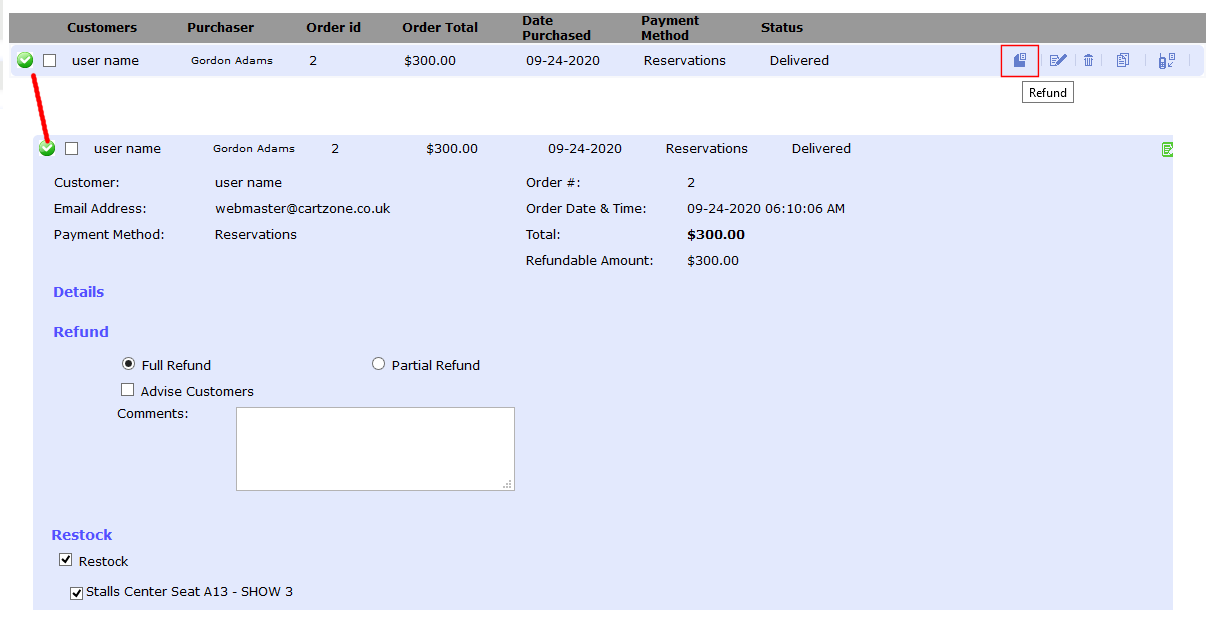
3. The customer wants to add more items to the order.
The Administrator can edit the order Admin>Orders>Edit and choose the feature 'Add Products' and select from an inventory list. The order will be updated and new eTickets will be available to print.
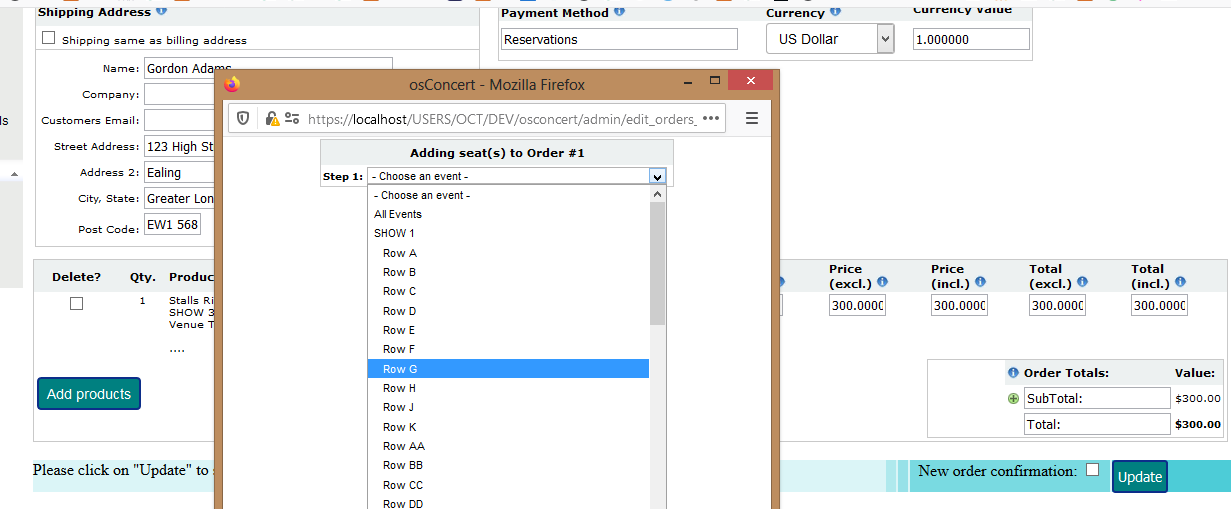
4. The Administrator has enabled the default Bank Transfer module.
This is a simple module that will send your Bank Details so that the customer can pay direct to your Bank Account. This can bring problems if care is not taken.
For a start the order will begin with a Pending status and eTickets cannot be generated.
So it will be the responsibility of the Administrator to check each order and to check if the Bank Transfers were made correctly and funds are received. Once funds are received it is also a great responsibility to go back to the osConcert Admin and perform an update of the order Admin>Orders>Edit

And when we edit the order....we scroll down to the place where we can UPDATE the payment status
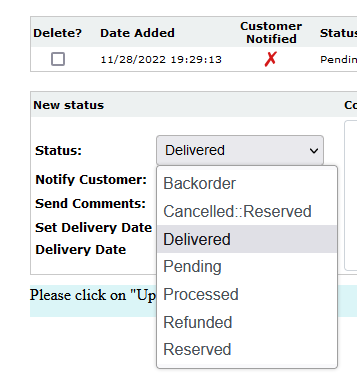
Furthermore...it would be polite if we wrote a personal message and fired off a notification and recorder the delivery date.
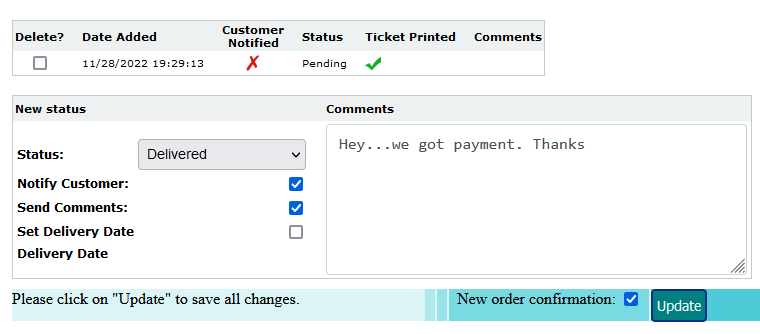
When you have updated like the above....the customer should recieve an email response with the order details and ticket attached and an extra email response with a message telling them that their payment was received and thier order was updated.
The final order should read like this:
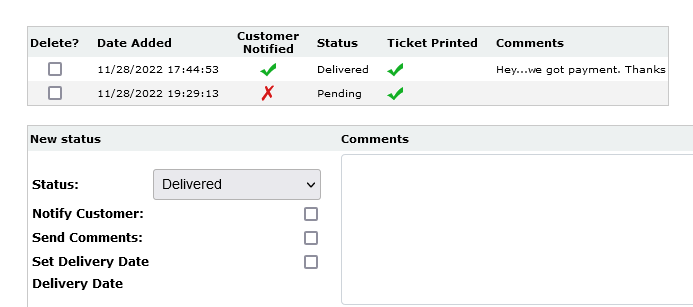
The extra email can be like this. The template is in Admin>Marketing
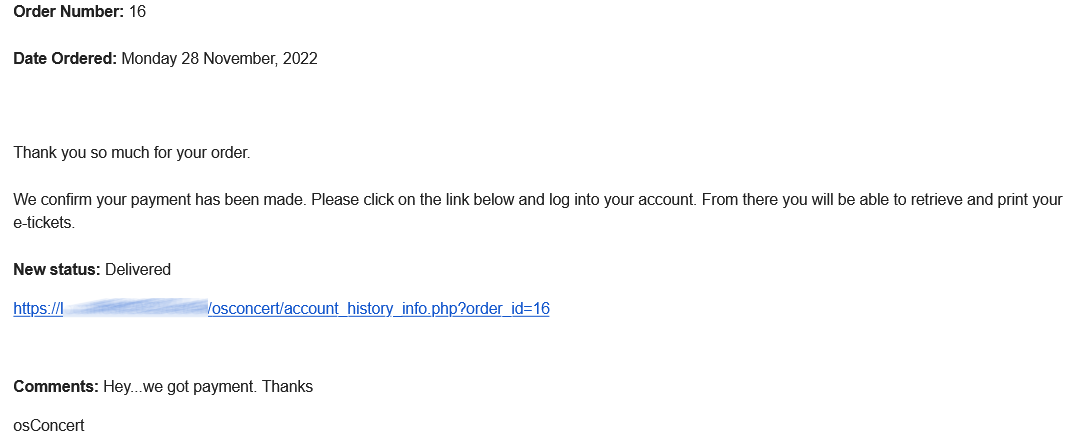
Author: Gordon
Last update: 2022-11-28 18:53
Products
How to enable Gift Vouchers for purchase and redemption?
It's now possible to allow your customers to purchase Gift Voucher/Coupons at a price they determine above $1.
They will recieve an eTicket as a GIFT VOUCHER with a generated coupon code that can be transferred but used only once for purchases at your store.
Here's how to set up a GIFT VOUCHER within your Administration
In Admin>Products create a General Admission category for your Gift Coupon product
Save it and create a product
If yours is version 9.7 in the TYPE tab set C: Gift Coupon (for older versions select General)
In tab COST set price=1
Create an unlimited stock or if you have a limite set it here as quantity.
IMPORTANT: Now set SKU = 6. This is a specific setting for Gift Vouchers
Save the product and go to the front end. You should see the product like this.
Don't forget to give the product an image and the category an image in the usual way.
Follow the instructions for setting up coupons for order totals in this FAQ
Now when a customer wants to purchase a GIFT VOUCHER they can set thier own price and purchase through your payment system just like buying a normal event ticket.
The customer will see the eTicket PDF and the Gift Code will be presented on the printable ticket/coupon. Now the recipient of the coupon code will be able to use it at your store just like any other coupons that are provided by you for discounts. They simple redeem the code at the checkout payment.
Author: Gordon
Last update: 2022-12-09 05:22
Can we remind customers of specific product at checkout?
For version 9.8 we have a simple feature that will allow the user to add a REMINDER product (or products) at the shopping cart page, the payment method page and the checkout confirmation page.
The administrator can choose which pages they would like to show the reminder and there will be a place to input Product ID's. There is also a place to edit the REMINDER text for the customer to read.
For example....perhaps you have an Event Programme you want to sell or some refreshments for the interval?
It's a simple nudge for the customers at checkout.
Author: Gordon
Last update: 2023-03-12 10:35
Reports
How can I produce a Sales Report of tickets sold per event?
All orders have an Order Status. Among other functions, osConcert is using these order statuses to generate a Sales Report on-line and that can be exported to PDF and MS-excel as CSV.
Admin>Orders>osConcert Sales
Make the appropriate selection from the pull down-menus and click either the SEARCH button or the EXPORT TO PDF or EXPORT TO EXCELL button.
PDF Sales Report
When clicking EXPORT TO PDF, osConcert will generate a pop-up with the following Sales Report. Click the ‘Saved as…’ button to save the PDF file;
DEVELOPERS: the image for the PDF report is admin/images/osconcert.jpg
Excel Sales Report
After the EXPORT TO EXCEL Button is clicked, a popup will ask you to save the file. Excel will generate the following Sales as a .CSV (Comma Delimited) report that can be further edited to suit your needs.
Author: Masud
Last update: 2020-09-10 08:28
Design Mode
How do I create a seat plan in Design Mode?
In osConcert version 9.5 (APRIL 2022) there is a new feature Design Mode
To start creating seat plans in Design Mode we must first access the Administration as Top Administrator. Then we should activate the Design Mode in Admin>Concert Details>Box Office
PLEASE ALSO DISABLE 'Seat Plan Cache'
Admin>Concert Details>Seat Plan>Seat Plan Cache
and Clear Seat Plan Cache Admin>Clear Seat Plan Cache
or we will have problems with the pages we are trying to build.
The Top Administrator must create the products, the text and the props so that a Front End Box Office account can eventually move the objects in the Design Space...effectively designing the seat plan.
IMPORTANT NOTE: All products created for the Design Space will be relative to each other. This means if you delete any this will most probable affect the position of some or all of the objects. Therefore take this into consideration when designing the seat plan. Products that you don't want to be seen must be hidden (Admin>Alternative Categories Edit>HIDE)
Goto Admin>Products and create the Show Category just like if it were a General Admission Event. For the Type of feature select a Design Style e.g Design Mode Style 5...this represents a standard stylesheet that will dictate the shape and styles of our objects on the Front End. There will be 4 styles to choose from and they can be easily adjusted by accessing the file with a html text editor.
Create your first product. Let's make a Seat product and call it Seat 1
In the TYPE TAB.....let's make sure we select Product Type= Reserved Seating (P). That means the product is a seat product which has a price, color band, stock=1 ....we can adjust these things later, for the oment they take the defaults.
Make sure you click the SAVE button and we have our first product.
If we want more products the easiest way is to use the COPY function and copy as many as we need. For this tutorial we will copy our first product and then edit and rename it as Seat 2. We will then explore the results at the Front End.
Choose duplicate product and click COPY. (also check images if you plan to have a Ticket Image)
Now we have 2 products ready for this tutorial. Let's go to the Front End and take a look at what we have got.
We see the default Design background and the products loaded at the Top Left of the design space.
When we login as Box Office we can drag the seats from the stack and place them wherever we like in the Design Space. But first let's go back to the Administration because for this tutorial I want ot have a Stage Label and because I didn't upload a stage image it remains default = none.
Open the Show Category for edit and scroll down and we will see options to upload images for the category. We want to upload an image for the Stage ...so will upload the image below:
By the time I release this tutorial I may have a default stage image from the outset but for now you are able to upload your own image or the default image provided in the osconcert/images folder.
Upload and Click the SAVE button as usual.
Now let's go back to the Front End and view the stage image.
Now we should login with our Box Office account because only Box Office Staff have the right to move objects in the Design Space
Goto the osConcert Login:
Now go back to the Show category on the Front End and click the blue "click to Redesign Seating" button
Now you should see a Design GRID (default is 50 pixels but it could be 10px or 100px )
Grab the products with your Left Click>Mouse and DRAG them around the Design Space ...where they stop will be recorded in the database until you decide to mode them again. Only Box Office has this access.
Now you can Cancel the Design Mode and Logout from your Box Office Account and the products will be ready for the Booking Process. make sure as Administrator the Concert Details are set as usual for your event and the Prices are set per Color Band of course.
To this point ...that is the very basics of creating products and designing the seat plan arrangement of the chairs. Next we will create Text e.g Row Letters and Props e.g Sound Desk
Creating Text and Props
When we have Rows of Reserved Seating ...it would be a helpful to show the Row name e.g Row A for seats in row A :)
Simply create a New Product.... Name it 'Row A' and number it as 'A'...then we should choose the Row Name/Number Text in the Type Tab and SAVE
That's it! Go to the Front End Design Mode and you should be able to 'drag' it into place.
For something like a Sound Desk prop ...follow the same procedure but choose Prop from the TYpe Tab drop down menu.
Now we will need to give the object a width in pixels and maybe enlarge it a little
For this example I write Sound Desk ....width=150 pixels height 40 pixels and Scale +1 and SAVE the product!
Rotating objects
What if we want to rotate an object e,g 45 degrees
Just edit the product and add 45 to the Rotate Input. (or PASTE -45 into the input field for the opposite angle)
Styles and stylesheets
NOTE: Basic styling is saved in specific css stylesheets in templates/newzone/assets/css/
seatplan5.css
seatplan6.css
seatplan7.css
seatplan8.css
When you edit your category you can choose another of the 4 stylesheets
If you are familar with css styles you can edit the master stylesheets and create something really special.
Seatplan 6 has a basic circle as seats.
That's the very basics of the Design Mode....obviously for more complex creations it will become an art.
Perhaps some users will surprise me :)
Author: Gordon
Last update: 2024-02-24 06:53
How can we create a Car Boot Sale Booking System?
Activate Design Mode (Version 9.5) admin>concert details>box office configuration
Disable Enable Design Grid: Enable Design Grid=no (we will use our map as the guide)
Create a category with Event Name e.g Sunday Car Boot Sale
Choose Stylesheet Design Mode 6
Capture a screenshot of the venue (car park?) from a online terrain street map
Upload your image via the Background Image upload and SAVE the category
Now create some products Type-Reserved Seating (Stall 1, Stall 2, Stall 3 etc)

SAVE your products set Allow Box Office Design=yes and goto the Front End.
IMPORTANT NOTE: All products created for the Design Space will be relative to each other. This means if you delete any this will most probable affect the position of some or all of the objects. Therefore take this into consideration when designing the seat plan. Products that you don't want to be seen must be hidden (Admin>Alternative Categories Edit>HIDE)
Login as Box Office Agent and arrange the Stall Products over the map image.
Voila! you have a Car Boot Sale Booking System
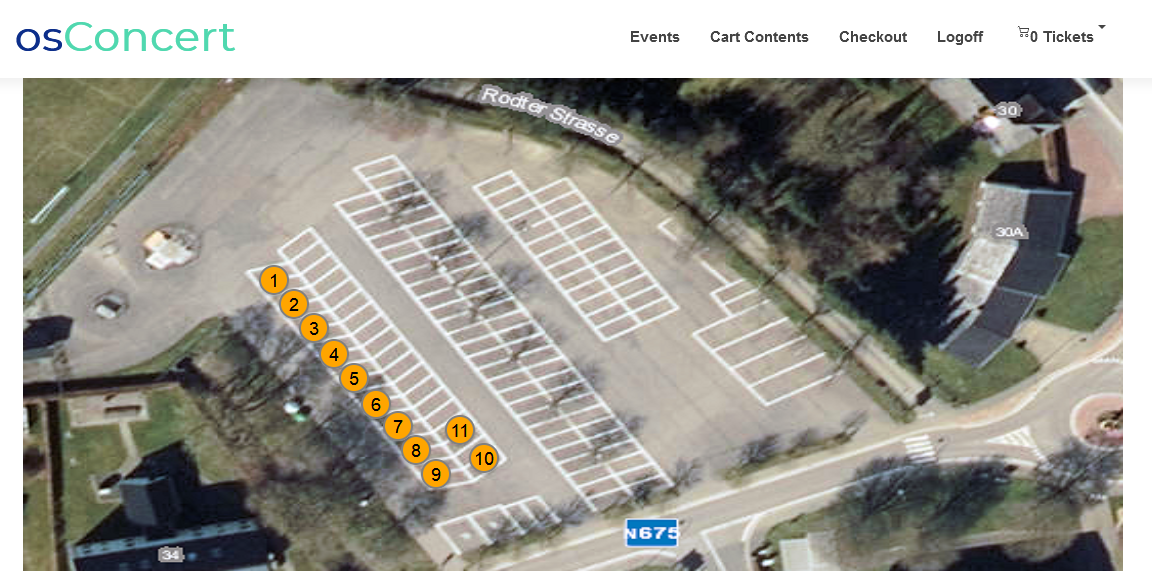
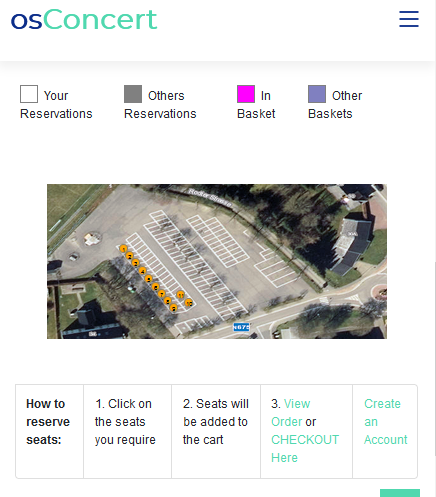
Author: Gordon
Last update: 2022-04-11 07:47
How to build your own seat plan?
UPDATED February 2024
In all versions there is osConcert Design Mode
This means you are able to utilize the osConcert Seat Plan Technology for your very own seat plan creations.
To start creating seat plans in Design Mode we must first access the Administration as Top Administrator. Then we should activate the Design Mode in Admin>Concert Details>Box Office
PLEASE ALSO DISABLE 'Seat Plan Cache'
Admin>Concert Details>Seat Plan>Seat Plan Cache
and Clear Seat Plan Cache Admin>Clear Seat Plan Cache
or we will have problems with the pages we are trying to build.
Set Activate Design Mode = yes AND Allow BO Design = yes
The first action you will want to do is create a New Show Category for your seat plan.
The Top Administrator must create the products, the text and the props so that a Front End Box Office account can eventually move the objects in the Design Space...effectively designing the seat plan.
IMPORTANT NOTE: All products created for the Design Space will be relative to each other. This means if you delete any this will most probable affect the position of some or all of the objects. Therefore take this into consideration when designing the seat plan.
Products that you don't want to be seen should be hidden (Admin>Alternative Categories Edit>HIDE)
Goto Admin>Products and create the Show Category just like if it were a General Admission Event. For the Type of feature select a Design Style e.g Design Mode Style 5...this represents a standard stylesheet that will dictate the shape and styles of our objects on the Front End. There will be 4 styles to choose from and they can be easily adjusted by accessing the file with a html text editor.
EACH OF MY 4 DEFAULT DEMONTRATIONS USES A DIFFERENT STYLESHEET
Now before we create Seat Products we can upload a backgound image for the design space. This could be a guide image like your own complete seat plan as an jpg image. This would make it easier for the designer at the front end to easily arrange the seats in the correct place.
Furthermore .....we should adjust the Design Space relative to the full width default=1100px
EXAMPLE
So I guess if your image width is 960w / 576h pixels the ratio required will need an image height of 660 pixels
You can enter the height of your image in the new field :
Now your image will keep a good ratio (1100w / 660h) when collapsing for devices in responsive mode.
Let's start adding Seat Products
Create your first product. Let's make a Seat product and call it Seat 1
In the TYPE TAB.....let's make sure we select Product Type= Reserved Seating (P). That means the product is a seat product which has a price, color band, stock=1 ....we can adjust these things later, ...for now IGNORE COST AND STOCK let's just create lot's of seats with their names and numbers.
(it's possible to also upload a Ticket Image for your checkout process in the IMAGE tab)
Make sure you click the SAVE button and we have our first product.
If we want more products the easiest way is to use the COPY function and copy as many as we need. For this tutorial we will copy our first product and then edit and rename it as Seat 2. We will then explore the results at the Front End.
There are ways to create numerous products if you use database imports....but for novices, the COPY function takes only a few seconds per seat......you can have a hundred seats in no time if you set your mind to it. I know some feel this is hard work.....but every seat needs a name and number and only YOU know what you want. I don't have an AI version yet.
Choose duplicate product and click COPY. (also check images if you plan to have a Ticket Image)
Now we have 2 products ready for this tutorial. Let's go to the Front End and take a look at what we have got.
We see the default Design Background and the products loaded at the Top Left of the design space.
When we login as Box Office we can drag the seats from the stack and place them wherever we like in the Design Space.
But first let's go back to the Administration because for this tutorial I want ot have a Stage Label and because I didn't upload a stage image it remains default = none.
Open the Show Category for edit and scroll down and we will see options to upload images for the category. We want to upload an image for the Stage ...so will upload the image below:
I have a default stage image from the outset but for now you are able to upload your own image or the default image provided in the osconcert/images folder.
Upload and Click the SAVE button as usual.
Now let's go back to the Front End and view the stage image.
Now we should login with our Box Office account because only Box Office Staff have the right to move objects in the Design Space
Goto the osConcert Login:
Now go back to the Show category on the Front End and click the blue "click to Redesign Seating" button
Now you should see a Design GRID (default is 50 pixels but it could be 10px or 100px )
Grab the products with your Left Click>Mouse and DRAG them around the Design Space ...where they stop will be recorded in the database until you decide to mode them again. Only Box Office has this access.
Now you can Cancel the Design Mode and Logout from your Box Office Account and the products will be ready for the Booking Process. make sure as Administrator the Concert Details are set as usual for your event and the Prices are set per Color Band of course.
To this point ...that is the very basics of creating products and designing the seat plan arrangement of the chairs. Next we will create Text e.g Row Letters and Props e.g Sound Desk
Creating Text and Props
When we have Rows of Reserved Seating ...it would be a helpful to show the Row name e.g Row A for seats in row A :)
Simply create a New Product.... Name it 'Row A' and number it as 'A'...then we should choose the Row Name/Number Text in the Type Tab and SAVE
That's it! Go to the Front End Design Mode and you should be able to 'drag' it into place.
For something like a Sound Desk prop ...follow the same procedure but choose Prop from the TYpe Tab drop down menu.
Now we will need to give the object a width in pixels and maybe enlarge it a little
For this example I write Sound Desk ....width=150 pixels height 40 pixels and Scale +1 and SAVE the product!
Rotating objects
What if we want to rotate an object e,g 45 degrees
Just edit the product and add 45 to the Rotate Input. (or PASTE -45 into the input field for the opposite angle)
Styles and stylesheets
NOTE: Basic styling is saved in specific css stylesheets in templates/newzone/assets/css/
seatplan5.css
seatplan6.css
seatplan7.css
seatplan8.css
When you edit your category you can choose another of the 4 stylesheets
If you are familar with css styles you can edit the master stylesheets and create something really special.
Seatplan 6 has a basic circle as seats.
That's the very basics of the Design Mode....obviously for more complex creations it will become an art.
Perhaps some users will surprise me :)
Author: Gordon
Last update: 2024-02-24 09:02
Shipping/Delivery
How to set up Flat Fee shipping/delivery?
We need to install a shipping module and we need to apply a weight to the products that we want to deliver by post.
There are a number of shipping modules that are included with osConcert for this tutorial we will focus on the Flat Fee module. This is because Tickets are usually sent by National Postal Service and for a small stamp fee.
Goto Admin>Products>Shipping and install the Flat Fee module
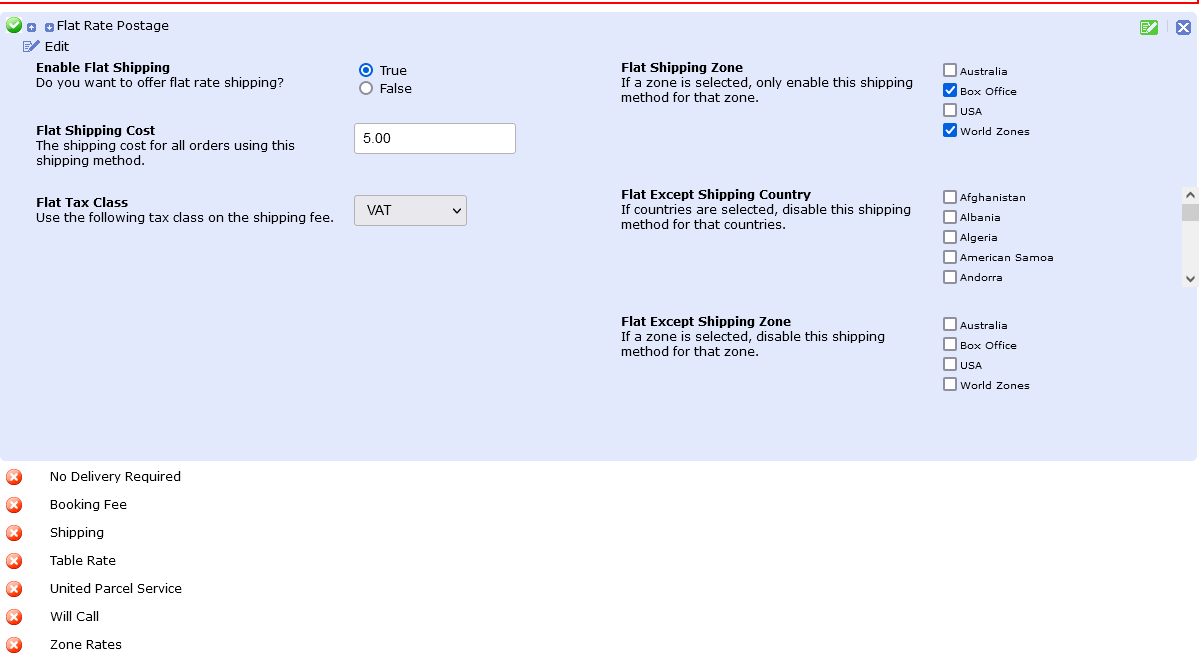
You'll see we must set a Shipping Zone and if we expect the Box Office Staff to also slect Shipping/Delivery we must also set the Box Office Zone.
Set the cost and the tax if applicable. That's it. SAVE the module and go to Admin>Products
Let's presume we have a product in a category General Admission Tickets already set then we simply goto tab>stock and enter a simple weight like 0.01 (we don't have to have a specific weight as osConcert does not calculate overall weight for Postal Tickets.)
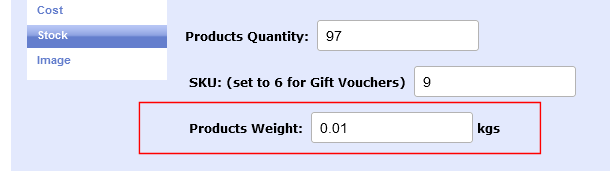
We SAVE the product and goto Admin>Payment >Order Totals
We must uninstall ALL the existing modules and re-install them in the order that we want them to display at the checkout confirmation page.
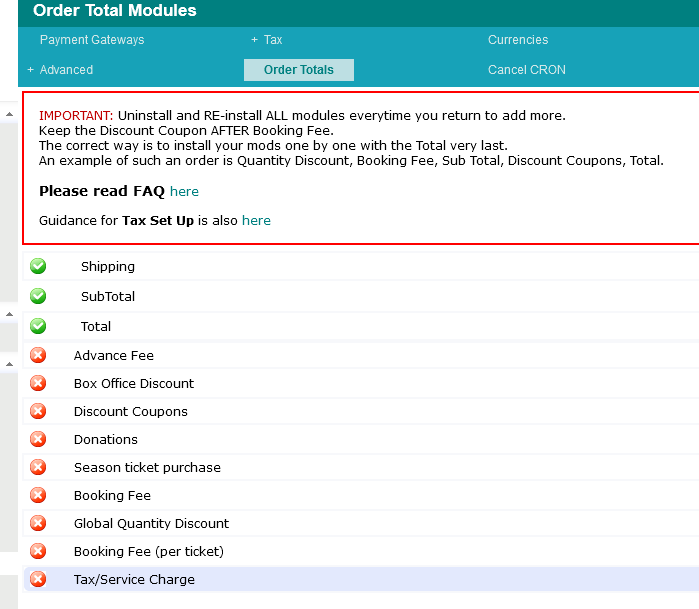
That should be enough for a basic set up.
How to add 'shipping/delivery' to ALL seat plan products?
You may want to disable eTickets for the category and enable Shipping/Delivery weight?
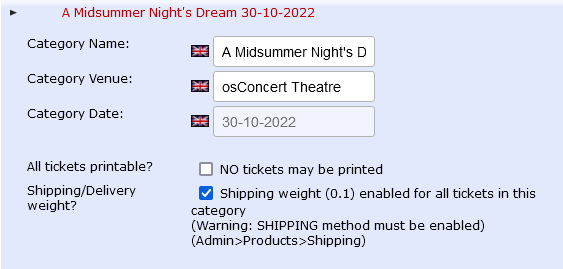
Check the settings as above and SAVE the category. Products weight of 0.01 to all products in the edited category.
At the Front End when a customer selects products that have Shipping/Delivery they will be presented with the checkout_shipping page for the customer to agree to the Shipping/Delivery cost
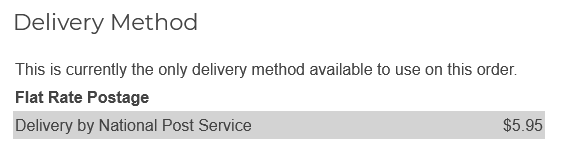
You may want to edit the associated language files to display your preferred text.
If the customer wants to change delivery address there is a button Change Address on the shipping page where the customer can create an address for their address book.
That's the basics of Shipping and Delivery Set Up. If you have questions be sure to send a message to gordon@osconcert.com
Author: Gordon
Last update: 2022-04-11 08:30